
<script type="application/ld+json" data-schema-version="grey-blog-v4"> [{"@context":"https://schema.org","@type":"BlogPosting","@id":"https://grey.co/blog/how-to-receive-amazon-payments-in-pakistan#article","headline":"How to receive Amazon payments in Pakistan","description":"Discover how to receive Amazon payments in Pakistan using Grey. Set up international bank accounts, avoid high fees, and streamline cross-border transactions easily.","inLanguage":"en","url":"https://grey.co/blog/how-to-receive-amazon-payments-in-pakistan","mainEntityOfPage":{"@id":"https://grey.co/blog/how-to-receive-amazon-payments-in-pakistan#webpage"},"datePublished":"2024-12-12T02:57:13.058Z","dateModified":"2026-06-15T15:18:09.388Z","author":{"@type":"Person","@id":"https://grey.co/authors/priscila-marotti#person","name":"Priscila Marotti","url":"https://grey.co/authors/priscila-marotti","jobTitle":"Content Writer","sameAs":["https://www.linkedin.com/in/priscila-marotti/"]},"publisher":{"@type":"Organization","@id":"https://grey.co/#organization","name":"Grey","url":"https://grey.co","logo":{"@type":"ImageObject","url":"https://cdn.prod.website-files.com/6360022338a81bd6fdbb1145/6564ae1077a67e39d3c491a6_Grey%20Logo%20Lockup%20Black.svg"}},"image":{"@type":"ImageObject","@id":"https://grey.co/blog/how-to-receive-amazon-payments-in-pakistan#primaryimage","url":"https://cdn.prod.website-files.com/636a85d290ee58e70c17e1c0/6a3017b140faea492d0f8d16_6a3017b0bf0be51ff8a4ffaf_how-to-receive-amazon-payments-in-pakistan__header-image.webp","contentUrl":"https://cdn.prod.website-files.com/636a85d290ee58e70c17e1c0/6a3017b140faea492d0f8d16_6a3017b0bf0be51ff8a4ffaf_how-to-receive-amazon-payments-in-pakistan__header-image.webp","width":1200,"height":675}},{"@context":"https://schema.org","@type":"WebPage","@id":"https://grey.co/blog/how-to-receive-amazon-payments-in-pakistan#webpage","url":"https://grey.co/blog/how-to-receive-amazon-payments-in-pakistan","name":"How to receive Amazon payments in Pakistan","description":"Discover how to receive Amazon payments in Pakistan using Grey. Set up international bank accounts, avoid high fees, and streamline cross-border transactions easily.","inLanguage":"en","primaryImageOfPage":{"@id":"https://grey.co/blog/how-to-receive-amazon-payments-in-pakistan#primaryimage"},"breadcrumb":{"@id":"https://grey.co/blog/how-to-receive-amazon-payments-in-pakistan#breadcrumb"}},{"@context":"https://schema.org","@type":"BreadcrumbList","@id":"https://grey.co/blog/how-to-receive-amazon-payments-in-pakistan#breadcrumb","itemListElement":[{"@type":"ListItem","position":1,"name":"Home","item":"https://grey.co/"},{"@type":"ListItem","position":2,"name":"Blog","item":"https://grey.co/blog"},{"@type":"ListItem","position":3,"name":"How to receive Amazon payments in Pakistan","item":"https://grey.co/blog/how-to-receive-amazon-payments-in-pakistan"}]}] </script>

How to receive Amazon payments in Pakistan

Priscila Marotti

TABLE OF CONTENT

SHARE THIS POST

Receiving Amazon payments in Pakistan as a seller can be challenging due to limited access to global banking services. However, managing cross-border transactions can be hassle-free with the right digital banking solution. Grey provides a seamless way for Pakistani Amazon sellers to receive payments in multiple currencies, making it the ideal solution for handling international earnings efficiently.

Amazon payments: How they work

Amazon pays its sellers through a system designed to ensure secure and timely transactions. Here’s an overview:

  1. Earnings calculation: Amazon deducts fees, refunds, and other charges from your total sales. The net amount is then processed for payout.
  2. Disbursement frequency: Payments are typically sent every 14 days, though this may vary by marketplace and account status.
  3. Currency limitations: Amazon pays in the marketplace’s local currency, often requiring sellers to manage currency conversions, which can be expensive.
  4. Bank account requirements: To receive payments, you need a valid bank account in the payout currency. Grey’s virtual accounts simplify the process.

How to receive Amazon payments in Pakistan with Grey

Grey offers virtual foreign currency accounts in USD, GBP, and EUR, enabling Pakistani sellers to receive payments directly from Amazon marketplaces without expensive intermediaries or unnecessary delays.

1. Create a Grey account

Signing up for Grey is quick and free:

  • Download the Grey app or visit the website.
  • Register and verify your identity to access virtual foreign currency accounts.

2. Set up a foreign currency account

Once your account is created, generate bank details in the desired currency to link with Amazon Seller Central. For example:

  • USD for Amazon.com
  • GBP for Amazon UK
  • EUR for Amazon Germany

3. Link Grey to Amazon Seller Central

To connect your Grey account with Amazon:

  • Log in to Amazon Seller Central.
  • Navigate to Settings > Account Info > Payment Info > Bank Account Info.
  • Add your Grey account details as the payout method, selecting the bank location corresponding to the currency.
  • Complete verification by submitting proof of ownership, such as a bank statement from Grey.

Also read: How to receive Amazon payments with Grey

Manage Amazon payments across currencies

Selling on multiple Amazon marketplaces? Grey supports payments in different currencies, enabling you to:

  • Avoid high conversion fees by keeping funds in their original currency.
  • Convert earnings to Pakistani Rupees (PKR) at competitive rates directly within the app.
  • Streamline payments from various marketplaces with a single platform.

Why Grey is ideal for Pakistani Amazon sellers

Grey simplifies cross-border payments, making it a powerful tool for Amazon sellers in Pakistan. Key benefits include:

  • Low fees and transparent rates: Save money with competitive exchange rates and minimal fees.
  • Fast processing times: Receive funds quickly, avoiding long delays associated with traditional banks.
  • Multi-currency support: Hold, manage, and convert funds in USD, GBP, and EUR.
  • User-friendly platform: Enjoy intuitive app features that make managing your Amazon payments effortless.

Tips for maximising your Amazon payouts

To get the most out of your Grey account as an Amazon seller:

  1. Use multi-currency accounts: Receive payouts in the same currency as the marketplace to avoid conversion losses.
  2. Monitor your earnings: Keep track of transactions using Grey’s detailed history feature.
  3. Leverage competitive exchange rates: Convert your funds to PKR when rates are most favourable.

Take control of Amazon payments in Pakistan with Grey

Managing Amazon payments in Pakistan doesn’t have to be complicated or expensive. Grey provides a streamlined, cost-effective solution for handling your earnings. By offering virtual foreign currency accounts, competitive rates, and fast transfers, Grey empowers you to focus on growing your Amazon business without the stress of cross-border banking.

Sign up with Grey today and unlock seamless financial management for your Amazon payments.

‍

Last updated:

October 2, 2026

Open a free Grey account to get startedJoin 1 million digital nomads
IF YOU ENJOYED THIS, CHECK THESE OUT

What is the currency of Italy? Euro symbol and code

•

•

2 min read

The currency of Italy is the euro, identified by the code EUR and the symbol €. If you are planning a trip to Rome, shopping in Milan or sending money to someone in Italy, understanding the local currency can help you manage your money and avoid unnecessary charges.

Imagine arriving in Italy, ready to explore its historic streets, enjoy a meal at a local restaurant or pay for your hotel. You will need euros for everyday purchases, whether you are paying by card or carrying cash. Euro banknotes come in different denominations, while coins are available in cents and euros. Although cards are widely accepted, having some cash can be useful for smaller purchases and places that prefer cash payments.

Currency exchange fees, ATM charges and your bank's foreign transaction fees can increase your spending without you noticing if you always have to convert. If you need to send money to Italy, exchange rates and transfer fees affect how much your recipient receives. This guide explains the Italy currency, its symbol and code, and practical ways to spend and transfer money while keeping costs down.

What is the currency of Italy?

Italy uses the euro (€) as its official currency. Whether you are visiting Rome, shopping in Milan or paying for accommodation in Venice, you will use euros for everyday transactions. The currency is shared by many European countries, making travel and payments across participating nations more convenient.

The euro’s official currency code is EUR, while its symbol is €. You will see the symbol before prices in many Italian shops, restaurants and online stores. One euro is divided into 100 cents. Euro banknotes are available in different denominations, alongside coins ranging from one cent to two euros, which you can use for smaller purchases.

The European Central Bank (ECB), working with the national central banks of eurozone countries, is responsible for monetary policy and maintaining price stability across the euro area. It helps manage the euro’s value by setting key interest rates and using other monetary policy tools.

Italy is a member of the eurozone, the group of European Union countries that use the euro as their official currency. This means you can generally use the same currency when travelling between Italy and other eurozone destinations, although your bank may still charge fees for certain transactions.

Euro notes and coins in Italy

When you visit Italy, you will use euro banknotes and coins for everyday purchases, from buying coffee to paying for meals and transport. Euro banknotes come in denominations of €5, €10, €20, €50, €100 and €200. Although the €500 note is no longer issued, existing notes remain valid. Banknotes share common designs across the eurozone, featuring architectural styles from different periods in European history.
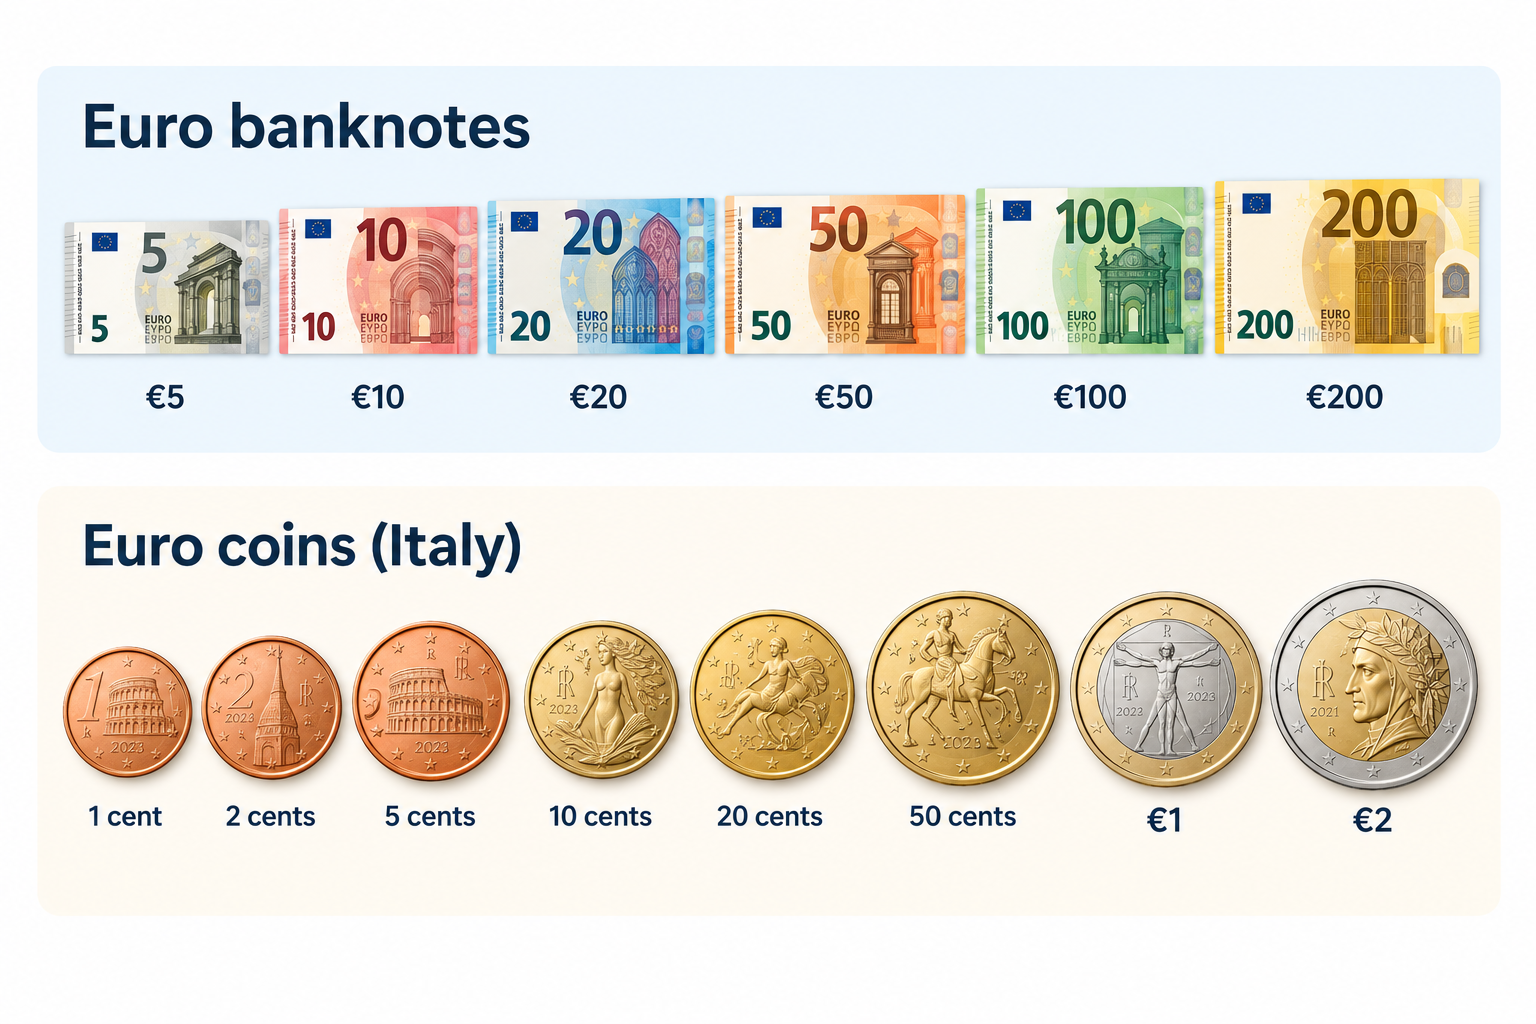
Euro coins come in eight denominations: 1, 2, 5, 10, 20 and 50 cents, plus €1 and €2. Each coin has a common European side and a national side featuring designs selected by its issuing country. All euro coins can be used across the euro area.

Italy’s national coin designs reflect its rich artistic and cultural heritage. The €1 coin features Leonardo da Vinci’s Vitruvian Man, his famous drawing illustrating the proportions of the human body. Other denominations showcase Italian landmarks and masterpieces, including Dante Alighieri, the Colosseum and Sandro Botticelli’s Birth of Venus. These designs celebrate Italy’s contribution to European art and history. The European Central Bank oversees euro banknotes and contributes to maintaining confidence in the currency across participating countries.

Should you pay by cash or card in Italy?

When travelling around Italy, you can pay by card at most hotels, restaurants, supermarkets and shops in major cities, where Visa and Mastercard are widely accepted. However, keeping some euros in your wallet can help when shopping at local markets, making small purchases or visiting places where card payments are unavailable. Before travelling, check your bank’s foreign transaction fees so you know how much you could spend on charges.

You are not expected to tip everywhere in Italy, as tipping is not compulsory, but you can leave a small amount or around 5–10% when you receive particularly good service. Check your bill for any service charge before deciding what to leave.

To manage your spending digitally, you can use a Grey virtual card for eligible purchases in euros, including online bookings and payments at merchants that accept Visa. Depending on your card setup, you may also be able to add it to Apple Pay or Google Pay for contactless payments. Check applicable fees and currency conversion rates before spending.

How to get Euros for a trip to Italy

Before travelling to Italy, decide how you will access euros for meals, transport, shopping and accommodation while keeping exchange costs low. You can exchange money before departure, withdraw euros from ATMs in Italy or use a payment card that supports euro spending.

ATMs operated by established banks are convenient for withdrawing cash, but check your bank’s withdrawal charges and any fee displayed by the ATM before confirming. Exchange bureaux are another option, although you should compare exchange rates and commissions to avoid paying more than necessary.

To avoid unnecessary conversion costs, choose euros rather than your home currency whenever an ATM or card terminal offers dynamic currency conversion. This allows your card provider to handle the conversion instead of accepting the machine’s potentially unfavourable rate. You should also check whether your bank charges foreign transaction fees.

A Grey virtual card offers another way to pay for eligible purchases in euros. Check Grey’s card fees and exchange rates, and compare them with your bank’s charges to find a cost-effective way to spend while travelling.

Also read: Italy digital nomad visa: Requirements, costs and process

How to send money to Italy

Whether you are supporting a family in Italy, paying tuition fees or covering accommodation and other expenses, you need a reliable way to send money in euros without losing track of exchange rates and transfer costs. Grey makes cross-border transfers easier by allowing eligible users to send money from Nigeria to European bank accounts in EUR. You can fund your Grey account, review the available exchange rate and fees, and transfer euros directly to your recipient’s bank account.

Grey is also a multi-currency platform, allowing you to hold and convert supported currencies to manage international payments in one place. This can be useful when you earn in one currency but need to pay expenses in euros. Before confirming a transfer, check the live exchange rate, applicable fees and the final amount your recipient will receive.

Frequently asked questions about the currency of Italy

1. Does Italy use the euro or the lira?

Italy uses the euro (€) as its official currency, not the Italian lira. The lira was replaced by the euro in 1999 for accounting purposes, with euro banknotes and coins entering circulation in 2002. Today, you need euros to pay for everyday purchases, transport, meals and accommodation in Italy.

2. What is the euro symbol and code?

The euro symbol is €, and its official three-letter currency code is EUR. You will see these used on Italian price tags, restaurant menus, receipts and online bookings. One euro is divided into 100 cents. When exchanging money or sending payments to Italy, use EUR to identify the currency correctly.

3. Can you use US dollars in Italy?

US dollars are not generally accepted for everyday purchases in Italy because the euro is the official currency. You should exchange dollars for euros or withdraw euros from an ATM. Some tourist businesses may accept other currencies, but their exchange rates may be unfavourable. Paying in euros usually makes costs easier to compare.

4. Is it better to pay with cash or card in Italy?

Cards are widely accepted in Italian cities, hotels, restaurants and shops, making them convenient for everyday spending. However, carrying some euros is useful for markets, small purchases and places that do not accept cards. Check your bank's foreign transaction fees and choose euros rather than your home currency when prompted at payment terminals.

5. How much cash should you take to Italy?

The amount depends on your travel plans, accommodation and spending habits. For many travellers, carrying around €50–€100 for initial expenses and small purchases is a reasonable starting point, while using a card for larger payments. You can withdraw additional euros as needed, but check ATM charges and your bank's withdrawal limits first.

6. How do you send money to Italy?

You can send money to Italy through a bank transfer or an international money transfer service. Compare exchange rates, transfer fees and delivery times before choosing. Grey supports eligible cross-border transfers and multi-currency services, allowing users to send money in euros to supported destinations. Check availability, fees and recipient requirements before confirming your transfer.
How to get an Airtel eSIM

•

•

2 min read

Switching to an Airtel eSIM lets you use your mobile number without inserting a physical SIM card into your phone. Instead, your device stores the SIM profile digitally, making it easier to activate your line on a compatible smartphone and manage your mobile connection.

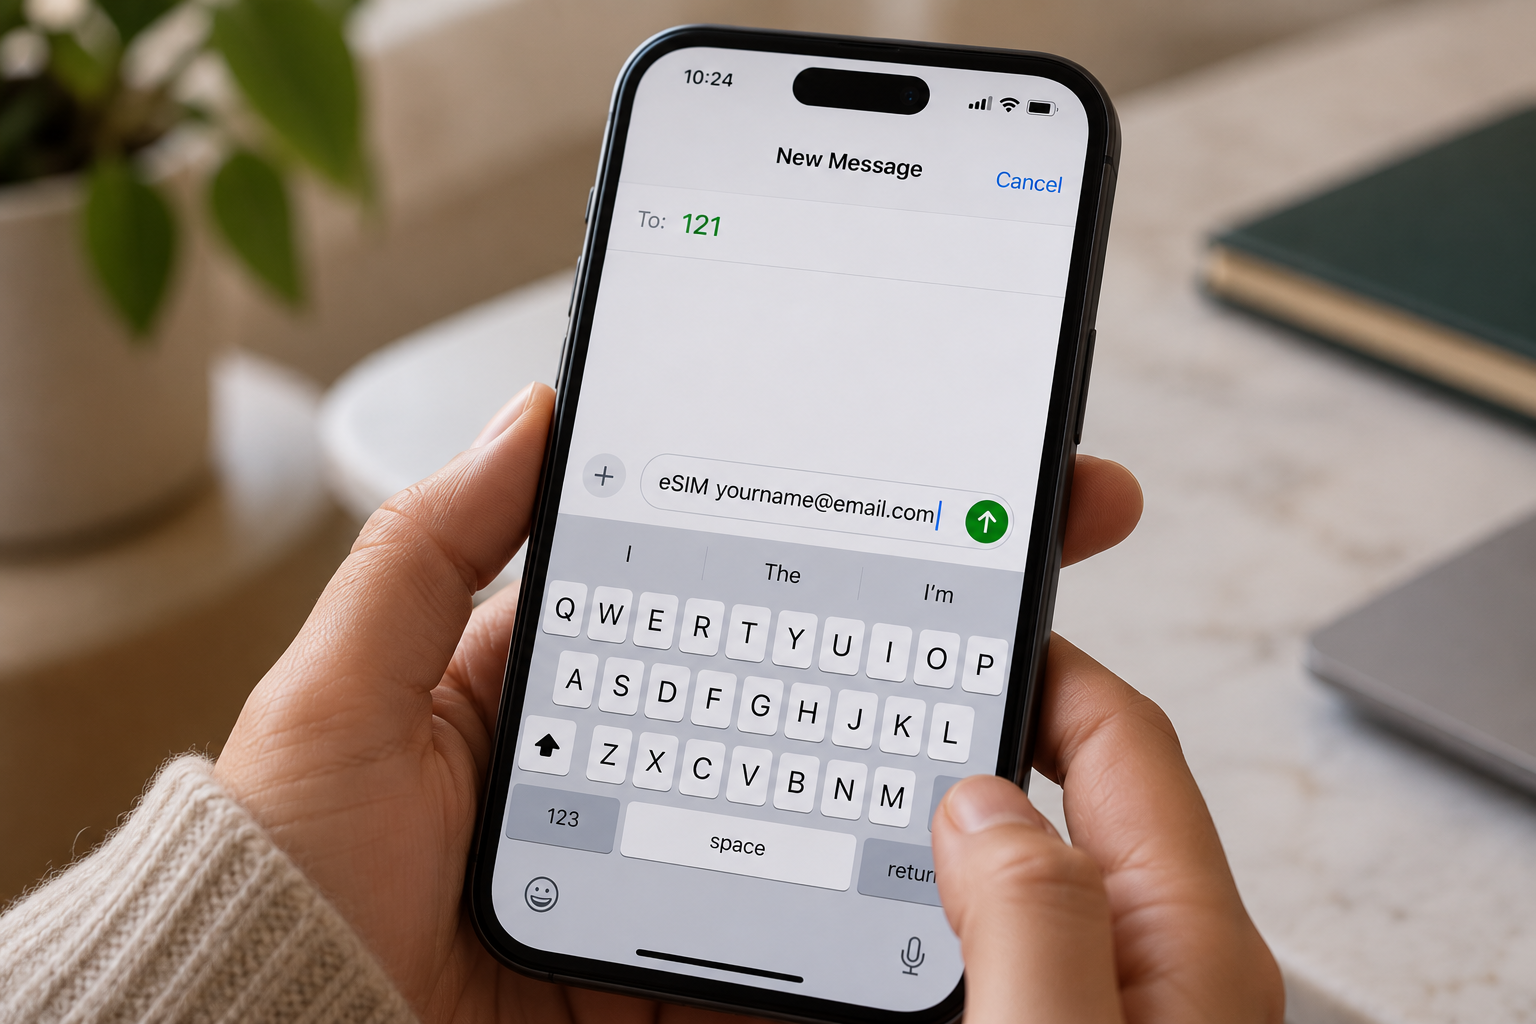
If you want to convert your existing Airtel SIM to an eSIM, you'll typically need to send a text message, confirm your request and scann a QR code sent to your email address. The exact steps and eligibility requirements may vary depending on your country and Airtel’s current eSIM service.

Before you begin, check that your phone supports eSIM technology and that your Airtel line qualifies for conversion. You should also have access to the email address linked to your request and a reliable internet connection to download your eSIM profile. This guide explains the steps to follow and what to know before switching.

What do you need before converting an Airtel SIM to eSIM?

Before converting your Airtel SIM to an eSIM, make sure you have a compatible smartphone, an active Airtel number and access to a registered email address. These are essential for completing the conversion and receiving the eSIM activation details.

1. An eSIM-compatible smartphone

Your phone must support eSIM technology. Common eSIM-capable devices include the iPhone XS, XS Max and newer models, selected Samsung Galaxy S20 and newer models, Google Pixel 4 and newer models, and certain newer Motorola devices. However, compatibility varies by model, region and carrier, so confirm that your specific handset supports eSIM.

2. A registered email address

You need a working email address to receive the eSIM QR code and activation instructions from Airtel. Check that you can access your inbox before starting the process.

3. An active Airtel number

Keep your existing Airtel SIM active so you can send the conversion request and confirm it when prompted. You may also need your phone to receive verification messages during activation.

Check Airtel’s local requirements before beginning, as procedures differ by country.

How to convert an Airtel SIM to eSIM by SMS

Convert your Airtel SIM to an eSIM by texting Airtel, confirming your request, waiting for activation and scanning the emailed QR code.

Airtel eSIM QR code ready to scan on a phone. Place at the top of the article.
  1. Send an SMS to 121: Open your messaging app and send eSIM followed by your registered email address to 121. Check the spelling of your email before sending the message.
  2. Confirm your request: Airtel should send a confirmation message. Reply with 1 as instructed to authorise the SIM-to-eSIM conversion. Follow any additional prompts provided by Airtel.
  3. Wait for processing: Allow approximately 60 minutes for Airtel to process your request, although activation times may vary. Keep your existing SIM and phone available during this period in case you receive further instructions.
  4. Check your email for the QR code: Airtel will send an eSIM QR code to your registered email address when the process reaches the relevant stage. Check your spam or junk folder if it does not appear in your inbox.
  5. Scan and activate your eSIM: Connect your compatible phone to Wi-Fi, open its mobile network settings and select the option to add an eSIM. Scan the QR code and follow the on-screen instructions to complete activation.

How to convert an Airtel SIM to eSIM in the Airtel Thanks app

You can convert your physical Airtel SIM to an eSIM through the Airtel Thanks app without visiting a store, provided your number and device are eligible. The steps below apply to Airtel India; menu options may vary by app version.

  1. Open the Airtel Thanks app: Install or update the app, then log in using the Airtel number you want to convert. Keep your physical SIM active to receive verification messages.
  2. Find the eSIM option: On the home screen, scroll to Shortcuts, tap More, then select Upgrade to eSIM. If you cannot find it, check the app’s search or help section.
  3. Choose your device: Select "This device" to install the eSIM on your current phone, or choose Another device if that option is available.
  4. Enter your EID. Provide the device’s 32-digit EID when prompted. You can usually find it in your phone’s settings under "About".
  5. Complete verification. Follow the on-screen instructions, including any OTP or confirmation call from Airtel.
  6. Activate the eSIM. Wait for Airtel’s confirmation, then follow the installation prompts on your phone. Processing may take around two hours

How to scan the Airtel eSIM QR code on iPhone and Android

To activate your Airtel eSIM, scan the QR code provided by Airtel using your phone’s mobile network settings. Keep your phone connected to Wi-Fi during setup, as the eSIM profile needs an internet connection to download.

On iPhone

  1. Open Settings and select Cellular or Mobile Service.
  2. Tap Add eSIM, then choose Use QR Code.
  3. Scan your Airtel eSIM QR code using your camera.
  4. Tap Continue and follow the on-screen instructions to install the mobile plan.
  5. Once activated, check that your Airtel line shows a signal and can make calls.

If you’re moving to a new iPhone, follow this guide to transfer an eSIM from one iPhone to another.

On Android

  1. Open Settings and select Connections on Samsung, or Network & Internet on Google Pixel.
  2. Tap SIM manager or Mobile Network.
  3. Select Add eSIM or Add mobile plan.
  4. Choose the QR code option and scan the code from Airtel.
  5. Follow the prompts to download and activate your eSIM.

What happens to your physical SIM?

After the eSIM activates, your physical Airtel SIM for that number is deactivated. You can remove it from your phone. If activation fails, contact Airtel before deleting any installed eSIM profile

Why is my Airtel eSIM not activating?

Your Airtel eSIM may fail to activate because of a problem with your identity verification, phone compatibility, registered email address or activation timing. Identifying the specific issue helps you determine the right fix without unnecessarily repeating the conversion process.

  1. KYC mismatch: Airtel may be unable to verify your identity because your registration details do not match its records. Contact Airtel to confirm your subscriber information and complete any required verification.
  2. Unsupported handset: Your smartphone may not support eSIM technology, or its regional variant may lack eSIM functionality. Check your exact model’s specifications before attempting activation again.
  3. Wrong email address: If you entered an incorrect email address, you may not receive the Airtel eSIM QR code. Verify your registered email and check your spam folder. Contact Airtel if the QR code is missing.
  4. Activation delay: Airtel’s activation process can take up to two hours. Keep your phone connected to the internet and follow the installation instructions. If activation still fails after the waiting period, contact Airtel support or visit an authorised store. Avoid deleting an installed eSIM profile before receiving assistance.

If you need mobile connectivity while travelling, Grey lets you top up airtime and buy eSIMs. You can also manage cross-border expenses by using Grey to send money from the US to India or send money from the UK to India, helping you handle payments while staying connected abroad

Frequently asked questions

1. How long does an Airtel eSIM take to activate?

An Airtel eSIM usually activates within two hours after you download and enable the eSIM profile on your compatible phone. During processing, your physical SIM may continue working. Keep your device connected to Wi-Fi and follow Airtel’s instructions to complete activation. Timings may vary by country and request.

2. Does converting to an Airtel eSIM change my number?

No, converting your existing Airtel physical SIM to an eSIM generally keeps your current mobile number. The process replaces the physical SIM with a digital profile linked to the same line. You can continue using your number for calls, messages and mobile data once activation is complete.

3. Can I convert an Airtel prepaid SIM to eSIM?

Yes, eligible Airtel prepaid customers can convert their physical SIM to an eSIM in supported markets. However, the process differs by country. Airtel India provides an app-based conversion process, while Airtel Nigeria directs customers to a service centre for assistance. Confirm your line’s eligibility before starting.

4. What happens to my physical Airtel SIM after conversion?

Once your Airtel eSIM activates successfully, the physical SIM linked to that number becomes inactive. You can remove it from your phone because the eSIM now provides your mobile connection. Keep the physical SIM in place until activation is confirmed to avoid losing service during the transition.

5. Can I switch an Airtel eSIM back to a physical SIM?

Yes, you can generally switch your Airtel eSIM back to a physical SIM by requesting a SIM replacement. In India and Nigeria, Airtel directs customers to a service centre or showroom for assistance. Bring the required identification and complete any verification steps before using the replacement SIM.

6. Is there a fee to convert an Airtel SIM to eSIM?

The cost depends on your country and Airtel’s current policy. Airtel Nigeria currently states that eSIM activation has no charge, while other SIM replacement services or markets may have different fees. Before converting, check with your local Airtel provider whether activation, replacement or related services incur additional costs.

Top remote jobs for Nigerians in 2026: Roles, pay and how to get paid

•

•

2 min read

Remote jobs for Nigerians in 2026 are no longer a niche or a fallback. Software developers, data analysts, designers, and marketers from Nigeria are working full-time for companies in the US, UK, and Europe, earning in dollars, and doing it all from home. The roles are real, the salaries are competitive, and the infrastructure to support it has never been more accessible.

One thing most guides skip: when you apply to platforms like Upwork or Turing, they ask for your banking details before you land your first job. Having a Grey account ready means you can provide a US ACH routing number and account number on the spot and receive USD payments from day one without scrambling for a solution after you have already been hired.

This guide covers the highest-paying remote roles for Nigerians, realistic salary ranges, where to find legitimate international opportunities, and how to set up the payment side before you start applying.

Software developer and engineer

Software development remains the highest-paying remote role accessible to Nigerian professionals. International companies hire Nigerian developers for frontend, backend, mobile, and full-stack roles across fintech, SaaS, AI, and healthtech.

Employment Freelance rates
USD 30,000 to 90,000 per year USD 25 to 80 per hour

Also read: Remote work in Lagos: how Nigerians earn and manage global dollar income

Skills in demand: React, Node.js, Python, TypeScript, Go, cloud infrastructure. Employers prioritise portfolios and real-world experience over credentials.

Data analyst and data scientist

Remote data analyst roles are growing as global businesses rely on data-driven decisions. Nigerians with SQL, Python, and business intelligence skills are finding long-term contracts with international teams, often with flexible schedules.

Employment Freelance rates
USD 25,000 to 70,000 per year USD 20 to 60 per hour

Skills in demand: SQL, Python, Tableau, Power BI, dbt, statistical modelling.

Digital marketer and growth specialist

Digital marketing is one of the most accessible remote roles for Nigerians. Results matter more than location, and Nigerian marketers are securing international roles in SEO, paid advertising, content, and email marketing with global startups and brands.

Employment Freelance rates
USD 20,000 to 75,000 per year USD 15 to 50 per hour

Skills in demand: performance marketing, SEO, HubSpot, Google Analytics, Klaviyo, growth experimentation.

You may also like: How to receive USD freelance payments in Nigeria

Product designer — UI/UX

Remote design roles continue to grow as companies invest in digital products. Nigerian designers with strong portfolios work remotely with global teams on apps, websites, and SaaS platforms, competing on craft rather than location.

Employment Freelance rates
USD 30,000 to 75,000 per year USD 25 to 70 per hour

Tools in demand: Figma, Framer, user research, prototyping, design systems.

Technical writer and content specialist

Remote writing has expanded beyond blogging. Nigerian professionals are working as technical writers, documentation specialists, and content strategists for international companies in SaaS, fintech, and developer tools.

Employment Freelance rates
USD 20,000 to 55,000 per year USD 20 to 60 per hour

Virtual assistant and operations support

VA roles have evolved into full remote operations positions. Nigerian VAs now support founders and remote teams with scheduling, CRM management, customer support, and internal coordination, often on long-term retainers.

Employment Monthly retainer
USD 12,000 to 35,000 per year USD 800 to 2,500

Customer success and support

International companies value Nigerian professionals in customer success roles for communication skills and time zone alignment with Europe. These roles offer stable monthly income and career progression.

Employment Contract rates
USD 18,000 to 45,000 per year USD 10 to 25 per hour

Set up your payment account before you apply

Most international platforms and employers ask for your banking details during onboarding, not after your first payment. Upwork, Turing, Deel, and most payroll systems ask you to add a withdrawal method before you can accept work or receive a salary. If you do not have a USD account ready, you are either blocked at that step or forced to use a less efficient workaround.

Here is what the onboarding forms typically ask for:

  • Account type: Checking
  • ACH routing number
  • Account number
  • Bank name

A Grey account gives you a US ACH routing number and account number that works with all of the above. You fill in those four fields, and your dollar earnings arrive in your Grey USD account within 1 to 2 business days of each payment. Open your multi-currency account before you start applying so the payment side is ready the moment you land a role.

Once the money is in your account, you hold it in USD, convert to naira when the rate works for you, and spend internationally with a virtual card. There is no pressure to convert immediately and no automatic conversion that locks you into a bad rate.

Also read: Best digital platforms for freelancers to receive money in Nigeria

Where to find legitimate remote jobs as a Nigerian

These platforms consistently list international remote opportunities suitable for Nigerians:

  • LinkedIn — remote-first roles and direct hiring from international companies
  • We Work Remotely — curated global remote jobs across tech, design, and marketing
  • Remote OK — tech, data, and marketing roles
  • Wellfound — startups hiring internationally, often with equity
  • Upwork — freelance and long-term remote contracts across all categories
  • Turing — remote engineering roles with US companies, vetted entry process

Building a remote career from Nigeria that pays well

The professionals earning consistently in remote roles do three things: they build skills with long-term demand, they use the right platforms to find legitimate opportunities, and they set up reliable systems for getting paid before they need them. The payment side is the easiest part to solve in advance. Manage your earnings in USD, convert when the rate suits you, and focus your energy on the work itself.

Frequently asked questions

What are the highest-paying remote jobs for Nigerians in 2026?

Software development, data science, and UI/UX design offer the highest earning potential, with annual salaries ranging from USD 30,000 to USD 90,000 depending on experience and role level.

How do Nigerians get paid for remote jobs?

Most international employers and platforms pay via ACH direct deposit into a US bank account or via payroll platforms like Deel or Remote. Having a USD account with an ACH routing number, such as a Grey account, lets you receive these payments directly.

What banking details do I need for Upwork or Turing?

Both platforms ask for a checking account type, an ACH routing number, an account number, and a bank name. A Grey USD account provides all four.

Do I need to be in the US to receive dollar payments from remote work?

No. You receive the money into your USD account regardless of where you are. Grey accounts are available in Nigeria and 80+ other countries, and you access your USD balance from the Grey app.

Is it legal to earn in dollars from remote work in Nigeria?

Yes. Nigerians can legally earn in foreign currency from international employers and clients. You are responsible for declaring income to FIRS as required under Nigerian tax law. Consult a tax professional for advice on your specific situation.

Which remote jobs can Nigerians do with no experience?

Virtual assistant, data entry, customer support, and entry-level content writing roles are the most accessible for those starting out. These typically pay USD 10,000 to USD 25,000 per year and provide a foundation for moving into higher-paying categories.

Salary ranges are indicative and based on industry data available at the time of publication. Actual compensation varies by employer, experience level, and role scope. Tax obligations for remote workers in Nigeria are subject to Nigerian law; consult a qualified tax adviser for guidance specific to your situation.

‍

If you’re working online for international clients or employers, create a free account on Grey to receive USD, EUR, or GBP, manage your income efficiently, and focus on growing your remote career in 2026 and beyond.

How YouTubers receive earnings from abroad

•

•

2 min read

Across the globe, countless YouTubers with millions of followers are creating content, educating audiences, and building strong communities. Many are now attracting sponsorships and monetising their influence, but getting paid isn’t always easy. Some face challenges receiving funds from brands, while others struggle to access ad revenue in foreign currencies. Delays, conversion losses, and complicated payment systems can make the process stressful.

In this article, you’ll discover how top content creators manage international payments efficiently, ensuring their hard work is rewarded on time, so they can stay focused on what they do best: creating amazing content.

Also read: Best ways to receive payments from international clients

How YouTubers earn money from international audiences

YouTubers today aren’t limited by borders. With audiences and brands worldwide, creators have multiple income streams coming from international sources. Understanding how these earnings work helps you maximise revenue, get paid reliably, and grow your channel sustainably.

1. Ad revenue from global views

YouTube’s AdSense pays creators based on views, engagement, and ad placement. International audiences often generate higher CPMs, meaning a video watched in the US or Europe can earn significantly more than local views. Travel vloggers or tech reviewers with global subscribers benefit from this. The more your content resonates worldwide, the higher your ad revenue grows over time.

2. Brand sponsorships

Brands across the globe pay creators to promote their products or services. These sponsorships can range from one-off campaigns to long-term partnerships and are often paid in foreign currencies. Tech reviewers partnering with European software firms or lifestyle creators showcasing US products are good examples. Sponsorships also open doors to networking with international companies, building your channel’s credibility globally.

Also read: How creators receive payouts from international platforms

3. Affiliate marketing

YouTubers earn commissions by recommending products or services to a global audience. Every purchase made through their affiliate link generates income. Gaming channels using Amazon Affiliates or software creators promoting tools internationally can generate consistent revenue. By choosing products that match your audience, you create trust and repeat income while expanding your influence beyond your home country.

4. Selling digital products or Merchandise

Creators turn their knowledge into products like e-books, online courses, or branded merchandise for global fans. A fitness YouTuber selling training guides to US or European followers, or a designer offering digital templates worldwide, can generate substantial revenue. Selling internationally also helps diversify income streams, giving creators stability and control over their financial growth.

Challenges YouTubers face when receiving international payments

Creators often face hurdles when dealing with international earnings. Understanding these challenges helps you plan more effectively and stay focused on content creation.

1. Currency fluctuations

Earnings from abroad often arrive in foreign currencies, and fluctuating exchange rates can reduce your actual income. Without a strategy to convert at favourable rates, creators can lose money unexpectedly, affecting budgeting and reinvestment plans for their channel. Managing these fluctuations is essential to keep your earnings stable.

2. Payment platform limitations

Not every platform supports all countries or currencies, and some have high fees or limited withdrawal options. YouTubers can struggle to access funds efficiently, with complicated interfaces adding stress. Choosing reliable and flexible platforms is critical to ensure your earnings reach you safely and without unnecessary hassle.

Also read: Financial tips for freelancers and creators: How to manage your finances effectively in 2023

3. Tax and compliance issues

Receiving international funds may involve understanding multiple tax systems. Mismanaging taxes or failing to report income correctly can cause fines or payment blocks. YouTubers must stay informed about their legal obligations, both locally and abroad, to keep their channels profitable and their earnings secure.

4. Brand or platform disputes

Sometimes, payments get held up due to misunderstandings with sponsors or payment platforms. Incorrect invoices, contract issues, or verification problems can create friction. YouTubers must maintain clear communication and proper documentation to avoid conflicts and ensure smooth payment from global partners.

How to receive payments globally using Grey

Grey makes getting paid from international platforms easy and secure, helping creators focus on their content rather than payment hassles.

  • Sign up or download the app: Start your Grey account in minutes.
  • Get a foreign account instantly: Open a free EUR, USD, or GBP account with Grey in minutes.
  • Link your account to payment platforms: Use Grey banking details to receive funds from YouTube, sponsors, or affiliate programs.
  • Fast transfers to local accounts: Move your international funds quickly to your home currency whenever you need them.

LDMAG1

Receive your YouTube earnings with Grey

Earning from YouTube is a huge opportunity for creators worldwide. You no longer need complicated banking to receive international payments. With Grey, you can get paid globally and access your funds locally, all while focusing on growing your channel. Sign up or download the Grey app today to start receiving your earnings securely and effortlessly.

‍

Virtual cards in Egypt for online payments

•

•

2 min read

It is one thing to have the funds for online payments; it is another thing to have the means to complete the payment without getting frustrated. Managing international payments in Egypt can be quite a hassle. If you’ve tried paying for an international subscription, a work tool, online shopping, or an online course from Egypt, perhaps you can relate to the struggle. Local Egyptian bank cards are often restricted from international transactions, offer poor exchange rates, or aren’t supported by global platforms.

Virtual cards exist mostly to solve these problems, and they have become one of the most efficient options for anyone who shops online, pays for subscriptions, or needs a reliable way to spend in foreign currency without the limitations of a standard local bank card.

This article explains how virtual cards work, who they are for, and the main options available to people in Egypt right now.

What is a virtual card, and how does it work?

A virtual card is a digital payment card that works just like a traditional debit or credit card, except it exists only electronically. Instead of receiving a plastic card, you get the card details instantly on your phone or computer, including the card number, expiration date, and CVV security code.

Because virtual cards are issued digitally, they are typically available within minutes, unlike physical cards that must be printed and delivered.

Most virtual cards operate as prepaid or debit cards, meaning you spend funds you already have. In many cases, the card is connected to a multi-currency account, so payments are deducted directly from your balance in currencies such as USD, GBP, or EUR. This eliminates the need to manually top up the card before each purchase.

For example, Grey virtual cards are linked directly to your foreign currency balance, allowing you to pay online or in apps without transferring funds to the card first.

In practice, using a virtual card is no different from using a physical one. You simply enter the card details at checkout when making online payments, subscriptions, or international purchases. Many virtual cards can also be added to Apple Pay or Google Pay, enabling secure contactless payments with your phone wherever mobile wallets are supported.

Also read: Managing USD income as a remote worker in Egypt

What to look for when choosing

Not all virtual cards work the same way. The best option for you will depend on how you plan to use it, which currencies you deal with most often, and how frequently you make international payments. Before choosing a provider, it’s worth looking closely at a few key factors.

Currency support. Many virtual cards are designed primarily for USD payments, but international platforms often charge in other currencies such as EUR or GBP. If you regularly use services based in Europe or the UK, a card that supports multiple currencies can help you avoid additional conversion fees. Choosing a provider with a multi-currency account allows you to hold and spend different currencies more efficiently.

Funding options. Different platforms allow you to add funds in different ways. Some accept local bank transfers, others allow crypto deposits such as USDT, and some link directly to a multi-currency account balance, like Grey. Before signing up, check that the funding method available actually works for your situation and location.

Platform compatibility. Not every virtual card works equally well across all international platforms. Some services, particularly advertising platforms or large marketplaces, may reject certain cards depending on the issuing network or region. If you plan to use your card for a specific purpose, such as paying for Google Ads or cloud hosting, it’s worth confirming that the card is widely accepted on those platforms.

Fees and exchange rates. Virtual card costs can vary significantly between providers. Some charge a card creation fee, others add transaction fees, and most apply a small markup on currency conversions. A card that appears free at first glance may become more expensive if the exchange rate spread is high. Always look at the total cost of using the card, not just the upfront fee.

Security and regulation. Security should always be a priority when choosing a financial platform. Look for providers that follow proper identity verification processes and operate with licensed financial partners. Features such as two-factor authentication, transaction alerts, spending limits, and the ability to instantly freeze your card add an important layer of protection.

Contactless payments. Some virtual cards can be added to mobile wallets like Apple Pay or Google Pay, allowing you to make contactless payments with your phone. This can be particularly useful when travelling or making in-store purchases abroad. If this feature matters to you, make sure the card supports mobile wallet integration in your region.

Taking a few minutes to compare these factors can help you choose a virtual card that fits your spending habits and avoids unnecessary fees or payment issues later.

The top virtual cards in Egypt for online payments

While cards issued by local banks work well for domestic spending, they are not always reliable for international payments. Here is a list of the top virtual cards in Egypt for online payments.

Grey

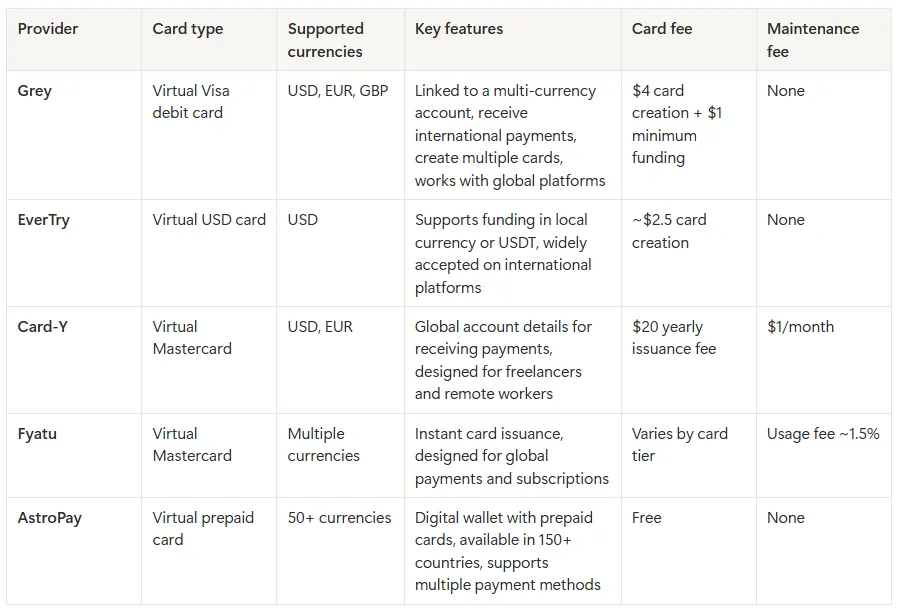
Grey offers virtual cards linked to a multi-currency account that supports USD, EUR, and GBP. You can create multiple cards for various uses to properly plan your finances. One card can be for online shopping while another could be for subscriptions and or online course. Grey cards are globally accepted and works with the full range of international platforms

You can receive international payments into your Grey USD, GBP, or EUR account or fund your account in EGP and convert to USD to spend on your cards directly.

Fees: Grey virtual USD cards cost a one-time creation fee of $4, plus a minimum of $1 to fund the card, totalling $5 to get started. There are no monthly maintenance fees.

EverTry

EverTry offers a solution for international payment restrictions in Egypt through their virtual dollar card platform. It allows Egyptian users to pay for global services that often decline local bank cards. It supports funding in local currency and USDT, making it accessible to users who are comfortable with crypto. The card works across a wide range of international platforms, including Netflix, Spotify, AWS, DigitalOcean, Namecheap, Facebook Ads, and Google Ads.

Fees: Card creation typically costs $2.5, with no monthly maintenance fees.

Card-Y

Card-Y is a fintech platform that offers multi-currency global accounts with a linked virtual card, designed for Egyptian freelancers and remote workers. It offers USD and EUR account details for receiving international payments, with a free virtual card included that draws from those account balances. It also issues local Egyptian bank cards to subscribers.

Fees: Card-Y offers virtual Mastercard issuance for a $20 USD fee, which is valid for one year and does not add to the card balance. The service features a $1 monthly maintenance fee, a 1% USD transaction fee ($1 min/$5 max), and a 1.5% foreign currency conversion fee.

Fyatu

Fyatu provides instant virtual Mastercards with support for multiple currencies, aimed at users who need to make global payments and manage international subscriptions. Onboarding is digital, and card issuance is immediate. It is a straightforward option for users whose primary need is an international spending card rather than a full suite of banking features.

Fees: Fyatu virtual card costs include a 1.5% fee for card usage (for either withdrawal or payments), with card replacement fees of $5 for World cards and $10 for Platinum cards. A $1.00 fee applies to declined transactions. Funding methods vary, with fees such as 3% for MTN MoMo and various percentages for online wallets like PayPal (3.5% + $0.30).

AstroPay

AstroPay is a globally recognised digital wallet and virtual card platform, available in over 150 countries, including Egypt. It has been around since 2009 and has a particularly strong footprint in emerging markets across Africa, Latin America, and Asia. The platform supports more than 50 currencies, issues virtual prepaid cards instantly, and does not require a traditional bank account to sign up.

For Egyptian users, AstroPay works as a prepaid spending tool. You load funds onto your wallet using a local payment method, then use the virtual card for international purchases on platforms that accept Visa or Mastercard. Card details are issued instantly through the app, and the platform supports one-time or multi-use cards depending on the denomination.

However, bank withdrawals from AstroPay can attract fees of up to 6% depending on the institution. There is a margin of 1% to 3% on exchange rate.

Fees: No card purchase or maintenance fee. No annual fee. Transaction fees of 2–5% depending on the payment method used. FX markup of approximately 1–3% on non-native currency transactions. Withdrawals to a bank account: up to 6%.

Comparison of the top virtual cards in Egypt

Before exploring each option in detail, the table below summarises some of the key differences between the most popular virtual cards available to users in Egypt, including supported currencies, card type, and typical fees.

Table comparing virtual cards from Grey, EverTry, Card-Y, Fyatu and AstroPay

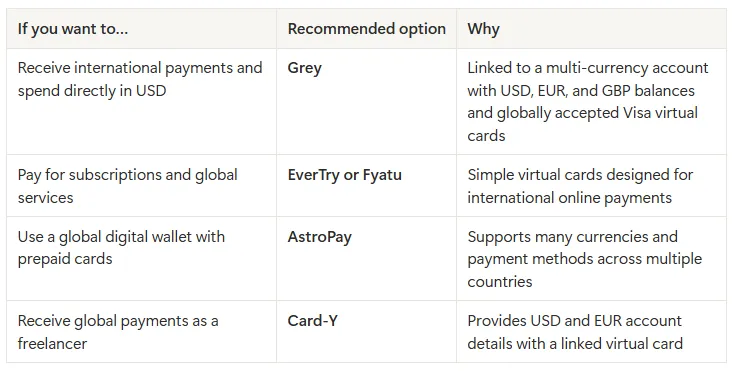
Quick recommendations

If you’re not sure which virtual card to choose, here’s a quick guide based on common use cases in Egypt.

Table recomending different cards for each need

For most freelancers, remote workers, and online entrepreneurs in Egypt, a virtual card linked to a multi-currency account is often the most practical option. It allows you to receive money from abroad, hold foreign currencies, and pay for global services without converting funds every time you make a transaction.

Also read: Grey card vs other virtual cards: What you should know

Make international payments with Grey

The advent of virtual cards has brought significant flexibility to managing international payments. Grey gives Egyptians a virtual card linked to your multi-currency account. This allows you to receive international payments and spend internationally from the same platform. Whether you are paying for software subscriptions, running digital ads, shopping on international platforms, or managing online tools for your work, Grey's virtual card is accepted globally and straightforward to set up.

Ready to get your virtual card? Sign up on Grey and download the app to create your virtual USD card in minutes.

‍

11 best virtual mailbox services for digital nomads

•

•

2 min read

A virtual PO box, or virtual mailbox, gives you a real street address where a provider receives your post, scans it and forwards or shreds it on request. Digital nomads use one to keep a stable address for banks, tax letters and deliveries, even when they move between countries.

Without a permanent home, managing important mail can become complicated. You might miss a bank statement, struggle to receive a replacement card or need an address to register a business. A virtual mailbox helps you handle these tasks without relying on friends or family to collect your post.

However, providers differ in their locations, monthly fees, mail-scanning limits, forwarding options and international shipping costs. Some offer additional services, such as check deposits and package consolidation.

This guide covers 11 virtual mailbox services worth considering, helping you compare their features, pricing and availability to find an option that fits your travel routine and mailing needs.

What is a virtual PO box?

A virtual PO box is a mail-handling service that gives you a physical mailing address without requiring you to rent or visit a mailbox in person. As a digital nomad, you can use it to receive letters, bank statements and packages while travelling or living abroad.

Unlike a traditional PO box, a virtual mailbox typically provides a real street address. When you sign up, your provider assigns you an address at its mail-handling facility. You can use this address for eligible correspondence, and the provider receives your mail on your behalf.

Your address may include a private mailbox (PMB) number, such as 123 Main Street, PMB 456. This identifies your individual mailbox within the provider’s facility. The exact format varies by provider, and you should follow its instructions when entering your address on forms.

A USPS PO box, by contrast, is rented directly from the United States Postal Service and usually uses a PO box number rather than a street address. A virtual mailbox may accept deliveries from multiple carriers, depending on its policies, and lets you view scanned mail online, request forwarding or arrange secure shredding.

The 11 best virtual mailbox services

The 11 best virtual mailbox services offer different address locations, mail scanning features, forwarding options and pricing plans. Whether you travel frequently, live abroad or run a remote business, compare each provider’s features to find a mailbox service that fits your needs.

Rank Provider Starting price Address locations Scans included Forwarding cost Best for
1 iPostal1 $9.99/mo 4,250+ locations globally Up to 30 exterior scans; content scans cost $2.25 per envelope for up to 10 pages Carrier rates plus handling fee, varying by location Overall network and local presence
2 Anytime Mailbox 4.98–9.99/mo, depending on address 2,500+ locations globally 30 incoming items and 5 open-and-scan pages monthly on the standard tier Carrier rates plus $5 per shipping bundle Budget and flexibility
3 Traveling Mailbox $15/mo 25+ US locations 35 page scans and 40 incoming envelopes monthly Carrier rates plus $2 per shipment; consolidation is free Digital nomads and RVers
4 PostScan Mail $10/mo 1,000+ locations 30 exterior scans; content scans cost $2 per envelope for up to 10 pages Carrier rates plus $2 for the first item and $0.50 per additional item Mobile app and multiple profiles
5 Physical Address $7.98/mo 6 regional hubs 30 incoming items monthly; unlimited exterior image views Carrier rates plus material costs Extended mail storage
6 US Global Mail 9.95–19.95/mo Locations across 23+ US states Unlimited exterior envelope scans; content scans depend on your plan Discounted carrier rates, advertised savings of up to 80% Expats and check deposits
7 Earth Class Mail 19–39/mo 80–90 US locations Envelope scans included; content scans charged according to volume Carrier rates plus handling charges Businesses and automated workflows
8 Stable Varies Selected premium office locations Custom high-volume limits for business accounts Secure, tracked priority shipping options Tech startups and API integrations
9 SavvyNomad Varies Residential-style addresses Digital envelope scanning and processing included, according to the supplied plan details Custom domestic and international forwarding Expats and financial correspondence
10 Northwest Registered Agent Varies All 50 US states Up to 5 document scans free annually on standard registered-agent plans Forwarding for state and business documents LLC formation and business privacy
11 Alliance Virtual Offices 37–49/mo 1,200+ locations worldwide Mail reception and notification tracking Scheduled forwarding using your chosen carrier Hybrid businesses needing meeting space

‍

How to choose a virtual mailbox

Choosing a virtual mailbox starts with understanding how much mail you receive and how you want to manage it. Compare each provider’s scanning allowance, including the number of incoming envelopes covered and the cost of opening and scanning their contents. If you receive important documents regularly, a plan with generous scanning limits may offer better value than a cheaper subscription with extra fees.

Next, consider forwarding costs. Providers may charge handling fees in addition to postage, and international deliveries can become expensive. Look for options such as mail consolidation, which combines multiple items into one shipment, and check whether storage limits apply before forwarding.

Your address type also matters. A commercial address may suit general correspondence and business mail, but some banks or government agencies require a residential address. Confirm that the address meets the requirements of the organisations where you intend to use it.

Finally, check the provider’s process for USPS Form 1583. This form authorises a commercial mail receiving agency to handle your mail. You generally need to provide identification and complete the required notarisation or identity verification process before your mailbox becomes active.

Also read: Virtual US accounts explained: Who they work for

Can you use a virtual mailbox for banking and business?

Yes, you can use a virtual mailbox for some banking and business purposes, but acceptance depends on the bank, service provider and intended use. Many virtual mailboxes provide a business mailing address for receiving bank statements, tax notices and official correspondence. However, a mailing address is not necessarily accepted as proof of your physical residential address. Before applying, review the bank’s address requirements and its rules for opening a business account.

Banks may flag a virtual mailbox as a commercial mail receiving agency (CMRA), which means it may not satisfy their physical-address verification requirements. This does not automatically prevent you from opening an account, but you must provide accurate details and any additional documents requested.

For business registration, a virtual mailbox may serve as your mailing address, depending on state rules. An LLC may also need a registered agent with a physical address in its state of registration to receive legal notices. Before applying, review this guide on how to open a business bank account and confirm the bank’s requirements.

Managing money while you travel

Managing money while travelling can get complicated when your income, savings and expenses involve different currencies. You might earn dollars from a US client, pay for accommodation in another country and still need money for expenses back home. Keeping track of exchange rates, transfer fees and spending limits can quickly become frustrating.

Grey helps simplify cross-border money management by giving you a way to receive international payments and manage multiple currencies. Instead of constantly converting money whenever you get paid, you can hold supported currencies and exchange them when it suits your needs.

When you need to pay for flights, accommodation or online subscriptions, Grey’s virtual card for spending abroad gives you another way to make international payments. And if you’re travelling while working remotely, you can get paid from the US while abroad by sharing your Grey USD account details with clients. That way, earning and spending across borders becomes easier to manage

Frequently asked questions about virtual mailbox services for digital nomads

1. What is a virtual PO box?

A virtual PO box, also called a virtual mailbox, gives you a mailing address where a provider receives your letters and packages. You can view scanned images of incoming mail online and choose to have items forwarded, stored or shredded. It is useful for travellers, remote workers and businesses that need reliable mail access.

2. Is a virtual mailbox legal?

Yes, virtual mailboxes are legal in the United States when used in accordance with applicable laws and postal regulations. Providers receiving USPS mail on behalf of customers operate as Commercial Mail Receiving Agencies (CMRAs) and must follow USPS requirements. You must provide accurate identification, complete required forms and avoid using the address for unlawful activities.

3. Can you use a virtual mailbox as a permanent address?

You can use a virtual mailbox as a long-term mailing address, even when you travel frequently. However, it may not qualify as your legal residence or physical address for every purpose. Government agencies, banks, insurers and licensing authorities may require a residential address, so check their specific rules before using one.

4. Do banks accept virtual mailbox addresses?

Some banks accept virtual mailbox addresses for mailing statements and correspondence, but others may reject them for account verification. A virtual mailbox is generally a commercial mailing address, not proof of where you live. Banks may require a separate residential or physical business address to meet identity-verification and compliance requirements.

5. What is USPS Form 1583?

USPS Form 1583 is an application that authorises a Commercial Mail Receiving Agency to receive mail on your behalf. You must provide identifying information and acceptable identification documents. Your signature must be witnessed by the provider or an authorised employee, or acknowledged before a qualified notary. Requirements should be confirmed with your mailbox provider.

6. How much does a virtual mailbox cost?

A virtual mailbox typically costs around $5 to $40 per month, depending on the provider, address location and plan features. Basic plans may include limited mail scanning, while higher-priced options offer more scans, storage or business services. Budget for additional charges such as postage, forwarding, document scanning, package handling and international shipping.

Arrow (up)

Back to top