
<script type="application/ld+json" data-schema-version="grey-blog-v4"> [{"@context":"https://schema.org","@type":"BlogPosting","@id":"https://grey.co/blog/how-to-receive-and-convert-foreign-currencies-to-usdc-in-austria#article","headline":"How to receive and convert foreign currencies to USDC in Austria","description":"Discover how freelancers in Austria can easily receive, send and convert foreign currencies to USDC with Grey","inLanguage":"en","url":"https://grey.co/blog/how-to-receive-and-convert-foreign-currencies-to-usdc-in-austria","mainEntityOfPage":{"@id":"https://grey.co/blog/how-to-receive-and-convert-foreign-currencies-to-usdc-in-austria#webpage"},"datePublished":"2024-11-28T21:02:46.204Z","dateModified":"2026-06-15T17:53:23.376Z","author":{"@type":"Person","@id":"https://grey.co/authors/olayoyin-olorunmota#person","name":"Olayoyin Olorunmota","url":"https://grey.co/authors/olayoyin-olorunmota","jobTitle":"Content Writer","sameAs":["http://www.linkedin.com/in/olayoyinolorunmota","http://x.com/yoyin_michael"]},"publisher":{"@type":"Organization","@id":"https://grey.co/#organization","name":"Grey","url":"https://grey.co","logo":{"@type":"ImageObject","url":"https://cdn.prod.website-files.com/6360022338a81bd6fdbb1145/6564ae1077a67e39d3c491a6_Grey%20Logo%20Lockup%20Black.svg"}},"image":{"@type":"ImageObject","@id":"https://grey.co/blog/how-to-receive-and-convert-foreign-currencies-to-usdc-in-austria#primaryimage","url":"https://cdn.prod.website-files.com/636a85d290ee58e70c17e1c0/6a3018bedb4d5cc29b3cc609_6a3018bdb24e8fcf46a15e7d_how-to-receive-and-convert-foreign-currencies-to-usdc-in-austria__header-image.webp","contentUrl":"https://cdn.prod.website-files.com/636a85d290ee58e70c17e1c0/6a3018bedb4d5cc29b3cc609_6a3018bdb24e8fcf46a15e7d_how-to-receive-and-convert-foreign-currencies-to-usdc-in-austria__header-image.webp","width":1200,"height":675}},{"@context":"https://schema.org","@type":"WebPage","@id":"https://grey.co/blog/how-to-receive-and-convert-foreign-currencies-to-usdc-in-austria#webpage","url":"https://grey.co/blog/how-to-receive-and-convert-foreign-currencies-to-usdc-in-austria","name":"How to receive and convert foreign currencies to USDC in Austria","description":"Discover how freelancers in Austria can easily receive, send and convert foreign currencies to USDC with Grey","inLanguage":"en","primaryImageOfPage":{"@id":"https://grey.co/blog/how-to-receive-and-convert-foreign-currencies-to-usdc-in-austria#primaryimage"},"breadcrumb":{"@id":"https://grey.co/blog/how-to-receive-and-convert-foreign-currencies-to-usdc-in-austria#breadcrumb"}},{"@context":"https://schema.org","@type":"BreadcrumbList","@id":"https://grey.co/blog/how-to-receive-and-convert-foreign-currencies-to-usdc-in-austria#breadcrumb","itemListElement":[{"@type":"ListItem","position":1,"name":"Home","item":"https://grey.co/"},{"@type":"ListItem","position":2,"name":"Blog","item":"https://grey.co/blog"},{"@type":"ListItem","position":3,"name":"How to receive and convert foreign currencies to USDC in Austria","item":"https://grey.co/blog/how-to-receive-and-convert-foreign-currencies-to-usdc-in-austria"}]}] </script>

How to receive and convert foreign currencies to USDC in Austria

Olayoyin Olorunmota

TABLE OF CONTENT

SHARE THIS POST

Austria — not to be confused with kangaroo-filled Australia has grown in leaps and bounds in recent years with a huge community of freelancers. While you won’t find koalas here, Austria offers something even better for freelancers, an ideal base for working with international clients. However, navigating foreign payments can be tricky, which is where USD Coin (USDC) steps in as a stable, efficient solution.

Grey offers a straightforward way to receive and convert payments, taking away the drama of exchange rate volatility.

This guide explains how to receive foreign payments, convert them into USDC, and manage your funds efficiently with Grey.
‍
Also read: How to receive and convert foreign currencies to USDC

Why convert foreign payments to USDC as a freelancer in Austria?

For freelancers working with clients abroad, converting foreign currencies to USDC offers several advantages:

Stable value: As a stablecoin tied to the U.S. dollar, USDC provides a predictable value, helping freelancers avoid the volatility of other cryptocurrencies.

Low fees: USDC transactions often incur lower fees than traditional bank transfers, making them cost-effective for international payments.

Quick access to funds: Blockchain technology allows for near-instant transfers, so freelancers have quick access to their funds.

Flexible conversion: Freelancers can hold USDC for stability and convert it to Euros (EUR) when favourable exchange rates apply.

Also Read: Send instant USDC payouts to 40+ countries with Grey

How to receive an convert foreign currency to USDC

Grey provides a simple and secure method for freelancers in Austria to handle USDC payments. Here’s how to send and convert foreign currencies to USDC using Grey:

Open the Grey app

Log in to your Grey account through the app or website for secure access to your USD and other currency balances.

Select your USD balance

Navigate to the “Accounts” section and select your USD balance. This will serve as the starting point for initiating USDC transfers.

__wf_reserved_inherit

‍

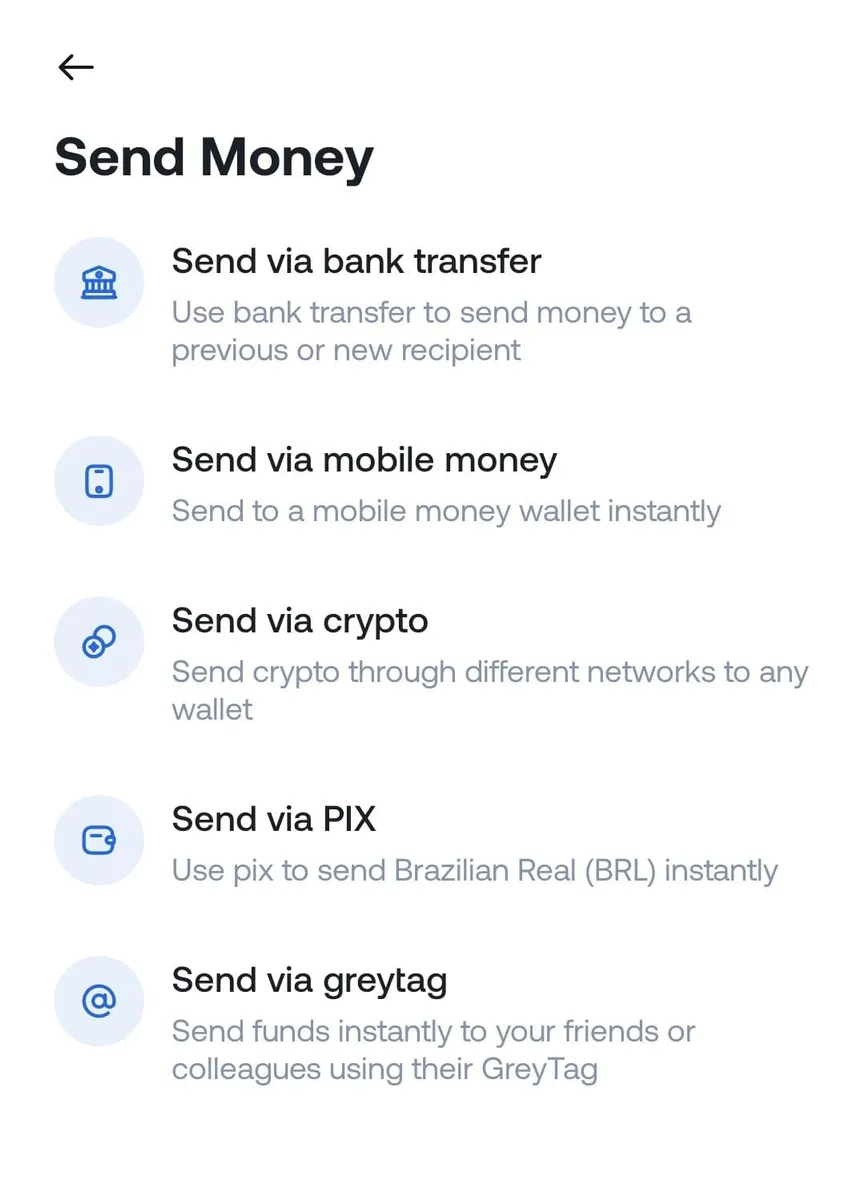
Tap “Send via crypto”

Choose the “Send money” option, then select “Send via crypto” to start the USDC transfer process.

__wf_reserved_inherit

Enter transaction details

Input the recipient’s wallet address carefully. Ensure you select the correct network, as Grey supports Solana (SOL) and Binance Smart Chain (BEP-20).

__wf_reserved_inherit

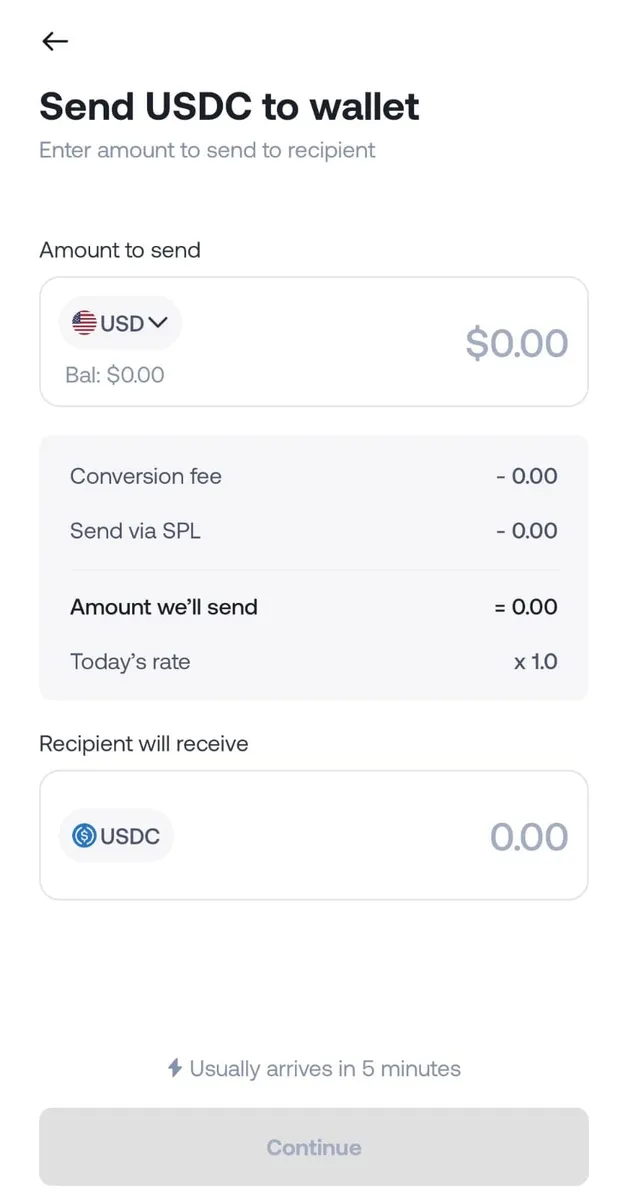
Input the transfer amount and review the details

Specify the amount you want to send, but don’t skip double-checking the wallet address and network — no one likes a lost transaction.

__wf_reserved_inherit

Confirm and complete the transfer

Once satisfied with the details, tap “Send.” Grey will prompt you to enter your two-factor authentication (2FA) code for added security.

Transaction success

The USDC will arrive in the recipient’s wallet after processing. The recipient can keep the USDC, convert it into local currency, or use it as needed.

Also Read: How to receive dollar payments and convert to USDC in Angola

How to convert USDC to Euros (EUR)

To convert USDC to Euros, use a crypto exchange or a local service that supports USDC-to-EUR transactions. Some platforms offer direct conversion, while others may require intermediary trading through USD or BTC.

What are the considerations for freelancers holding and converting USDC?

While holding USDC is convenient, here are a few factors to consider:

Network compatibility: Ensure the network used for USDC matches your wallet and conversion services to avoid transaction issues.

Fee awareness: Although USDC has low transaction fees, network fees may vary depending on the blockchain.

Tax compliance: Austria has clear regulations on cryptocurrencies, which are treated as financial assets. Consult a local tax advisor to ensure compliance when holding or converting USDC.

Using Grey to simplify USDC management

With Grey, freelancers in Austria can securely send USDC to supported wallets, manage funds efficiently, and take advantage of robust security measures like two-factor authentication (2FA)

Grey makes receiving and managing USDC payouts effortless for freelancers in Austria.  Create a Grey account today and unlock the benefits of global financial freedom.

The future of global banking is here, designed for you.

__wf_reserved_inherit

Last updated:

October 2, 2026

Open a free Grey account to get startedJoin 1 million digital nomads
IF YOU ENJOYED THIS, CHECK THESE OUT

How to send money from Europe to India

•

•

2 min read

Here's a question: if you send €500 from Germany to India today, how much will your family actually receive? You'd think there would be one simple answer, but check a few money transfer apps and you'll probably get three different amounts.

And if you're regularly sending money from Europe to India, those differences matter. Every euro spent on transfer fees or conversion charges is money your family could be receiving instead.

So, if you're wondering how to send money from Europe to India, this guide will help you compare transfer methods, understand the fees, find the cheapest way to send money and make sure more rupees reach your recipient.

Quick answer: The easiest way to send money from Europe to India is usually through a transfer app that supports Indian bank deposits or UPI payouts. Create an account, verify your identity, enter the amount, review the exchange rate and fees, then confirm. Transfers may arrive within minutes or take several working days, depending on the provider.

What is the best way to send money from Europe to India?

For most people, a money transfer app offering Indian bank deposits or UPI payouts is a convenient option. You can usually see how many Indian rupees (INR) the recipient will receive before confirming.

Traditional bank wires are another option, particularly for larger payments, but may involve additional charges and longer processing times.

Transfer method How it works What to consider
Money transfer app Pays into an Indian bank account Usually shows fees and INR amount upfront
UPI payout Sends to an eligible UPI ID Fast and convenient where supported
International bank wire Transfers between bank accounts May involve intermediary fees and longer processing

‍

Grey, for example, supports INR payouts to Indian bank accounts and UPI IDs. You can manage supported foreign currencies in your account and review the exchange rate, fees and final amount before sending. Available options depend on your location and account eligibility.

You can also compare the best apps to send money internationally or check how to send money from the UK to India if you're based in Britain.

Also read: What is the best app to send money to India from the US?

How to send money from Europe to India step by step

You can send money from Europe to India in six steps using a provider that supports Indian bank transfers or UPI payouts.

1. Choose a transfer provider

Check which services operate in your country and support payments to India. Fees and funding methods can differ between Germany, France, Ireland and other European countries.

If you're based in Germany, for example, check the available options to send money from Germany to India.

2. Create an account and verify your identity

Sign up and complete the required identity checks. You'll usually need personal details and a valid identity document. Larger transfers may require additional verification.

3. Enter the amount

Choose your sending currency, usually EUR, and enter how much you want to transfer. Check the estimated INR amount alongside the exchange rate and fees.

4. Add the recipient's details

For an Indian bank transfer, you'll generally need the recipient's name, account number and IFSC code. If UPI is supported, you may be able to use an eligible UPI ID instead.

Grey supports both payout methods for eligible INR transfers. Your recipient doesn't need a Grey account, but their bank details or UPI ID must be correct.

5. Review and confirm

Check the exchange rate, fees, recipient amount and estimated delivery time.

With Grey, you can review these details in the app before authorising the transfer through the required security verification.

6. Track your payment

Keep the transfer confirmation and follow its status in the app. Some transfers arrive within minutes, while others take longer because of bank processing or verification checks.

If you regularly earn in euros, you can also check whether you're eligible to open a euro account with Grey and receive supported EUR payments through SEPA.

What it costs: fees and EUR to INR rates

The cost of sending money to India comes down to three things: the transfer fee, the exchange rate and any additional charges.

A service advertising a €0 transfer fee isn't necessarily cheaper than one charging €4. The exchange rate can change how much your recipient actually receives.

Understanding the exchange rate margin

Some providers offer a rate below the reference EUR to INR exchange rate. The difference is called the exchange rate margin, and it affects the amount delivered even when the transfer itself is advertised as free.

Example: sending €500 to India

Imagine the reference rate is €1 = ₹100. This is an illustrative example, not a live exchange rate.

Provider A Provider B
Amount sent €500 €500
Transfer fee €0 €4
Exchange rate ₹98/€1 ₹100/€1
Amount converted €500 €496
Recipient receives ₹49,000 ₹49,600

‍

Despite charging €4, Provider B delivers ₹600 more.

That's why the cheapest way to send money from Europe to India is to compare the final INR amount rather than the advertised fee alone.

What fees does Grey charge for transfers to India?

Grey's published USD-to-INR pricing includes a 1% conversion fee without a percentage-fee cap. Its withdrawal-fee guidance also lists a $1.50 fee for eligible INR bank and UPI payouts.

For example, converting $500 from USD to INR would cost $5 in conversion fees. Including the listed $1.50 payout charge, the combined fees would be $6.50, excluding funding costs and any exchange rate difference.

If you receive euros into Grey through SEPA or SEPA Instant, the published deposit fee is 0.8%, with a €2 minimum and €10 maximum.

These charges apply to different transactions. The USD-to-INR fee shouldn't be treated as the price of a direct EUR-to-INR transfer, so check the available route and final quote in your account.

Grey's published US-to-India information also lists limits of ₹450,000 per bank transfer and ₹100,000 per UPI transfer. Limits for European corridors may differ.

If you're based in the Netherlands, you can check how to send money from the Netherlands to India and compare the available quote.

Sending money home? Send money from Europe to India with Grey and check the available exchange rate, fees and payout options before confirming.

Can you send money from Europe to India without charges?

You may find providers offering fee-free transfers, but that doesn't always mean there are no costs.

Some offer introductory promotions, while others include their charges in the exchange rate. A provider offering ₹99 per euro will deliver less than one offering ₹100, even if neither charges a transfer fee.

If you're looking for how to send money from Europe to India without charges, compare the total amount paid with the rupees delivered.

With Grey, for example, check the applicable conversion and payout fees. If you first need to fund your account, include any deposit charges too.

Receiving money in India: NRE, NRO and UPI

Money sent from Europe can arrive in an eligible Indian bank account or, where supported, through a UPI payout.

For non-resident Indians (NRIs), the type of receiving account can also matter.

NRE accounts

A Non-Resident External (NRE) account allows eligible NRIs to hold funds received from abroad in Indian rupees.

Permitted overseas remittances can generally be deposited into an NRE account, and the funds are repatriable under applicable rules. Interest is generally exempt from Indian income tax while the account holder meets the relevant eligibility conditions.

NRO accounts

A Non-Resident Ordinary (NRO) account is commonly used to manage income arising in India, including rent, dividends and other eligible payments. It can also receive permitted overseas remittances.

Interest earned on NRO accounts is generally taxable in India. Repatriation is subject to applicable rules, documentation and tax compliance. Certain eligible remittances fall under a USD 1 million annual limit per Indian financial year.

The Reserve Bank of India provides further guidance on NRE and NRO accounts.

What about UPI?

UPI allows payments to eligible Indian bank accounts using a linked UPI ID. Some international transfer services, including Grey, support UPI payouts for eligible INR transfers.

This means you may be able to send money without entering the recipient's full bank details. However, the receiving account must be eligible, and provider-specific limits apply.

Grey's published US-to-India corridor information lists a ₹100,000 UPI transfer limit, but you should check the limit applicable to your own sending country and account.

Is money received from abroad taxable in India?

Money received from overseas isn't automatically taxable. The treatment depends on the purpose of the payment, the relationship between sender and recipient, and the recipient's tax circumstances.

Qualifying gifts from specified relatives are generally exempt, while income from work, business or investments may be taxable. Other gifts may also be taxable depending on the amount and circumstances.

For larger transfers or complex situations, consider speaking with a qualified tax professional.

Frequently asked questions about sending money from Europe to India

What is the cheapest way to send money from Europe to India?

The cheapest option is the provider that delivers the highest INR amount for the same total cost. Compare transfer fees, exchange rates and additional charges. A zero-fee transfer may still cost more through the exchange rate.

How long does it take to send money from Europe to India?

Transfers can arrive within minutes or take several working days, depending on the provider, payout method and bank processing. Grey supports eligible INR transfers that may arrive within minutes, although verification and banking delays can affect delivery.

Can I send money to a UPI ID from Europe?

Yes, some international transfer services support UPI payouts to eligible Indian bank accounts. Grey also supports UPI payouts for eligible INR transfers. Check availability for your sending country before confirming.

Should I use an NRE or NRO account?

An NRE account is generally suited to eligible NRIs holding overseas earnings in India. An NRO account is commonly used for income arising in India. Both can receive permitted overseas remittances, but their tax and repatriation rules differ.

Is there a limit on sending money to India?

Limits depend on the provider, sending country, payout method and verification requirements. Grey's published US-to-India limits are ₹450,000 for bank transfers and ₹100,000 for UPI payouts. European corridor limits may differ, so check your account before sending.

Is money received in India from abroad taxed?

Not necessarily. Qualifying gifts from specified relatives are generally exempt from Indian income tax, while payments for services, business activities or investments may be taxable. The recipient's circumstances determine the treatment.
How to use Google Pay in Nigeria

•

•

2 min read

Google Pay launched in Nigeria on 28 October 2026, through the Google Wallet app on Android. Google’s current list covers eligible cards from five banks: FirstBank, GTBank, Providus Bank, UBA, and Zenith Bank, mostly Mastercard. Verve, AfriGO, and cards from banks like OPay, Moniepoint, Kuda, and PalmPay are not on it, and contactless terminals remain limited.

Whether tapping works depends on three things: your card, your phone, and the terminal. This guide takes them in that order, then covers what to do if your card is not supported.

Does Google Pay work in Nigeria?

Yes. Google launched Google Wallet, including Google Pay, in Nigeria on 28 October 2026 for Android and Wear OS users. Google says it lets you pay by tapping in stores, in apps, and online, using a card stored on your phone.

Both names cause confusion, so here is the difference. Google Wallet is the app that holds all your payment cards and can also store loyalty cards, event tickets, and boarding passes. Google Pay is the payment function inside it, the part that passes your card to a terminal or a checkout page. You install one app, add a card, and pay with Google Pay.

Unfortunately, Google Pay won’t work for everyone. Three things have to line up:

  • Your card: It has to be on Google’s list, and your bank decides whether a given card works.
  • Your phone: It has to run Android and have a screen lock. Tapping in stores also needs NFC.
  • The place you are paying. An online shop has to offer Google Pay, and a physical shop needs a contactless-enabled terminal.

The next section covers the first of these: the banks and cards.

Nigerian banks and cards that work with Google Pay

The table below follows Google’s Nigeria payment methods page, as at the time of publishing.

Bank Supported cards
First Bank of Nigeria Mastercard debit
Guaranty Trust Bank (GTBank) Mastercard debit and prepaid
Providus Bank Mastercard credit, debit, and prepaid
United Bank for Africa (UBA) Mastercard credit, debit, and prepaid; Visa prepaid
Zenith Bank Mastercard credit, debit, and prepaid

An account at a listed bank is not enough. Google has stressed that your bank decides whether its cards work with Google Wallet. The card network (Mastercard or Visa) and the card type (debit, credit, or prepaid) both count. A bank that issues Mastercard and Verve cards may support one but not the other, so find your bank’s row, then check the network and card type you hold. Both are usually shown on the card itself or in your banking app.

What is not supported:

  • Verve cards. Google currently only supports Mastercard and Visa.
  • AfriGO cards.
  • Cards from OPay, Moniepoint, Kuda, and PalmPay. None of these providers appears on the list.
  • Visa debit cards from the listed banks. Visa appears only as a prepaid card at UBA.

If your card is not covered, the section below on unsupported cards outlines your options.

How to set up Google Pay in Nigeria

You need an Android phone, a screen lock, and a card from the table above. For tapping in stores, the phone also needs NFC. Google Wallet generally requires a recent version of Android, so update your phone first if it is running an older version.

  1. Install Google Wallet. Download it from the Google Play Store and open it
  2. ‍Set a screen lock. Wallet requires a PIN, pattern, password, or fingerprint before it can store a payment card.‍
  3. Add the card. Tap Add to Wallet, then Payment card, then New credit or debit card.‍
  4. Enter the card details. Scan the card with the camera, or type the number, expiry date, and CVV.‍
  5. Accept the terms and verify. Your bank may send an SMS code or ask you to confirm in its app. Complete this step to activate the card.‍
  6. Set a default. Open Wallet settings and choose the card you want Google Pay to use first.‍
  7. Check NFC. In your phone's settings, search for NFC and switch it on if you plan to tap in stores.

If the verification message does not arrive, or the card is declined, call the number on the back of the card. Google's page says to contact your bank when a card cannot be set up for mobile payments.

Virtual cards go in the same way. Grey's guide on how to add a virtual card to Apple Pay or Google Pay covers it in more detail.

How to set up Google Pay with your Grey card

If your bank card is not on Google's list, a Grey virtual dollar card is another card you can try in Google Wallet. Grey's guide says its virtual cards can be added to Google Wallet on Android, and that Google Pay accepts virtual debit cards on the Mastercard and Visa networks as long as the issuer supports it. Google decides which countries and cards Wallet supports, so availability can vary by region.

What you need: an active, funded Grey virtual card and an Android phone with a screen lock. A frozen or expired card, or one with a $0 balance, can fail verification.

  1. In the Grey app, go to Cards, tap your virtual card, and copy the card number, expiry date, and CVV.
  2. Open Google Wallet, tap Add to Wallet, then Payment card.
  3. Tap New credit or debit card and enter the details.
  4. Tap Save. Google checks the card with the issuer.
  5. Accept the terms and complete the verification step. This may be an SMS code, an email link, or a confirmation in the Grey app.
  6. Open Wallet settings and set the card as your default payment method.

Adding a card to Google Pay is free. Any fees come from the card issuer.

What it is good for

A Grey virtual card holds US dollars, so it suits payments priced in dollars:

  • International online checkouts that show Google Pay at the payment step.
  • Subscriptions billed abroad in dollars, such as software and streaming.
  • Spending when your Nigerian bank card is not on Google's list.

It is a dollar card, so it does not replace a naira bank card for everyday spending in Nigerian shops. For that, a card on Google's list is the simpler fit.

You can get a Grey virtual card from the app, and fund your card from a USD balance so it is ready when you need to pay.

Fees and rates: a Grey virtual card costs $5 to create, once, with no monthly fee. Payments on non-US websites can carry a cross-border fee of 2% plus $0.50. If you fund the card from a non-USD balance, currency conversion applies, and Grey's exchange rates vary with a margin over the mid-market rate. See grey.co/pricing for current fees.

Where you can actually use Google Pay in Nigeria

Online checkout is the realistic use for most people right now. Tapping in stores is possible, but only at terminals that support it, and those are still uncommon.

Online. Paystack has offered Google Pay at checkout for Nigerian merchants since September 2026, and Interswitch's payment gateway supports it too. Each merchant has to switch it on, so you will not see it at every shop. A business turns it on in its Paystack dashboard, and Paystack's help page lists the requirements. Paystack supports Visa and Mastercard for Google Pay, and the option appears only when your device, browser, card, and Wallet setup all support it. If a checkout shows no Google Pay button, the cause is usually one of those four, or the merchant has not enabled it.

In apps. Some apps offer Google Pay at the payment step. The same rule applies: the app has to support it, and your card has to be on Google's list.

In stores. Tapping needs two things: a phone with NFC and a terminal with contactless enabled. Many point-of-sale terminals in use today lack the hardware, and contactless is still a very small share of payments in Nigeria. Even at a terminal that accepts taps, your bank's fraud systems have to recognise the payment, or it may be declined.

How to tell whether a terminal will work:

  • Look for the contactless symbol, four curved lines, on the terminal or its screen.
  • Ask the cashier before the bill is settled: "Does this take tap to pay?"
  • Unlock your phone, switch NFC on, and hold the back of the phone close to the reader for a few seconds.
  • If nothing happens after two or three tries, pay another way.

A practical rule is to use Google Pay online first and treat tapping in stores as a bonus where the terminal supports it. Keep a physical card or cash with you either way.

If your card is not supported

Your card may not be on Google's list. What you do next depends on what you wanted to pay for.

If you want to use the tap-to-pay feature with your card, you may need to wait for your bank to be added or switch to a supported card type. Google’s list can change, and your bank decides which card types are enabled. If you are trying to pay while shopping online, enter your card details as usual. Google Pay is a quick checkout option. If your transaction is in dollars, a virtual dollar card is a better fit, as it is designed for international dollar payments.

Waiting for your bank. The list was shorter at launch than it is now, so more banks and card types may follow. There is no published timetable, so do not plan around it.

Switching to a supported card type. If you bank with one of the five listed banks but hold a Verve or Visa card, ask whether the bank can issue a Mastercard debit or prepaid card. Then check that exact type against Google's list. This keeps you paying from your naira account.

Using a virtual dollar card. For international online payments, Google Pay is rarely the blocker, because you can type a card's details at any checkout that accepts it. A virtual dollar card gives you a dollar card number for those payments. To compare your choices, read about free virtual dollar cards and how to get a virtual dollar card in Nigeria. A dollar card does not replace a naira bank card at home. If you also need to move money between Nigeria and another country, you can send and receive money in Nigeria with Grey.

Fees apply to Grey virtual cards, including a one-time $5 creation fee, and currency conversion can add cost. See grey.co/pricing for current fees.

Frequently asked questions

Does Google Pay work in Nigeria?

Yes. Google launched Google Wallet, including Google Pay, in Nigeria on 28 October 2026 for Android and Wear OS. It works only with cards on Google's list, and only at online shops and terminals that support it.

Which banks support Google Pay in Nigeria?

Google's list currently shows First Bank of Nigeria, GTBank, Providus Bank, UBA, and Zenith Bank. Support depends on the specific card, mostly Mastercard debit, credit, or prepaid. The table in this guide shows the exact types for each bank, and the list can change.

Why was my card rejected?

The most likely cause is that the card is not on Google's list, or your bank has not enabled that card type. Verve and AfriGO cards are not supported. Other causes are a missing screen lock, an unfinished verification step, or a bank fraud check that blocked the payment. Call the number on the back of your card and ask the bank.

Can I tap to pay in Nigerian stores?

Only at terminals with contactless enabled, and many terminals in Nigeria lack the hardware. Your phone also needs NFC. Look for the contactless symbol, and keep another way to pay.

Does my Kuda, OPay, or Moniepoint card work with Google Pay?

Not at the moment. Cards from Kuda, OPay, Moniepoint, and PalmPay are not on Google's list. Check the list again later, because it can change. For dollar payments online, a virtual dollar card is another option.

Is Google Wallet the same as Google Pay?

Not exactly. Google Wallet is the app that stores your cards, tickets, and passes. Google Pay is the payment function inside it. You install Google Wallet, add a card, and pay with Google Pay.

Paying for things abroad? Open a Grey account and get a virtual card for online payments.

What is the currency of Cambodia? Riel symbol and code

•

•

2 min read

Before a trip to Siem Reap, you look up Cambodia’s currency and find that it’s the riel. Then a friend who has been there tells you to bring US dollars, and the first ATM you use hands out dollars, not riel. Both are true, and how the two currencies fit together decides how you pay, what change you get back and where you lose money to poor rates. This guide covers the riel, its symbol and code, why dollars circulate alongside it, and how to spend and send money in Cambodia.

The currency of Cambodia is the Cambodian riel, symbol ៛ and code KHR. In practice, US dollars are widely used across Cambodia, especially for larger purchases, while riel is often used for small change. Many prices are quoted in dollars in tourist areas.

What is the currency of Cambodia?

The currency of Cambodia is the Cambodian riel, but US dollars are used alongside it every day, so most visitors end up handling both. The riel is the national currency, and the National Bank of Cambodia is its sole issuer. The dollar isn't issued by Cambodia at all, yet it's what most ATMs dispense and what many hotels, restaurants and shops use to set their prices.

In practice, the two currencies split the work:

  • US dollars cover larger payments: hotel rooms, tours, restaurant bills and most prices in cities and tourist areas.
  • Riel cover small purchases such as street food and tuk-tuk rides, and they’re the everyday currency in rural areas.

There are no US coins in circulation in Cambodia, so any change smaller than a dollar comes back in riel. That's why a visitor's wallet is usually a mix: dollar notes for the main payment and a stack of riel for the change. Near the Thai border, shops may also accept Thai baht, though usually at a poor rate.

The rest of this guide covers the riel itself, how the dollar became so common, and what to do with both when you travel or send money.

The Cambodian riel: Symbol and code

The Cambodian riel uses the symbol ៛ and the ISO currency code KHR. You'll see ៛ on price lists and signs in Cambodia, while KHR is the code used by banks, exchange apps and currency converters. The National Bank of Cambodia says it is the sole issuer of the Khmer riel, the national currency.

The riel is nominally divided into 100 sen, but sen aren't used in everyday life. Riel banknotes run from 100 riel up to 100,000 riel, and because a single riel is worth so little, prices in riel are usually written in the thousands.

A US dollar buys roughly 4,000 riel, and shops commonly round to that figure when they work out change. Rates move, so check the day's rate before you exchange money. The National Bank of Cambodia describes its approach as a managed floating exchange rate, where the rate is allowed to move within a band.

That high number of riel per dollar is why the currency appears on lists of the least valuable currencies. Such a ranking only counts how many units buy one dollar. It doesn't measure how strong an economy is, and a low-value currency can reflect history, such as past hyperinflation, rather than current conditions.

Why US dollars are used in Cambodia

US dollars are used in Cambodia because people lost confidence in the riel after years of upheaval, and a large inflow of dollars in the early 1990s made the dollar the easier currency to trust and spend. The National Bank of Cambodia's own research paper on dollarisation says dollarisation did not result from a policy decision. It built up as shocks wore down trust in the riel.

Year What happened
1975 The Khmer Rouge destroyed the financial system and decided not to issue a new currency
1980 The central bank was re-established and the riel became legal tender again
1990 to 1992 Central bank financing of the budget fuelled a sharp riel devaluation and three-digit hyperinflation
1991 to 1992 The UN transitional operation, which cost USD 1.7 billion, brought large dollar inflows
1993 onward The dollar has been widely used since 1993, and it stayed in use after stability returned in 1999

‍

Memory of that hyperinflation is why the habit lasted. The same paper put foreign currency at 97.3% of bank deposits at the end of 2006, which shows how far people had moved their savings into dollars. The central bank has since encouraged wider use of the riel, so the balance may have shifted, but the day-to-day split described above still holds for most visitors.

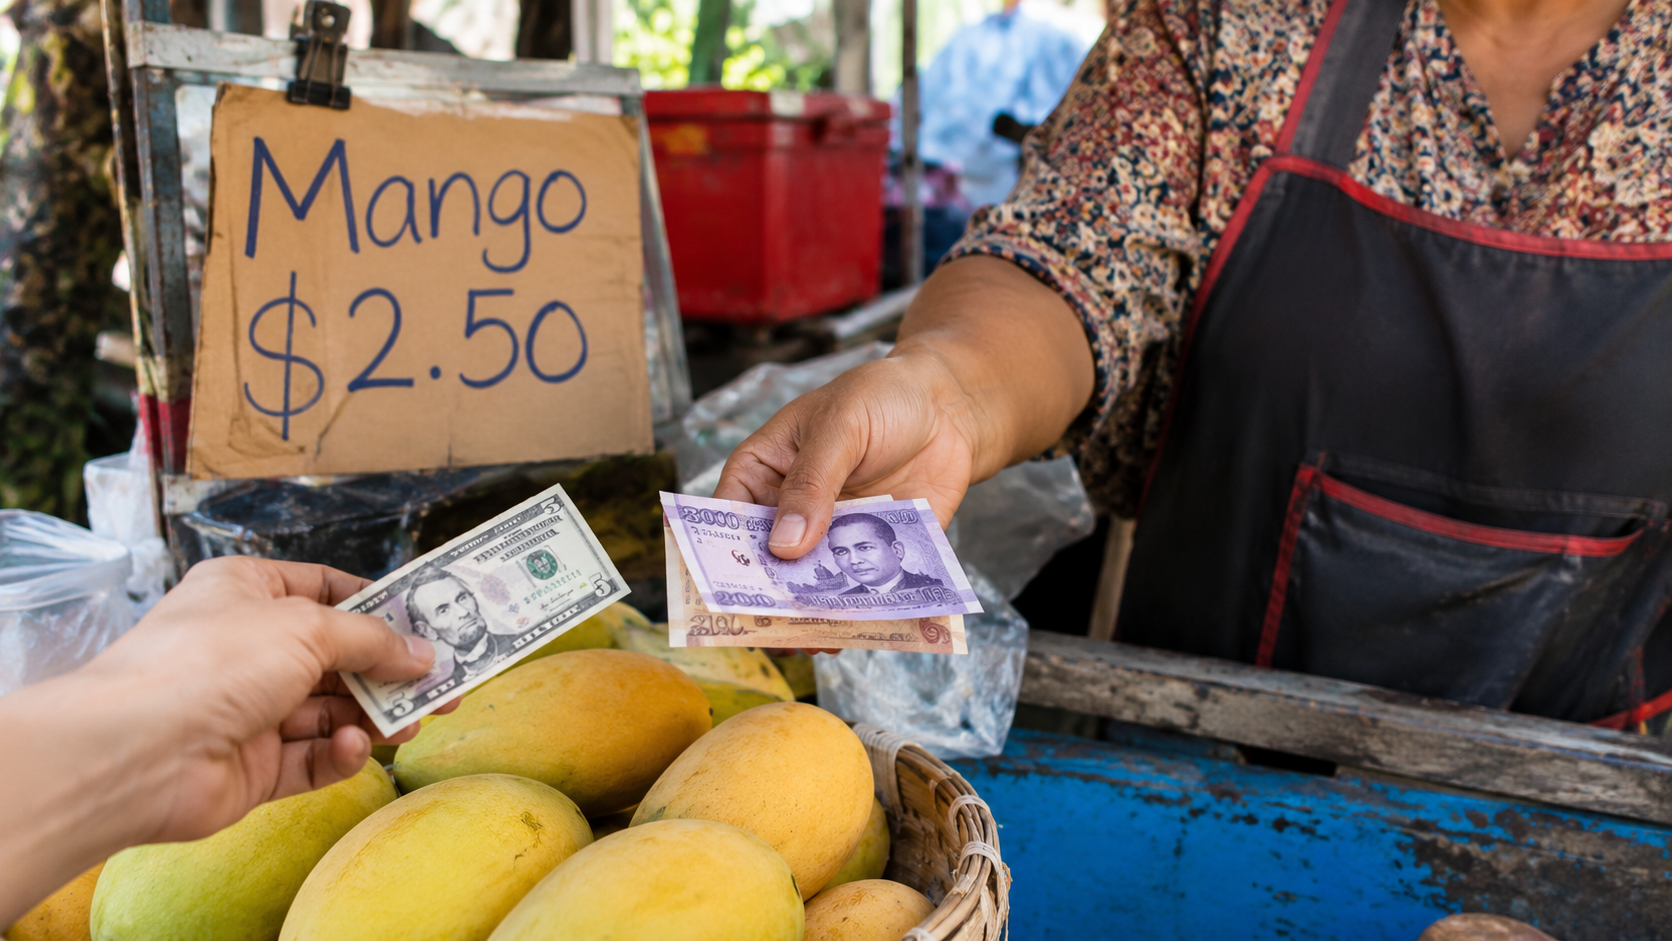
In practice, prices are often quoted in dollars, and you can pay in either currency. If a drink costs $2.50 and you pay with a $5 note, the change might come back as $2 and 2,000 riel, at the common rounded rate of 4,000 riel to the dollar.

A Cambodian price quoted in US dollars with riel notes given as change.

If you earn or save in dollars, you can hold US dollars and other currencies in a Grey account, which keeps your trip budget in the currency Cambodia already prices in.

Money tips for travellers in Cambodia

For most trips, carry small, undamaged US dollar notes for everyday spending, a little riel for small purchases, and a card for the places that accept one. Cash is the main way to pay in much of the country, so a few habits protect you from the usual losses:

  • Bring clean, untorn dollar notes. Banks, money changers and shops can refuse notes with tears or heavy marks, and larger notes are the hardest to use. Check yours before you fly.
  • Carry small bills. Tuk-tuk drivers and street vendors often can't break a large note, so $1, $5 and $10 notes go further than a $50 or $100.
  • Keep some riel. You'll want it for motorbike taxis, snacks and small shops, and it has little value outside Cambodia, so spend what's left before you go.
  • Expect dollars from ATMs. Most ATMs dispense US dollars, often in large notes, and some charge a fee per withdrawal. Read the screen before you confirm.
  • Count your change. In busy tourist areas, riel change is sometimes short. A quick check takes seconds.
  • Compare money changers. Tourism Cambodia says money changers generally give slightly better rates than banks, so compare a few before you swap.

Cards work in a narrower set of places. The same source says they're accepted at upscale hotels, shops and restaurants in the major tourist towns and generally not elsewhere, and that most businesses that take cards add a fee of 2% to 4%. Ask before you pay, and keep cash as your backup.

Your own bank is the other place money leaks. Many cards add a foreign transaction fee on purchases in another currency, and how to avoid foreign transaction fees explains what to look for. Because many Cambodian prices are in dollars, a dollar card can pay those without a currency conversion, while riel prices are a different currency and may trigger a conversion or cross-border fee depending on the card.

Sending money to Cambodia

Sending US dollars is often a practical way to send money to Cambodia, as USD is widely used for everyday payments, pricing and savings. With Grey, you can send USD directly to a bank account in Cambodia via SWIFT, with a flat $30 transfer fee and limits ranging from $100 to $5,000 per transaction.

You can also send money from the US to other supported destinations, including Thailand, where Thai baht is the local currency.

Before you send, check three costs:

  1. The transfer fee: Grey shows its fees before you confirm a transfer.
  2. The exchange-rate margin: if you convert from another currency first. It's built into the rate rather than shown as a separate line.
  3. The receiving bank's own charges: Banks can add fees to incoming international transfers, so ask the recipient.

If you're travelling rather than sending, a Grey virtual card lets you spend from a USD balance. Grey doesn't charge a foreign transaction fee on purchases made in the card's base currency, which is USD for the virtual USD card. A cross-border card fee of 2% plus $0.50 applies to non-USD purchases, so a purchase priced in riel would carry it. Card acceptance varies by merchant, so keep some cash too.

Grey is a financial technology company, not a bank: banking services are provided by licensed banking partners.

Frequently asked questions

What is the currency of Cambodia?

The currency of Cambodia is the Cambodian riel (KHR). US dollars circulate alongside it and are widely used for larger purchases and in tourist areas, while riel is used mostly for small amounts and change.

What is the riel symbol?

The riel symbol is ៛. You may see it on price lists in Cambodia, while banks and currency converters use the code KHR instead.

What is the currency code for Cambodia?

The currency code is KHR. Use it in currency converters, bank forms and exchange apps when you look up the Cambodian riel.

Can I use US dollars in Cambodia?

Yes. Dollars are widely accepted in cities and tourist areas, and most ATMs dispense them. Change under a dollar comes back in riel, and torn or heavily marked notes may be refused, so carry clean, small bills.

Should I carry riel?

Yes, carry a small amount for tuk-tuks, snacks and small shops, where riel is the usual currency. It has little value outside Cambodia, so spend or exchange what's left before you leave.

How do I send money to Cambodia?

Grey lists Cambodia among the countries that can receive USD transfers by SWIFT, with a flat $30 fee and a limit of $100 to $5,000 per transfer. Check the fee and any exchange-rate margin before you confirm, and ask the recipient whether their bank charges for incoming transfers.

Send money abroad with Grey

How to transfer an eSIM from one iPhone to another

•

•

2 min read

Your new iPhone is on the table, and your phone number lives on the old one as an eSIM. There’s no SIM tray to open and no card to slide across, so it isn’t obvious how to transfer an eSIM from one iPhone to another without losing service. The answer depends on your carrier and on which version of iOS both phones are running. This guide covers the quick route, the route for after setup, the fixes when it fails, and what changes for travel eSIMs.

You can move an eSIM between iPhones with eSIM Quick Transfer, during setup or later in Settings. On the new iPhone, choose Transfer From Nearby iPhone, then tap Transfer on the old one. Both iPhones need iOS 18.4 or later, Bluetooth on and a carrier that supports Quick Transfer. If yours doesn't, your carrier can issue a QR code.

What is eSIM Quick Transfer on iPhone?

eSIM Quick Transfer is an iPhone feature that moves your phone number's eSIM from your previous iPhone to your new one over a nearby connection, so in many cases you don't need to ask your carrier for a new QR code. It's the quickest way to complete an eSIM transfer on iPhone, but it only works when your carrier supports it.

Per Apple's eSIM instructions, you need all of the following:

  • Both iPhones signed in with your Apple Account.
  • Both iPhones on iOS 18.4 or later. Transferring more than one phone number at once requires iOS 26 or later.
  • The previous iPhone unlocked with its passcode.
  • Both iPhones nearby, with Bluetooth on.
  • A Wi-Fi network or hotspot. Some eSIM-only models in certain countries can activate without one.
  • A carrier that supports eSIM Quick Transfer.

Quick Transfer appears during setup if you’re asked to transfer your phone number to the new iPhone. If you skip that prompt or your iPhone is already set up, you can start the transfer later in Settings. If neither option appears, your carrier probably doesn’t support Quick Transfer, so use the QR code route in the troubleshooting section.

If either iPhone is on older software, update it first. Check with your carrier too: support depends on the carrier, not only on the phones.

How to transfer an eSIM during iPhone setup

To transfer an eSIM during setup, turn on the new iPhone, follow the prompts until it asks you to transfer your phone number, and approve the transfer on your previous iPhone. Keep both phones close together and unlocked, with Bluetooth on, until the new plan activates. These steps use Apple’s wording for the buttons:

1. Start setup on the new iPhone. Follow the setup screens and sign in with your Apple Account when asked. Keep the previous iPhone nearby, unlocked and connected to Wi-Fi.‍

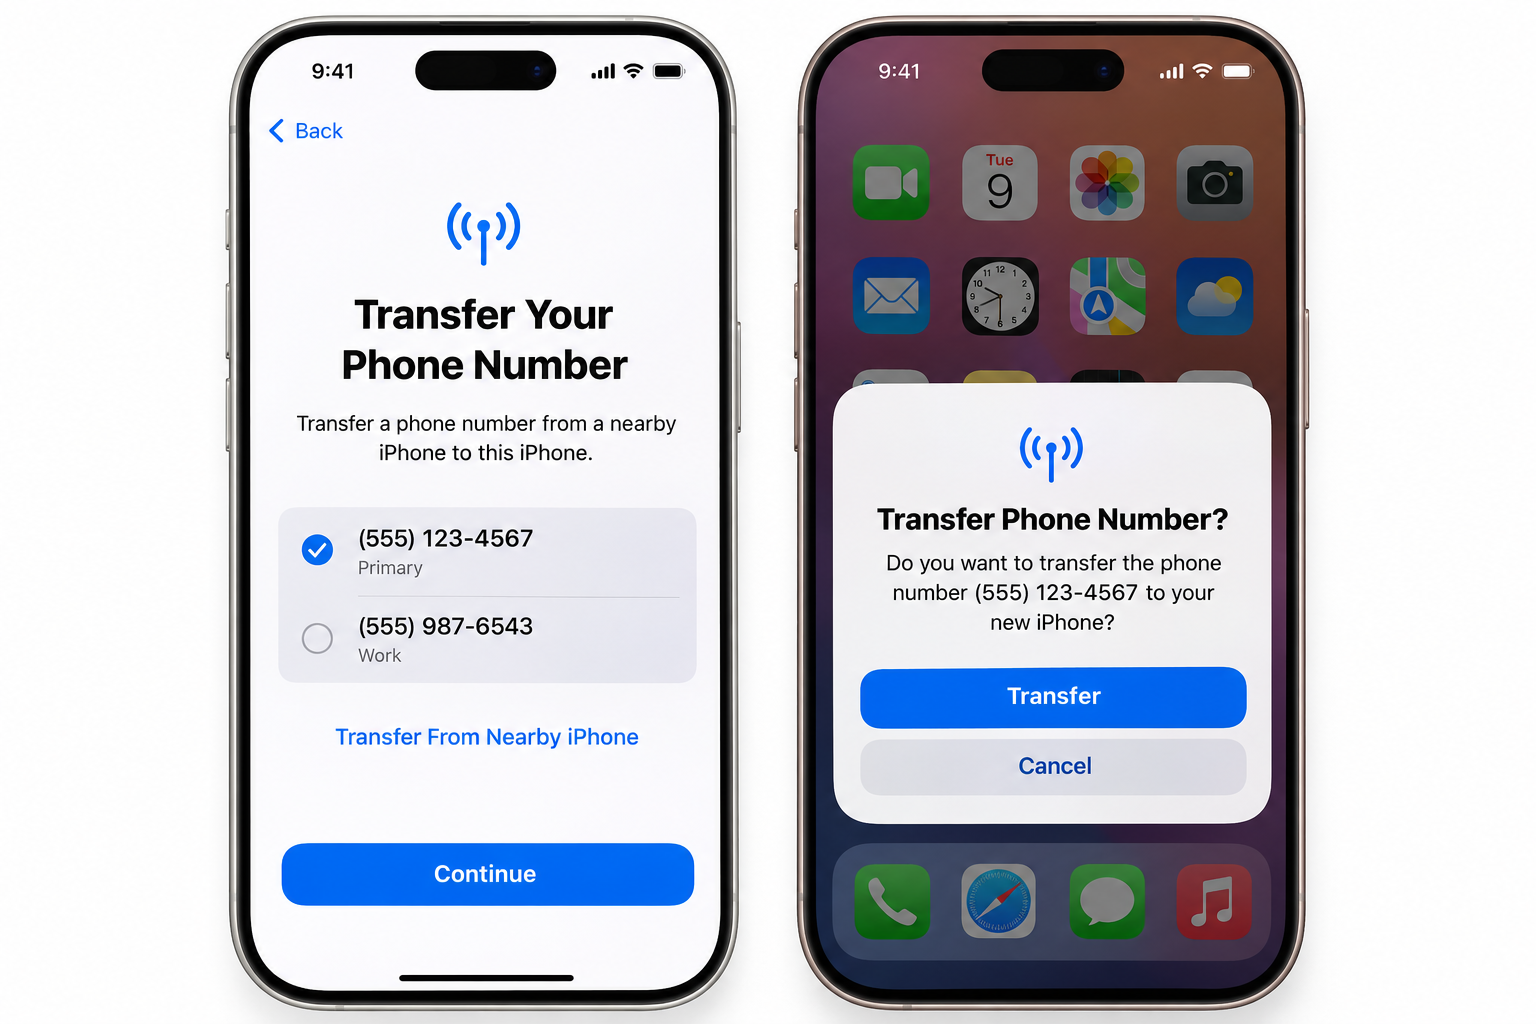
2. Reach the cellular screen. When the new iPhone asks you to set up cellular or to transfer your phone number, choose to transfer from your previous iPhone. If no list of numbers appears, tap Transfer From Nearby iPhone.

3. Choose the plan to move. If you have several numbers, pick the one you want to transfer.

4. Confirm on the previous iPhone. Follow the instructions that appear on it and tap Transfer. If it asks for a verification code, enter the code shown on the new iPhone.

Two iPhones confirming an eSIM Quick Transfer.

5. Wait for the plan to activate. Activating the plan on the new iPhone deactivates the SIM on the previous one, so don’t switch the old phone off in the middle of the transfer.

6. Finish with your carrier if asked. If a banner reads Finish Setting Up Your Carrier’s Cellular Plan, tap it and complete the transfer on your carrier’s website.

7. Test the line. Make a call from the new iPhone to confirm it has service.

Apple’s page doesn’t spell out the setup screens word-for-word, so the labels you see may vary slightly across iOS versions and carriers. The Quick Transfer buttons themselves, Transfer From Nearby iPhone and Transfer, match Apple’s instructions. If you transfer several numbers at once, make sure both iPhones run iOS 26 or later.

How to transfer an eSIM after setup is finished

If your new iPhone is already set up, you can move the eSIM from Settings by going to Cellular, then Add eSIM, and choosing a plan to transfer from your previous iPhone. This is the route to use if you skipped the prompt during setup or recently got a new iPhone. The same requirements apply: both iPhones running iOS 18.4 or later, Bluetooth and Wi-Fi on, and a carrier that supports Quick Transfer. To move an eSIM to a new iPhone this way:

1. Open Settings on the new iPhone and tap Cellular. In some regions, this menu is called “Mobile” or “Mobile Data”.

2. Tap Set Up Cellular or Add eSIM.

3. Choose a plan to transfer from another iPhone. If no list of numbers appears, tap Transfer From Nearby iPhone.

4. On the previous iPhone, follow the prompts and tap Transfer, or enter the verification code shown on the new iPhone if prompted.

5. Wait for the plan to activate on the new iPhone. This deactivates the SIM on the previous one.

6. If a banner reads Finish Setting Up Your Carrier’s Cellular Plan, tap it. You’ll be redirected to your carrier’s website to complete the transfer.

iPhone Cellular settings showing two eSIM plans.

When it’s done, return to Settings and Cellular to check that the plan is listed. If you have two plans on the same iPhone, both will appear there. Then call someone to confirm the line works.

Why is my eSIM transfer not working?

An eSIM transfer usually fails because your carrier doesn’t support Quick Transfer, or because one of the requirements isn’t met: Bluetooth is off, an iPhone is on an older iOS, or the phones aren’t signed in to the same Apple Account. Work through these checks in order, then fall back to your carrier’s QR code if the transfer still won’t start.

  • Carrier support: Quick Transfer only appears if your carrier supports it. Ask your carrier, or check its website, before you spend time troubleshooting.
  • Carrier lock: If the new iPhone is locked to a different carrier, it may not accept your plan. Ask your carrier to confirm the iPhone is unlocked.
  • Bluetooth off: Both iPhones need Bluetooth on and need to be close together.
  • iOS version mismatch: Both iPhones must run iOS 18.4 or later. Update the one that's behind.
  • Apple Account or lock screen: Both iPhones must be signed in with your Apple Account, and the previous iPhone must be unlocked with its passcode.
  • No Wi-Fi: Connect both iPhones to Wi-Fi, or use a hotspot, then try again.
  • Carrier step unfinished: If a banner says “Finish Setting Up Your Carrier’s Cellular Plan,” tap it to complete the transfer on your carrier’s web page.

If none of these fixes it, use the QR code route, which doesn’t depend on Quick Transfer. Ask your carrier for a QR code, then use one of these methods:

  • During setup: Tap Use QR code on the Set Up Cellular screen and follow the prompts.
  • After setup: Scan the code with the Camera app, then tap the Cellular Plan Detected notification. Your carrier may give you a confirmation code to enter.
  • Carrier link: On iOS 17.4 or later, tap the link your carrier sends, then tap Allow in the Activate New eSIM notification.
  • Manual entry: In Settings, tap Add Cellular Plan, then tap Enter Details Manually.

Some carriers also let you transfer your number in their own app. If the transfer still fails, contact your carrier: it can see what’s happening on your account.

Travel eSIMs versus carrier eSIMs when you switch phones

A carrier eSIM is linked to your phone number, so Quick Transfer or your carrier can move it to a new iPhone, whereas a travel eSIM is a data plan installed via a QR code and may not move at all. The difference matters if you’re changing phones before or during a trip. A QR code for a travel plan, which is the eSIM QR code iPhone owners scan to install it, is a profile for one device, not a number that travels with you.

Carrier eSIM Travel eSIM
What it is Your carrier plan, tied to your phone number and account A prepaid data plan from a separate provider
Phone number Keeps your number for calls and texts Usually data only, so it won't receive calls or texts to your number
Moving to a new iPhone Quick Transfer, if your carrier supports it, or a QR code from your carrier Depends on the provider, and many allow installation on one device only
Who to ask for help
Your carrier The travel eSIM provider
Before you delete it from the old iPhone Check the transfer worked and the new iPhone has service Check the provider's rules first, or you may lose the plan

‍

If you’re about to switch phones during a trip, don’t delete a travel eSIM from the old iPhone until you know whether the provider can reissue it. Some providers advise waiting to install a travel plan until you have the new phone. If you’re buying a plan for an upcoming trip, install it on the iPhone you’ll carry. The best eSIMs for international travel compares the options.

You can buy a travel eSIM on Grey in the Lifestyle tab of the Grey app and pay for it from your Grey balance. Availability depends on where you are and where you’re going. If you’re travelling to India, you can also send money from the US to India before you go. A Grey virtual card lets you pay for online purchases, such as eSIM plans, from your USD balance.

Grey is a financial technology company, not a bank: banking services are provided by licensed banking partners.

Frequently asked questions

Can I transfer an eSIM without contacting my carrier?

Yes, if your carrier supports eSIM Quick Transfer and both iPhones meet Apple’s requirements. You then move the plan from the new iPhone and approve it on the old one. If your carrier doesn’t support Quick Transfer, you’ll need a QR code or a transfer through its app.

Does transferring an eSIM delete it from my old iPhone?

It stops working there. Apple says activating the plan on the new iPhone deactivates your previous SIM, but its instructions don’t say whether the eSIM is removed from the old iPhone’s settings. Check that the new iPhone has service before you reset or sell the old one.

Can I transfer an eSIM from an iPhone to an Android phone?

Sometimes. Apple says that with iOS 26 and later, some carriers and select smartphone manufacturers support moving a SIM between Android and iPhone, in either direction. Otherwise, contact your carrier for a new eSIM.

What happens to my travel eSIM data plan when I switch phones?

It depends on the provider. A travel eSIM is activated via a QR code that many providers offer on one device only, so the plan may not transfer with the phone. Contact the provider before deleting it from the old iPhone and ask whether it can issue a new code.

Do I need Wi-Fi to transfer an eSIM?

Usually, yes. Apple lists a Wi-Fi network or hotspot among its requirements, though some eSIM-only iPhone models in certain countries can activate without one. Both iPhones also need Bluetooth on.

Can I have two eSIMs active on one iPhone?

Yes, on iPhone 13 and later, according to Apple’s Dual SIM guidance. Earlier models pair one eSIM with a physical SIM. Your iPhone uses only one cellular data network at a time.

Get a travel eSIM and a virtual card in one Grey account.

How to redeem an Amazon gift card

•

•

2 min read

A friend in the US sends you a $50 Amazon gift card by email. You want it on your account before the next sale ends, but the code looks like a random string of letters and numbers, and you're not sure where to apply it or whether it works outside the US. This guide shows how to redeem an Amazon gift card, how to fix the usual errors, and what changes if you're outside the US.

Go to amazon.com/gc/redeem, sign in, enter the claim code exactly as printed and select Apply to Your Balance. The value is added to your Amazon gift card balance and applies automatically to your next eligible order, so you don't need to enter the code again.

How do you redeem an Amazon gift card?

You redeem an Amazon gift card by entering its claim code at amazon.com/gc/redeem, or in the Amazon app under Gift Card Balance, and selecting Apply to Your Balance. A claim code is 14 or 15 characters, a mix of letters and numbers, and sits under a peel-off sticker or a scratch-off strip on the back of a physical card. Electronic cards have no code to type: you open the email, text or link and select Apply to your Amazon Account. Amazon’s own gift card redemption page is the place to start from either route.

You need an Amazon account first. If you were hoping to redeem an Amazon gift card without an account, that isn’t possible because Amazon stores redeemed funds in an account. Create one before you apply the code.

Redeem on a computer

  1. Sign in at amazon.com with the account that should receive the funds.
  2. Go to amazon.com/gc/redeem, or hover over Account & Lists, select Account, then Gift Cards and Redeem a Gift Card.
  3. Type the claim code exactly as printed.
  4. Select Apply to Your Balance.

Redeem in the Amazon app

  1. Open the Amazon app and tap the user icon in the bottom bar.
  2. Scroll to Gift Card Balance and tap Redeem Gift Card.
  3. Tap Scan Your Claim Code and point your camera at the card, or tap Enter Claim Code and type it.
  4. Tap Apply to Your Balance.

Redeem an electronic gift card

  1. Sign in to the Amazon account that should receive the funds.
  2. Open the email, text or link the card came in.
  3. Select Apply to your Amazon Account, and sign in again if Amazon asks.

If you haven’t redeemed a physical card by the time you check out, you can also select “Use a gift card, voucher, or promo code” on the payment page, enter the claim code, and select Apply.

If you give gift cards as well as receive them, you can buy, send and manage gift cards with Grey.

How to check your Amazon gift card balance

On a computer, go to Account & Lists, then Account, then Gift Cards to see your current balance; in the Amazon app, tap the user icon and look under Gift Card Balance. The balance is stored on your account, not on the card or the email, so it appears here once the code has been redeemed.

To check your Amazon gift card balance and see where it went, open the balance history. It lists the date each code was claimed, the last four digits of the code, and the items the balance paid for. That makes it the first place to look when Amazon says a code has already been redeemed, because the funds may already be sitting in your account.

Amazon applies the balance automatically to your next eligible order, so you don’t need to select it at checkout.

Why isn’t my Amazon gift card working?

An Amazon gift card most often stops working because the code is being applied to the wrong account or Amazon store, or because it has already been redeemed. Those two causes are the quickest to rule out, so check them first. Confirm which email address you’re signed in with, then open your gift card balance and balance history to see whether the code has already been claimed.

If neither explains it, find your symptom in the table below.

What you see Likely cause What to do
The code is rejected as invalid A typing mistake, or characters that look alike Re-enter the code slowly. A physical card's claim code has 14 or 15 characters, so count them. In the app, try scanning it instead
The code is rejected as already redeemed It was claimed earlier, possibly by you on another account Open Your Gift Card Balance and check the history for the last four digits. Then check any other Amazon accounts you own
The code is accepted but the balance isn't there You're signed in to a different account Sign out, sign in with the account you meant to use, and open the Gift Cards page
The card won't work on your local Amazon site A card issued for amazon.com only works on amazon.com Shop on amazon.com, or ask the sender for a card issued for your country's store
The code is a promotional certificate Promotional credits come with conditions, such as eligible items or an end date Read the terms shown with the offer before you rely on it
The sticker is scratched or the code is unreadable The card is damaged Look for the 16- or 30-digit serial number on the back and give it to Amazon customer service
You can't pay for a gift card with your balance
Gift card balance can't buy other gift cards Pay for the gift card with another payment method

‍

If you type a code by hand, copy it from the original email whenever possible, or use the camera scan in the app for a physical card. Both cut out typing mistakes. If the card still won’t work after these checks, contact Amazon customer service and have the card’s serial number ready.

One safety point: never read a claim code out to someone who contacts you first and asks for it. Anyone holding the code can spend the balance.

Can you combine multiple gift cards?

Yes. Every code you redeem is added to the same Amazon gift card balance on your account, so you don’t need to merge cards yourself. If you hold three cards, redeem each code in turn, and the balance page shows the running total, with each claim listed in your balance history.

Amazon applies that balance to your next eligible order automatically. If an order costs more than your balance, you can pay the difference with another payment method on your account.

Two limits matter once the money is in:

  • You can’t transfer it: A balance can’t be moved to another Amazon account, so a code redeemed on a family member’s account stays there.
  • You can’t take it back out: Amazon doesn’t let you cash out or resell a redeemed balance, and a gift card balance can’t be used to buy another gift card.

Because redeeming is a one-way step, hold off on redeeming a card you’re not sure you’ll spend. A card that’s still unredeemed can be sold, and this guide explains how to sell a gift card for cash instead.

Redeeming a US Amazon gift card from outside the US

A US Amazon gift card is tied to Amazon’s US store, so you apply the code on amazon.com, and the balance only pays for orders there. It doesn’t carry over to a local Amazon site such as Amazon.co.uk, and Amazon doesn’t let you move a redeemed balance from one country’s store to another. If someone sends you a US card while you’re abroad, check this before you redeem it, because the balance can’t be moved afterwards.

What the balance can buy depends on what amazon.com will deliver to where you live. Eligible items, shipping options, and import costs vary by country, so check the delivery options on a product page before relying on a card to pay for it. A gift card also can’t be turned into cash, so it’s the wrong tool if what you need is money in your bank account.

That situation comes up often in Nigeria, where a relative or client in the US sometimes sends an Amazon card because it's the simplest thing to hand over. If the goal is to get money to you, you can send money from the US to Nigeria instead, and spend it anywhere once it arrives.

If you’d rather shop on amazon.com without a gift card, you can spend online with a Grey virtual card. You create the card in the Grey app and fund it with your USD balance, and Amazon is one of the merchants where it works. Creating a card costs a one-time $5, with no monthly fee. Because amazon.com charges in dollars, the 2% plus $0.50 charge on non-USD card purchases doesn’t apply. If you start from naira, converting to dollars carries a 1% fee, capped at $6, plus the exchange-rate margin shown in the app before you confirm.

Frequently asked questions about how to redeem an Amazon gift card

Do Amazon gift cards expire?

Standard Amazon gift cards don’t carry an expiry date, but promotional credits and certificates can have an end date. Check the terms shown with the offer, and redeem any promotional code before that date.

Can you redeem an Amazon gift card without an Amazon account?

No. Amazon stores the value of a gift card as a balance on an account, so you need to sign in or create an account before you can apply the code. Once the balance is on your account, it applies to your next eligible order.

What happens if you enter the wrong claim code too many times?

Amazon can temporarily stop further attempts if a code keeps failing, and it doesn’t publish how many tries it allows. Stop after a couple of failed tries, check the code character by character, and contact Amazon customer service with the card’s serial number if you’re still blocked.

Can you use an Amazon gift card to buy another gift card?

No. A gift card balance can’t be used to buy another gift card, so you need another payment method for that purchase. Your balance still covers eligible physical and digital items.

Is it safe to buy a discounted Amazon gift card from a reseller?

It’s risky. Discounted cards sold on social media or by unknown sellers are a common route for scams, and the code may already be used or may have been obtained fraudulently. Buy from Amazon or from a retailer you trust, and check that the code works as soon as you receive it.

Can you redeem a US Amazon gift card on Amazon.co.uk?

No. A card issued for amazon.com only works on amazon.com, and Amazon doesn’t move a redeemed balance between country stores. To spend in pounds on Amazon.co.uk, you need a card issued for that store.

Open a Grey account and spend your balance online with a virtual card.

7 best peer-to-peer payment apps for sending money

•

•

2 min read

The best peer-to-peer payment apps let you send money to friends and family in seconds using a phone number, email address or username. Venmo, Zelle, Cash App and PayPal lead in the US, while Grey covers payments to people abroad. Compare fees, transfer limits, speed and whether the app works across borders.

Choosing a peer-to-peer payments app should be simple, but the right option depends on who you are paying and where they live. An app that works well for sending money to a friend in the US may not help when you need to pay someone abroad. Fees, transfer limits, and how quickly the money arrives can also vary.

Some apps are designed for local payments, while others offer ways to send money internationally. Before choosing one, consider whether you need free bank transfers, instant payments, or a way to send money across borders without paying more than necessary.

This guide compares seven peer-to-peer payment apps, including their key features, costs, and limitations, so you can choose the right option for your needs.

What is a peer-to-peer payment app?

A peer-to-peer payment app is an app that lets you send money directly to another person using a linked bank account or debit card. Instead of withdrawing cash or exchanging bank details, you can often pay someone using their phone number, email address, or username. Apps like Venmo, Cash App, and PayPal make everyday payments easier, from paying friends back to sharing household bills.

The main difference between a peer-to-peer payment app and a regular bank transfer is how you send the money. With a payment app, you can often select a contact and send funds in a few taps. A bank transfer usually requires the recipient’s bank details, such as their account number and bank name. However, both methods can move money between bank accounts, depending on the service.

Not every app supports the same payment methods or locations. Some focus on payments within the US, while others offer international transfers. Before choosing an app, check its fees, transfer limits, processing times, and whether it supports the country where your recipient lives.

The 7 best peer-to-peer payment apps

From instant transfers to international payments, these seven peer-to-peer payment apps offer different features for sending money to friends, family, and other people.

  1. Grey
  • Best For: Freelancers, remote workers, and expats needing international multi-currency accounts.
  • Fees: Free to receive domestic USD/EUR/GBP bank transfers; a 1% fee applies to auto-convert funds into local African currencies (like NGN or KES). Outgoing international wire fees vary by destination network.
  • Limits: Transaction and daily limits fluctuate dynamically based on user identity verification tier and the specific source currency channel (often starting around $2,000 to $5,000 daily).
  • Speed: Local wallet swaps are instant. International outgoing transfers generally take 1 to 3 business days depending on the receiving country's banking rail.
  1. Venmo
  • Best For: Casual, social expense splitting among friends.
  • Fees: Free for standard bank/debit transfers. A 3% fee applies if funded via credit card, and a 1.75% fee (minimum $0.25, maximum $25) applies for instant debit card cash-outs.
  • Limits: A rolling weekly limit of $4,999.99 for person-to-person payments after completing identity verification.
  • Speed: Standard bank transfers take 1 to 3 business days, while instant transfers to a linked debit card take under 30 minutes.
  1. Zelle
  • Best For: Rapid, secure bank-to-bank domestic transfers.
  • Fees: 100% Free. Neither Zelle nor its partner retail banks charge fees for standard or instant P2P movement.
  • Limits: Limits are determined directly by your participating bank, but typically hover around $500 to $2,500 daily for consumer checking accounts.
  • Speed: Instant. Funds pass directly between integrated bank accounts within minutes.
  1. Cash App
  • Best For: Combined peer transfers, high-yield savings, and micro-investing.
  • Fees: Free for standard P2P transfers. A 3% fee applies for credit card funding, and a 0.5% to 1.75% fee applies for instant cash-outs.
  • Limits: Up to $7,500 per week for sending and an unlimited receiving capacity once basic account verification is completed.
  • Speed: Standard wallet withdrawals take 1 to 3 business days, while instant debit card transfers execute in minutes.
  1. PayPal
  • Best For: High-value transactions, online shopping, and commercial buyer/seller fraud protection.
  • Fees: Free for domestic US "Friends & Family" transfers funded by a bank balance or debit card. Credit cards incur a 2.9% + fixed fee. Commercial "Goods & Services" transactions cost the seller 2.99% + $0.49.
  • Limits: Verified accounts can send up to $60,000 per transaction, with no cumulative daily or weekly caps.
  • Speed: Standard balance withdrawals take 1 to 3 business days, while instant debit card withdrawals take under 30 minutes for a 1.75% fee.
  1. Apple Cash
  • Best For: iPhone users seeking seamless integration inside iOS Messages.
  • Fees: Free for standard balance clearance. A 1.5% fee (minimum $0.25, maximum $15) applies if you opt for an instant debit card cash-out.
  • Limits: Users can send up to $10,000 per transaction and a maximum cumulative cap of $10,000 within any rolling 7-day period.
  • Speed: Standard transfers land in your bank in 1 to 3 business days. Instant transactions update your external debit card balance within minutes.
  1. Google Wallet
  • Best For: Android users wanting cross-platform flexibility for tap-to-pay and peer transfers via Google Pay.
  • Fees: Free for standard bank account deposits. Instant cash-outs to a linked debit card require a 1.5% premium fee (minimum $0.31).
  • Limits: A standard cap of $5,000 per rolling 7-day period (or up to $10,000 for verified commercial profiles).
  • Speed: Standard ACH withdrawals complete in 1 to 3 business days, while instant debit card pushes process in minutes.

P2P payment apps comparison table

Each payment app has different fees, sending limits, and international payment options. Compare the costs of instant transfers and card payments, how much you can send, and whether you can use the app to pay people in other countries.

App Instant transfer fee Card funding fee Weekly sending limit International support
Grey 1% fee plus an exchange rate margin. Varies by currency and card type $3,000 Yes; supports global accounts and multiple currencies
Venmo 1.75% (minimum $0.25, maximum $25) Free for debit; 3% for credit cards $4,999.99 for verified accounts No; US only
Zelle Free; transfers are generally fast Not applicable; uses linked bank accounts Set by bank, often 2,500–5,000 No; US only
Cash App 0.5%–1.75% Free for debit; 3% for credit cards $7,500 for verified accounts Limited; US and UK
PayPal 1.75% (maximum $25) Free for US debit-funded P2P; credit card fees apply No weekly limit stated; up to $60,000 per transaction Yes; available in many countries, with conversion fees
Apple Cash 1.5% (minimum $0.25, maximum $15) No separate fee for eligible debit funding $10,000 No; US only
Google Wallet 1.5% (minimum $0.31) Free for debit cards $5,000 over a rolling seven-day period Limited; P2P sending depends on region

‍

Are peer-to-peer payment apps safe?

Peer-to-peer (P2P) payment apps are generally safe for sending money, but they are not free from risks. Scammers may trick you into sending money to the wrong person, and recovering it can be difficult once you approve the payment. Unlike some credit card purchases, transfers may not come with automatic purchase protection. Before sending money, double-check the recipient’s details and make sure you trust them.

Common scams include fake payment notifications, phishing messages, and claims that someone sent you money by mistake. Be careful when buying items from strangers, especially if they ask you to use a payment option that offers no buyer protection. You should also check Zelle transfer limits and your app’s rules before making large payments, as limits and protections vary by provider.

Another thing to consider is deposit insurance. Money held in a payment app is not automatically FDIC-insured in every case. Coverage depends on how the funds are held and the provider’s arrangements. The Consumer Financial Protection Bureau offers guidance on payment app risks and protecting your money.

How to pay someone in another country

Zelle and Venmo are useful for sending money within the US, but they are not designed for sending payments directly to recipients in most other countries. If you need to pay family, friends, or service providers abroad, you need a service that supports international transfers.

Grey lets you send USD to 170+ countries, giving you a way to pay recipients abroad without relying on a US-only payment app. You can choose the destination, enter the recipient’s payment details, and check the exchange rate and applicable fees before confirming the transfer.

For example, if you need to support family or pay someone in Mexico, you can send money from the US to Mexico directly to their Mexican bank account in pesos. Your recipient does not need a Grey account to receive the money. Transfer times and fees depend on the destination and funding method, so check the details before sending.

Frequently asking questions

1. What is the most popular peer-to-peer payment app?

Venmo and Cash App are popular choices for everyday payments in the US, while PayPal serves users in many countries. Zelle is widely used for sending money directly through participating banks. The best option depends on where you live, who you pay, and which apps they already use.

2. Which P2P app has no fees?

Zelle generally charges no fees for sending or receiving money, although your bank may apply charges. Venmo and Cash App offer free standard transfers to linked bank accounts, but instant withdrawals and credit card payments may cost extra. Check each app’s current fee schedule before sending money.

3. Can you use Venmo or Zelle internationally?

Venmo and Zelle are primarily designed for domestic US payments and generally cannot send money directly to international bank accounts. If you need to pay someone abroad, choose a service that supports your destination country, such as Grey, Wise, or Remitly.

4. What is the safest peer-to-peer payment app?

The safest option depends on how you send money and who receives it. PayPal offers purchase protection for eligible transactions, but not every personal payment is covered. Whichever app you choose, verify the recipient, protect your login details, and avoid sending money to strangers you cannot trust.

5. How much can you send on a P2P app?

Sending limits vary by app, account verification, bank, and payment method. Zelle limits are set by participating banks, while PayPal limits depend on account status and transaction details. Check your account’s current limits before making a large payment to avoid delays or declined transfers.

6. How do you send money to family abroad?

To send money to family abroad, choose an international payment service that supports their country and preferred payout method. Grey, Wise, and Remitly offer different international transfer options. Compare exchange rates, fees, delivery times, and available payment methods before choosing how to send the money.

Whether you’re supporting family, paying a supplier, or sending money to a friend overseas, Grey helps you send money abroad in minutes, so your money gets where it needs to go.

Arrow (up)

Back to top