<script type="application/ld+json" data-schema-version="grey-blog-v4">
[{"@context":"https://schema.org","@type":"BlogPosting","@id":"https://grey.co/blog/how-to-get-an-instant-usd-debit-card-in-greece#article","headline":"How to get an instant USD debit card in Greece","description":"Learn how to get an instant USD debit card in Greece with Grey. Simplify global transactions, save on conversion fees, and manage subscriptions effortlessly.","inLanguage":"en","url":"https://grey.co/blog/how-to-get-an-instant-usd-debit-card-in-greece","mainEntityOfPage":{"@id":"https://grey.co/blog/how-to-get-an-instant-usd-debit-card-in-greece#webpage"},"datePublished":"2024-12-19T08:48:26.963Z","dateModified":"2026-06-15T17:16:00.472Z","author":{"@type":"Person","@id":"https://grey.co/authors/adeolu-titus-adekunle#person","name":"Adeolu Titus Adekunle","url":"https://grey.co/authors/adeolu-titus-adekunle","jobTitle":"Content Writer","sameAs":["https://www.linkedin.com/in/titusadeoluadekunle/"]},"publisher":{"@type":"Organization","@id":"https://grey.co/#organization","name":"Grey","url":"https://grey.co","logo":{"@type":"ImageObject","url":"https://cdn.prod.website-files.com/6360022338a81bd6fdbb1145/6564ae1077a67e39d3c491a6_Grey%20Logo%20Lockup%20Black.svg"}},"image":{"@type":"ImageObject","@id":"https://grey.co/blog/how-to-get-an-instant-usd-debit-card-in-greece#primaryimage","url":"https://cdn.prod.website-files.com/636a85d290ee58e70c17e1c0/6a3016eef225af38d5578bd0_6a3016ecbf0be51ff8a461f6_how-to-get-an-instant-usd-debit-card-in-greece__header-image.webp","contentUrl":"https://cdn.prod.website-files.com/636a85d290ee58e70c17e1c0/6a3016eef225af38d5578bd0_6a3016ecbf0be51ff8a461f6_how-to-get-an-instant-usd-debit-card-in-greece__header-image.webp","width":1200,"height":675}},{"@context":"https://schema.org","@type":"WebPage","@id":"https://grey.co/blog/how-to-get-an-instant-usd-debit-card-in-greece#webpage","url":"https://grey.co/blog/how-to-get-an-instant-usd-debit-card-in-greece","name":"How to get an instant USD debit card in Greece","description":"Learn how to get an instant USD debit card in Greece with Grey. Simplify global transactions, save on conversion fees, and manage subscriptions effortlessly.","inLanguage":"en","primaryImageOfPage":{"@id":"https://grey.co/blog/how-to-get-an-instant-usd-debit-card-in-greece#primaryimage"},"breadcrumb":{"@id":"https://grey.co/blog/how-to-get-an-instant-usd-debit-card-in-greece#breadcrumb"}},{"@context":"https://schema.org","@type":"BreadcrumbList","@id":"https://grey.co/blog/how-to-get-an-instant-usd-debit-card-in-greece#breadcrumb","itemListElement":[{"@type":"ListItem","position":1,"name":"Home","item":"https://grey.co/"},{"@type":"ListItem","position":2,"name":"Blog","item":"https://grey.co/blog"},{"@type":"ListItem","position":3,"name":"How to get an instant USD debit card in Greece","item":"https://grey.co/blog/how-to-get-an-instant-usd-debit-card-in-greece"}]}]
</script>
Business
•
December 19, 2024
•
8 min read
How to get an instant USD debit card in Greece
Adeolu Titus Adekunle
TABLE OF CONTENT
SHARE THIS POST
Greece is a popular tourist destination for those looking to explore its stunning islands and history. However, Greece is also home to a growing number of freelancers, digital nomads, and online shoppers. So, whether you are here to relax on the shores of Santorini or working remotely from a café in Athens, managing international payments in USD can be a hassle without the right tools.
A USD debit card is a game-changer for anyone in Greece who shops internationally, manages subscriptions, or travels abroad frequently. But getting one through traditional methods often means long waits, hidden and outrageous fees, or difficulties funding the card with euros.
Fortunately, Grey offers an instant, reliable solution to this. In this guide, we'll explain why you need an instant virtual USD debit card and how to get started with Grey.
Why a USD debit card is essential in Greece
Seamless online shopping: A USD debit card ensures smooth transactions on international websites, eliminating currency conversion issues.
Save on conversion fees: Pay directly in USD and avoid the high costs of converting from Euros to USD, helping you keep more of your money.
Simplified travel payments: Greece’s central location makes it a gateway for travellers exploring Europe, Asia, and beyond. A USD debit card is ideal for booking flights, accommodation, and transport without worrying about fluctuating exchange rates.
Easy subscription payments: Manage your subscriptions to services like Netflix, Adobe, or Spotify seamlessly, as many platforms charge in USD.
Ideal for freelancers: Greece’s growing community of remote workers and freelancers often deal with international clients. A USD debit card makes receiving and spending in USD convenient.
Grey offers an efficient way to access these benefits with its instant USD debit card. Here’s how to get one in just a few steps.
How to get a Grey USD debit card in Greece
Step 1: Create a Grey account and complete KYC
Start by signing up for a Grey account on their website or downloading the mobile app.
Once registered, you’ll need to verify your identity through Grey’s KYC (Know Your Customer) process. Upload a government-issued ID, such as your Greek ID card or passport, to gain full access to your account.
Step 2: Set up and fund your foreign currency account
Once your KYC is approved, you can request a foreign currency account in USD, GBP, or EUR. This account allows you to receive payments from international clients or fund your card for global transactions. To fund your account, transfer money from your local bank account or receive payments directly into your Grey foreign account.
Step 3: Request your USD debit card
With your account funded, you’re ready to create your virtual USD debit card. Go to the “Card” section in your Grey account, follow the on-screen prompts, and pay the one-time card creation fee of $4.
An additional $1 will be deducted to fund your the card. Once completed, your virtual USD debit card will be ready for use instantly.
Why choose Grey for your USD debit card in Greece?
Instant card issuance: No lengthy waiting times—your USD debit card is ready within minutes.
Flexibility and wide use: Use your Grey USD card on any platform that accepts MasterCard, including online stores, travel agencies, and subscription services.
Transparent pricing: Grey offers low, predictable fees with no hidden charges.
Secure transactions: Your financial data and payments are safeguarded by top-notch security measures.
Convenient funding options: Seamlessly fund your USD card directly from your Grey account.
Conclusion
A USD debit card is a valuable tool for anyone in Greece looking to simplify international transactions. Whether you’re a freelancer receiving payments, a traveller booking your next adventure, or an online shopper, Grey makes the process quick and easy.
Earning in euros or dollars while living in India is a common goal for many remote workers, digital nomads, and expats. This often translates to higher earning potential, especially when converted to rupees. Unfortunately, high fees, payment delays, complex paperwork and forced currency conversions often make getting paid from Europe and the US while living in India very challenging.
However, there are various ways to manage international payments seamlessly while working in India. Here is how professionals in India efficiently receive payments from Europe and the US, and keep more of their earnings.
Why getting paid from Europe and the US can be tricky
Most traditional Indian banks are designed for just domestic transactions rather than foreign payments. When payments arrive via international wire, they may pass through multiple intermediary banks and incur extra charges. On top of that, you are forced to convert from EUR or USD to INR immediately the money lands in your accounts, and the rates are often not that great.
Due to processing and the transaction network, it may take a few days for the payment to reach your account. Lack of control over fees, transaction speed, and conversion can be frustrating for many professionals. The uncertainties make financial planning somewhat difficult.
How to get paid from Europe and the US while living in India
Here are the popular options for managing international payments from Europe and the US while living in India
Bank transfers and SWIFT payments
Many European and US companies opt for international bank transfers via SWIFT because it is reliable. This method is widely trusted and works well for both large payments and regular salaries. However, it has drawbacks. Transfers may take several business days, and fees are deducted before the money even gets to your account. You may also need to provide additional documentation to access your earnings, which can be cumbersome.
While SWIFT transfers are acceptable for occasional payments, they are rarely the most cost-effective option for frequent international income.
Using digital payment platforms
Platforms such as PayPal, Payoneer and Skrill are popular because they are easy for foreign clients to use. Payments arrive quickly, and you can withdraw funds to your Indian bank account.
However, convenience comes at a cost. You need to be mindful of platform fees, withdrawal charges, and currency conversion mark-ups that can significantly reduce your earnings. Some users also experience account limitations or compliance reviews that temporarily restrict access to funds. This is why it is best to compare options before choosing a digital payment solution.
Payoneer: Ideal if you work through international freelance marketplaces like Upwork or Fiverr. It provides multi-currency accounts and integrates seamlessly with these platforms, making withdrawals straightforward.
Razorpay: An India-based payment gateway that allows businesses and some freelancers to accept international card payments in over 130 currencies directly into their Indian bank account.
PayPal: Widely used and trusted by global clients. However, while PayPal supports swift transfers, it comes at a higher cost.
For many Indians earning from Europe and the US, multi-currency accounts have become the most efficient payment solution. These payment platforms help you open accounts in various currencies such as USD, EUR, and GBP. This way, clients can pay you as if they were making a local transfer within their country.
LDMAG1
You also don’t have to convert your earnings to INR immediately, as a multi-currency account allows you to hold foreign currency and convert when exchange rates are favourable. You can also spend foreign currencies directly to pay for your subscriptions, trips, and online purchases. This level of control protects your income because fees are typically low, transactions are swift, and there are no hidden fees.
Grey: Tailored to remote workers in India with international clients. Users can access USD, EUR, and GBP account details for international payments within minutes. Transaction fees are generally low with mid-market exchange rates, and transactions are nearly instant. You can also get a USD debit card for your online payments and automated invoicing to streamline your finances. Grey also integrates seamlessly with global freelancing platforms (like Fiverr and Upwork) and online marketplaces (like Etsy and Amazon), allowing you to access your earnings without delay.
Wise: Offers local account details (USD, EUR, GBP) so clients can pay you via a local transfer, avoiding SWIFT fees. Funds are converted at the mid-market exchange rate with low, transparent fees, ensuring you keep more of your earnings.
Winvesta: A fintech company providing cross-border payments and multi-currency accounts for Indians. Users can manage payments in USD, EUR, GBP and other foreign currencies.
Getting paid from Europe and the US while living in India does not have to be stressful. With the right tools, you can maximise your earnings and streamline your finances. Grey provides multi-currency accounts supporting USD, EUR, and GBP. This allows professionals in India to receive payments from Europe and the US easily. You can hold foreign currency, convert at competitive rates, and withdraw to your Indian bank account when it suits you.
Egyptians are increasingly expanding beyond local employment as remote work and digital income opportunities reshape how people earn. Across the country, more professionals, students, and creatives are targeting foreign currency earnings as a way to improve financial stability. With global connectivity improving, it is now common for Egyptians to earn in USD, EUR, or GBP without ever leaving the country. These incomes come from clients in the Gulf, Europe, the United States, and beyond, powered by freelance platforms, remote job boards, and digital marketplaces.
Below are the most practical and widely used ways Egyptians are earning foreign currency online today, along with what it takes to succeed in each path.
Content creation has become one of the most visible ways Egyptians earn foreign income. Platforms like YouTube, TikTok and Instagram allow creators to monetise attention through ads, brand partnerships, affiliate marketing, and subscriptions. Egyptian creators span comedy, lifestyle, tech, gaming, and education, proving there is no single path to success. The key is consistency and audience targeting rather than location.
Creators earn mainly in USD through platform monetisation systems and sponsorship deals with international brands. While competition is high, creators who focus on niche topics or global audiences often scale faster. Monetisation also extends beyond ads into memberships, Patreon-style support, and paid collaborations, giving creators multiple income streams rather than relying on a single platform.
Freelancing for international clients
Freelancing remains the most direct and scalable way to earn foreign currency online. Egyptians offer services in software development, graphic design, copywriting, digital marketing, SEO, video editing, data analysis, and customer support. Platforms such as Upwork, Fiverr, and Freelancer connect them to clients worldwide, while LinkedIn and cold outreach help secure higher-paying direct contracts.
Success in freelancing depends on positioning and specialisation. Generalists often struggle, while specialists in high-demand skills like AI development, UI/UX design, and performance marketing command higher rates. Payments are typically received in USD or EUR, giving freelancers access to stronger earning power compared to local currency jobs.
Remote employment has become one of the most stable ways Egyptians earn foreign income. Instead of project-based work, professionals secure full-time or long-term contracts with foreign companies in tech, finance, customer support, operations, and marketing. These roles provide predictable monthly salaries paid in foreign currency.
Unlike freelancing, remote jobs offer structure, benefits, and long-term stability. Many companies hiring remotely look for English proficiency, technical skills, and time zone flexibility. With the rise of distributed teams, Egyptians can now work for companies in Europe, the US, or the Gulf without relocating.
Online businesses and digital products
Another growing path is building online businesses that sell globally. Egyptians are creating e-commerce stores, SaaS platforms, digital templates, courses, ebooks, and subscription communities. Platforms like Shopify, Amazon, Etsy, and Gumroad make it easier to reach international buyers and collect payments in USD.
Digital products are especially attractive because they scale without physical inventory. A single course, template, or software tool can generate recurring income over time. Many creators also combine content creation with product sales, turning audiences into customers through email lists and social media funnels.
Tutoring, coaching, and consulting
Online tutoring/coaching is another strong income stream. Egyptians teach languages, academic subjects, fitness, business skills, and professional certifications to global students. Platforms like Preply, Italki, and Zoom-based private sessions allow educators to charge hourly rates in foreign currency.
Consulting is the higher-income version of this path. Professionals with experience in marketing, finance, HR, or tech offer advisory services to international startups and small businesses. These services often pay significantly more per hour than traditional jobs in Egypt.
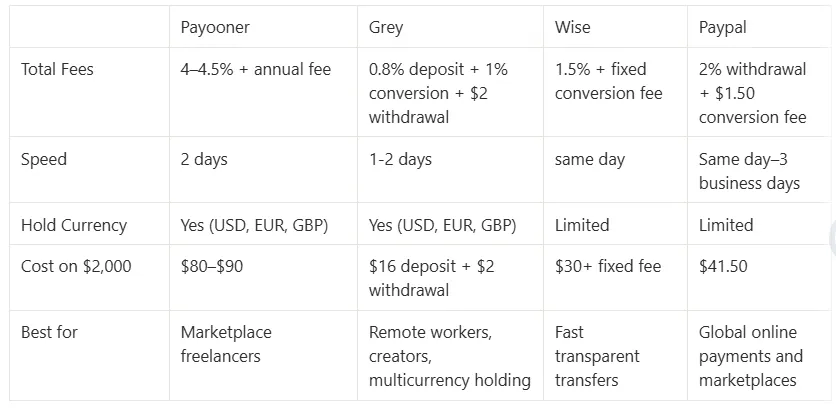
Payoneer remains one of the most widely used payment platforms among Egyptian freelancers and remote workers. It provides users with virtual receiving accounts in USD, EUR, and GBP, making it easier to receive payments from international clients, freelance marketplaces, and global companies. Funds can then be withdrawn directly into Egyptian bank accounts. Payoneer typically applies combined conversion and withdrawal charges of about 4–4.5%, which can significantly affect larger payouts over time. The platform also charges an annual maintenance fee of $29.95, although this fee is waived for users processing at least $100 in yearly transactions. Its global acceptance remains one of its strongest advantages for freelancers earning internationally.
Grey
Grey is becoming increasingly popular among Egyptians receiving payments from abroad because of its multicurrency flexibility and cleaner fee structure. Users can receive, hold, and manage USD, EUR, or GBP balances within one account before sending to their local accounts when they prefer. This gives users greater control over exchange timing instead of relying on automatic bank conversions. Grey charges a 0.8% deposit fee depending on funding method, while currency conversion costs 1%, capped at $6. Compared to traditional banking routes, this structure makes costs more predictable for freelancers, creators, remote workers, and online business owners receiving regular international payments from clients and global platforms.
Wise
Wise is widely recognised for transparent pricing and exchange rates that closely match the real mid-market rate. Egyptians can receive payments in foreign currencies such as USD and transfer funds directly into local bank accounts with fewer hidden markups than many traditional providers. Wise generally charges around 1.5% plus a small fixed conversion fee depending on the currency route and payout method selected. One of its strongest advantages is clarity, allowing users to see the exact conversion rate and total charges before confirming transactions. This makes Wise particularly attractive to freelancers, consultants, and remote professionals who prioritise predictable international payment costs and fast transfer processing.
PayPal
PayPal remains one of the most globally recognised online payment platforms and is commonly used by freelancers, online sellers, and creators receiving international payments. However, withdrawing funds into Egyptian bank accounts can become expensive due to combined withdrawal and conversion costs. PayPal charges approximately 2% for withdrawals, while USD account conversion fees can add another $1.50, and exchange rate markups can reduce the final amount received. Despite these costs, many people still use PayPal because of its global acceptance and compatibility with international websites, marketplaces, and digital services. It is especially common among beginners entering freelance or online business work for the first time.
How the platforms compare
The cheapest platform is not always the one with the lowest visible fee. Focus on how much finally reaches your Egyptian account after conversion, withdrawal, and hidden FX costs. If you receive payments regularly, even small percentage differences across platforms can save or cost you hundreds of dollars yearly.
How to avoid losing money when receiving payment online in Egypt
Look at what you actually receive
Do not focus on “zero fee” claims when receiving money online in Egypt. Many platforms hide costs inside exchange rates. A service may charge no visible fee but apply a 2%–3% conversion margin, reducing your final USD value more than a small fixed charge. Always compare the actual amount credited to your account from the same payment.
Watch the conversion rate before cashing out
Money received online is often held in USD before conversion into Egyptian pounds. Rates change daily, and timing affects your payout. On a $1,000 payment, even a 1% difference equals $10 lost or gained. If your platform allows holding balances, compare rates before converting instead of accepting automatic conversion.
Use timing to your advantage when converting funds
If your platform allows you to hold funds in USD or other currencies, avoid immediate conversion. Waiting for better rates before withdrawing into Egyptian pounds can improve your final payout. For regular online earners, this simple timing habit reduces long-term losses without needing to predict currency movements.
Frequently asked questions
What is the cheapest way to receive money online in Egypt?
The cheapest option depends on volume and frequency. For larger incoming payments (around $1,000+), platforms that offer low conversion fees and capped charges like Grey can reduce total cost because the effective percentage drops. For smaller or frequent receipts, instant platforms like Wise or PayPal alternatives may feel easier, but exchange rate margins often determine the real cost. Always compare the final USD or EGP amount credited, not just the fee.
How long does it take for international payments to reach Egypt?
Speed depends on the provider and payout method. Fintech platforms like Wise typically settle within minutes to 1 business day. Grey processes payments within 1–2 business days, depending on the route used. Traditional SWIFT bank transfers can take 2–5 business days due to intermediary banks and compliance checks. Cash-based services like Western Union can be instant, but are less common for online earnings.
Can I receive money in USD and convert it later in Egypt?
Yes, but only with certain platforms. Many services convert funds immediately into Egyptian pounds upon receipt, limiting control over timing. Platforms like Grey allow you to hold USD, EUR, or GBP balances before converting. This gives you the flexibility to choose better exchange rates instead of accepting automatic conversion at a weaker rate, improving your final payout.
What documents do I need to receive international payments in Egypt?
For most online payment platforms, basic KYC is required, such as a national ID and proof of address. For higher-value or frequent transactions, providers may request additional information like the source of funds, invoices, or the purpose of payment. This ensures compliance with international AML rules and Egyptian banking regulations governing foreign currency inflows.
Why do two people receiving the same amount get different payouts in Egypt?
Because payment routes differ. One transaction may pass through SWIFT banks with FX spreads and intermediary deductions, while another uses fintech platforms with tighter rates. Timing also matters, exchange rates fluctuate daily. Even when the original amount is identical, the final EGP or USD received can vary based on fees, conversion points, and processing channels.
Earning foreign currency is only half the equation. You need to find a way to manage your international earnings without incurring high transfer fees or forced conversions when receiving payments through traditional banks or some digital wallets. Grey is a leading payment platform that helps Egyptians earn globally by offering foreign currency accounts, competitive exchange rates, and easy local withdrawals. You can also get a virtual USD debit card to manage your online payments without stress.
Grey charges fees on deposits, conversions, and withdrawals. Deposits via ACH, SEPA, or FPS incur a 0.8% fee (minimum $2/€2/£2, maximum $10/€10/£10). Currency conversions are charged at 1%, capped at $6. Withdrawal fees vary by currency: ₦35 for NGN, 0.5% for EUR/GBP (minimum €2/£2, maximum €10/£10), and $2 for Egypt. Cross-border card transactions (non-USD purchases on a USD card) incur a 2% fee plus $0.50. Exchange rates are variable and include a margin over the mid-market rate. Always review fees and the rate before confirming a transaction. Visit grey.co/pricing for current rates.
Selling digital products to customers abroad is one of the most reliable ways to earn passively in foreign currency. Once you have built your digital product, it can be sold repeatedly without the worry of inventory, shipping, or location barriers. For freelancers, creators, and entrepreneurs, selling internationally opens the door to stable, passive long-term income, especially when you do it right.
Why you should consider selling digital products to customers abroad
You can increase your earning potential by creating digital products and selling to international clients. Here are some reasons you should consider selling digital products to customers abroad.
Wider reach: You gain access to millions of potential customers outside your home country, which significantly increases your sales potential.
Income diversification: Selling digital products to customers abroad reduces your reliance on a single income stream or market. This provides a more stable income amid local economic challenges.
Increased brand awareness: Having a global presence enhances your visibility and strengthens your international reputation.
Round-the-clock sales: Your digital products are always available. This allows you to make sales across different time zones and make money without interruption, even in your sleep.
Lower costs: Selling digital products bypasses physical shipping and logistics costs associated with physical goods.
Faster growth: If you can tap into the global market, you can boost your business growth faster than if you remain local.
Digital products you can sell to international customers
Here are some of the best-performing digital products you can package and sell to international customers.
Software and tools: Mobile apps, WordPress themes/plugins, AI tools, SaaS (Software as a Service).
Entertainment: Games, podcasts, digital magazines.
How to sell digital products to customers abroad
Before you begin selling digital products internationally, here are some steps to take.
Choose a product with global relevance
The most successful digital products are built around problems that exist everywhere. Templates, courses, ebooks, design assets, software tools, Notion dashboards, and educational resources work well because they are not tied to local markets. Before building a digital product, confirm that the product is in demand. Look at what people are already paying for, read reviews, and identify gaps you can improve on. Global customers care less about where you are based and more about whether your product delivers value.
Price for an international audience
Pricing is critical when selling abroad. Most digital products are priced in USD because it is familiar and trusted globally. Pricing in a stable currency also protects your earnings from local currency fluctuations. Keep your pricing simple and transparent. Consider offering tiered pricing or bundles to accommodate different budgets without compromising on value.
Pick the right platform
Choosing platforms that handle hosting, delivery, and checkout simplifies your sales process. However, platform fees can eat into your earnings, and there might be limited payout methods. Some sellers eventually move to their own websites for better control over branding, pricing, and customer service. This can be more overwhelming for beginners. However, whichever option you choose, make sure it supports international payments and ensures smooth service delivery.
Etsy: The go-to for creative products like planners, templates, and printables. While it has a massive audience, it charges listing fees ($0.20/item) and transaction fees (6.5%).
Shopify: This is a top-tier choice for selling digital products, offering high profit margins (often around 90%) and extensive automation. While it was originally built for physical goods, it has become a leader for digital-only storefronts due to its stability and vast Shopify App Store ecosystem.
Amazon KDP: The global leader for self-published ebooks and audiobooks, providing access to millions of Prime customers.
Gumroad: Extremely easy to set up for independent creators. It supports "pay-what-you-want" pricing and has a flat 10% transaction fee model. The platform features basic email marketing (Workflows), license key generation for software, and recurring payments for subscriptions.
Thinkific and Teachable: These are dedicated platforms for online courses with quizzes, student communities, and certifications.
Lemon Squeezy: Popular with software developers and SaaS founders because it acts as a "Merchant of Record," handling global taxes and VAT compliance automatically.
Getting paid is as important as making the sale. International customers expect to pay by card or via local bank transfers in familiar currencies. Using a setup that allows you to receive and hold foreign currency helps you avoid unnecessary conversion losses. Instead of converting everything immediately to your local currency, you can manage your income more efficiently.
Multi-currency accounts make this easier by providing you with foreign bank details to manage payments in USD, EUR, and GBP at competitive exchange rates when withdrawing to your local bank account.
LDMAG1
Understand taxes and compliance
Digital product sales can involve tax considerations, especially when selling internationally. Some countries require VAT or digital services tax, depending on where your customers are located. While platforms may handle some of this automatically, it is important to understand your local tax obligations and keep proper records of sales and income. Consulting a tax professional early can save time and prevent issues later.
Market to a global audience
Selling abroad requires visibility. Content marketing, email lists, social media, SEO, and partnerships are effective ways to reach international audiences. Your message should clearly explain who the product is for and what problem it solves. Customer support also matters. Promptly responding to enquiries and clear documentation improve your reviews and increase repeat purchases.
Selling digital products internationally with Grey
Selling digital products to customers abroad requires having the right product, platform, pricing, payment setup, and marketing strategy. If you are worried about how to manage your international payments, Grey’s got your back. With USD, EUR, and GBP accounts from Grey, you can easily withdraw your earnings without any other third-party apps taking a cut. You can maximise your earnings by leveraging the platform’s low transaction fees and competitive exchange rate when withdrawing to your local bank. Here’s how to link Grey to your store.
Finding US and European clients is a familiar struggle for many remote workers and businesses, but getting paid efficiently is a whole different ball game. Importantly, how you manage your international payments determines how much of your income you actually keep. High fees, payment delays, and forced currency conversions can be frustrating and reduce your earnings if you don’t plan how to receive your payment efficiently. Here are your top options for receiving payments from US and European clients.
One reason many US and European clients might be hesitant to work with Moroccans is payment challenges. It would be easier to pay via local bank transfers such as ACH (US) or SEPA (Europe). Unfortunately, Moroccan bank accounts don’t support these systems directly. Payments are usually routed through international wire transfers. And while this option can be reliable, international wire transfers are slow and expensive. Sometimes, intermediary banks also add their own charges. As soon as the money reaches your account, it is converted to MAD at an unfair exchange rate.
How to get paid by US and European clients while living in Morocco
Here are some of the most popular options for receiving international payments in Morocco, with their benefits and shortcomings.
Traditional bank transfers
Despite high fees, slow payment processing, and forced conversion at unfavourable exchange rates, SWIFT transfers to Moroccan banks remain very popular, especially for larger payments and regular salaries. It seems to be a ‘more official’ payment option for international clients.
LDMAG1
Digital payment platforms
The arrival of digital payment platforms like Payoneer and PayPal tilted the odds in favour of Moroccans working with US and European clients. These services simplify international transactions and are faster than bank transfers.
Unfortunately, they also have drawbacks. Between high platform fees, withdrawal charges, and markups on exchange rates, many users end up losing a huge fraction of their income. Digital platforms are also prone to restrictions and account suspensions.
Multi-currency accounts are now becoming the mainstay of cross-border payments in Morocco. Various fintech platforms let you have bank details in USD, EUR or GBP, allowing clients to pay you as if you were based in the US or Europe. You can receive payments via ACH or SEPA, keep the money in foreign currency, and convert to dirhams whenever you wish. This option significantly reduces transaction fees, speeds up international payments, and gives you control over your earnings.
If you are looking for the most efficient way to manage your international earnings, you should consider Grey. The payment solution is designed to help Moroccans swiftly receive payments in USD, GBP, and EUR at low costs. You can keep your income in foreign currency and withdraw to your local MAD bank at competitive exchange rates. Users can also access a virtual USD debit card for seamless online payments and automate their invoicing in various currencies.
For too long, managing payments, compliance, and expenses has been complicated for global teams and businesses. Paying contractors abroad , handling multiple currencies, or even just tracking team expenses can quickly become overwhelming.
We set out to change this at Grey.
We’re excited to introduce Grey Business: an expanded suite of tools built to help you manage your company’s global finances with more control, clarity, and confidence.
Starting today, if your team in Indonesia needs to collect payments from clients in London, or your start-up in Nairobi needs to pay partners in New York, you can do it all seamlessly from your Grey Business dashboard.
Managing everything from multi-currency accounts and expenses to wage payouts and APIs is now simpler with Grey. All the tools you need to power your global operations in one simple, easy-to-use dashboard.
Here's a closer look at what Grey Business can help you achieve:
Foreign accounts for your business
With Grey Business, you can open and manage foreign bank accounts in USD, just like a local company would.
Each account comes with a unique IBAN, routing number, and SWIFT code, making it easier and faster to send and receive payments internationally.
No hidden charges. No long waiting times. No complicated paperwork.
All of this is built on a foundation of security and compliance. Every business account goes through KYC/KYB checks, with fraud prevention and transaction monitoring built in to keep your funds safe.
Empower your team with smart virtual cards
Stop playing "pass the credit card" or waiting for OTPs just to pay for a software subscription. With Grey Business, you can issue unlimited virtual USD cards instantly. Whether you need to cover digital ad spend, manage SaaS subscriptions, or equip your team for operational expenses, you can create dedicated cards in seconds.
But such speed doesn’t mean you lose control. You can set custom spending limits for each card, assign them to specific team members, and freeze or delete them instantly if a project ends.
Individual and bulk payouts made easy
As your business scales, your administrative load shouldn't have to keep pace. We built our payout engine to handle volume without the friction.
One-off payments: send money to partners or vendors instantly with just a few clicks.
Bulk payouts: Use our "Bulk upload" feature to ingest a simple CSV file and process mass payments simultaneously.
Whether you’re paying one vendor or a hundred, Grey Business gives you the flexibility you need.
Individual payouts: Send one-off payments to partners or contractors in over 100 countries. Get real-time foreign exchange rates before confirming and choose between bank transfers or mobile money.
Bulk payouts: Need to send multiple payments at once? Upload a CSV file, review everything in one dashboard, and let Grey handle the rest. You can even track payment statuses and retry failed ones instantly.
Whether it’s fiat or crypto, individual or bulk, local or global, Grey brings you speed, visibility, and reliability in one place.
Native USDC Support for the modern business
We know that for many modern companies, Fiat is only half the story. With Grey Business, you can hold a dedicated USDC balance alongside your fiat currencies, giving you total control over how you store your capital.
Need to move funds fast? You can deposit or withdraw USDC via the BEP20 network and send funds to any compatible wallet in seconds. It is the stability of the dollar with the speed of the blockchain, fully integrated into your dashboard.
APIs that grow with your business
If your company handles high-volume or automated payments, our developer APIs give you more control than ever.
You can now initiate payouts automatically through the Grey API — perfect for platforms, marketplaces, and payment-driven businesses that need to pay users regularly .
By integrating Grey directly into your systems, you can trigger local and international transfers with just a few lines of code.
We’ve also built P2P GreyTag APIs that let you verify user identities and send peer-to-peer payments directly from your platform.
This means you can embed Grey’s payment capabilities right into your product, with the same reliability and compliance we’re known for.
A unified dashboard for your finances
No need to toggle between different banking apps and spreadsheets to piece together your financial health. We built the Grey Business dashboard to give you a single, holistic view of your operations.
From one screen, you can track inflows, manage your USD balance, and monitor the real-time status of every payout. And when tax season arrives, you can easily generate detailed statements instantly, giving your accounting team exactly what they need without the headache.
Why Grey Business matters
Grey Business started as a way to help businesses make seamless cross-border payments.
But as our users grew, so did their needs. They didn’t just need to send payments; they needed to manage everything that comes with it: teams, approvals, accounts, reporting, and compliance.
Grey is no longer just a payments platform; we’re becoming the financial command centre for modern global businesses.
Whether you’re a start-up expanding into new markets, a remote team paying global talent, or a platform handling thousands of transactions, Grey Business is built to help you operate confidently across borders.
Start your global journey with Grey Business
The future of global business banking is here: faster, simpler, and built for the way modern teams work.
Open your Grey Business account today and experience:
Everyone talks about ‘being your own boss’ without giving you enough heads up on how challenging that can be. The truth is, even if you are told how difficult it is to be a solo founder, you are still likely going to underestimate how challenging it really is. It is unlikely we can help you with client chasing, marketing, or recruitment. One thing we can show you, however, is how to better manage your foreign income. Foreign income is often the first real sign of traction as a startup. But without the right setup, cross-border payments can cause problems due to high fees, forced currency conversion, delayed access to funds, and messy records.
This guide explains how solo founders receive foreign income, the setups that work best, and what to consider when choosing a system that scales with your business.
Unlike larger companies, solo founders usually don’t start with dedicated finance teams, complex legal structures, and multiple business bank accounts. That makes them more vulnerable to inefficiencies in cross-border payments. Heads up, the common problems you might encounter while managing foreign income as a solo founder include
Clients pay in USD, EUR, or GBP, while your expenses are local
Forced conversion at unfavourable rates
Delays caused by SWIFT transfers
Mixing personal and business income
Poor documentation for taxes, audits, or future fundraising
Common ways solo founders receive foreign income
If you are just starting off, it is better to begin with simple setups and refine them as revenue grows. Opt for the options that offer simplicity while maximising your income and reducing losses. Here are some options and how they compare:
Direct client payments via international bank transfer
Some founders invoice clients and receive payments directly into local bank accounts.
Pros
Simple to explain to clients
Works for one-off or low-volume payments
Cons
High fees and intermediary charges
Slow settlement times
Mandatory currency conversion at poor exchange rates
This method works early on but rarely scales well. Over time, your losses will pile up, and that might not be good in the long term.
Freelance and creator platforms
Some solo founders who sell services or digital products often earn through platforms like freelancing sites, digital marketplaces, and subscription or creator platforms.
Pros
Built-in payment collection
The platform handles invoicing and customer payments
Cons
Platform fees
Limited control over payout timing
Restricted payout options in some countries
Founders using these platforms often look for ways to receive payouts more efficiently, such as linking to a digital payment platform that supports foreign currencies.
For many solo founders, the most practical setup is separating foreign income collection from local spending using a global digital banking platform. These platforms allow founders to:
Receive USD, EUR, or GBP like a local business based in other countries
Hold foreign currency without immediate conversion
Convert only when rates are favourable
Withdraw to local bank accounts
Keep clean transaction records
This setup offers flexibility without requiring a complex company structure. You can also easily track your income for tax purposes. Some of the top recommendations for solo founders include:
Mercury: Widely recommended for tech founders with a US entity. It offers 4–5% yield on idle cash and seamless integration with Shopify, Stripe, and Amazon.
Wise Business: Ideal for founders who don't want a US entity. It provides local bank details in multiple currencies. Its Direct Debit feature is essential for paying global SaaS subscriptions without credit card limits.
Elevate Pay: This is a favourite for founders in emerging markets (Egypt, Nigeria) to get an FDIC-insured US bank account without a US LLC, protecting company capital from local currency crashes.
Managing foreign income as a solo founder with Grey
Transparent exchange rates and low conversion fees
Clear separation between foreign income and personal spending
Simple setup without forming a foreign company
Receiving foreign income as a solo founder doesn’t require complex structures. You can go a long way with clarity, control, and flexibility. By using the right tools, separating foreign earnings from local spending, and strategically converting currency, solo founders can protect their margins and simplify their operations.
When you’re building alone, your financial setup should work as hard as you do. Grey is built for this exact stage to help founders receive, manage, and grow international income without unnecessary headaches.
Get started with Grey and join other solo founders managing foreign income with ease.





.svg)


