<script type="application/ld+json" data-schema-version="grey-blog-v4"> [{"@context":"https://schema.org","@type":"BlogPosting","@id":"https://grey.co/blog/facebook-ads-in-nigeria#article","headline":"How to run Facebook Ads in Nigeria (2026): Step-by-step guide","description":"See how to run Facebook Ads in Nigeria in 2026, from setting up your first campaign to choosing audiences, budgets, creatives and tracking results.","inLanguage":"en","url":"https://grey.co/blog/facebook-ads-in-nigeria","mainEntityOfPage":{"@id":"https://grey.co/blog/facebook-ads-in-nigeria#webpage"},"datePublished":"2026-08-29T23:02:40.669Z","dateModified":"2026-08-30T09:00:00+01:00","author":{"@type":"Organization","@id":"https://grey.co/authors/grey-team#person","name":"The Grey Team","url":"https://grey.co/authors/grey-team"},"publisher":{"@type":"Organization","@id":"https://grey.co/#organization","name":"Grey","url":"https://grey.co","logo":{"@type":"ImageObject","url":"https://cdn.prod.website-files.com/6360022338a81bd6fdbb1145/6564ae1077a67e39d3c491a6_Grey%20Logo%20Lockup%20Black.svg"}},"image":{"@type":"ImageObject","@id":"https://grey.co/blog/facebook-ads-in-nigeria#primaryimage","url":"https://cdn.prod.website-files.com/636a85d290ee58e70c17e1c0/6a936463853d7f9bc252e61c_How%20to%20Run%20Facebook%20Ads%20in%20Nigeria%20(2026)%20Step-by-Step%20Guide-compressed.jpg","contentUrl":"https://cdn.prod.website-files.com/636a85d290ee58e70c17e1c0/6a936463853d7f9bc252e61c_How%20to%20Run%20Facebook%20Ads%20in%20Nigeria%20(2026)%20Step-by-Step%20Guide-compressed.jpg","width":1200,"height":675}},{"@context":"https://schema.org","@type":"WebPage","@id":"https://grey.co/blog/facebook-ads-in-nigeria#webpage","url":"https://grey.co/blog/facebook-ads-in-nigeria","name":"How to Run Facebook Ads in Nigeria (2026): Step-by-Step Guide","description":"See how to run Facebook Ads in Nigeria in 2026, from setting up your first campaign to choosing audiences, budgets, creatives and tracking results.","inLanguage":"en","primaryImageOfPage":{"@id":"https://grey.co/blog/facebook-ads-in-nigeria#primaryimage"},"breadcrumb":{"@id":"https://grey.co/blog/facebook-ads-in-nigeria#breadcrumb"}},{"@context":"https://schema.org","@type":"BreadcrumbList","@id":"https://grey.co/blog/facebook-ads-in-nigeria#breadcrumb","itemListElement":[{"@type":"ListItem","position":1,"name":"Home","item":"https://grey.co/"},{"@type":"ListItem","position":2,"name":"Blog","item":"https://grey.co/blog"},{"@type":"ListItem","position":3,"name":"How to run Facebook Ads in Nigeria (2026): Step-by-step guide","item":"https://grey.co/blog/facebook-ads-in-nigeria"}]},{"@context":"https://schema.org","@type":"FAQPage","@id":"https://grey.co/blog/facebook-ads-in-nigeria#faq","mainEntity":[{"@type":"Question","name":"How much money do I need to start Facebook Ads in Nigeria?","acceptedAnswer":{"@type":"Answer","text":"Meta's minimum is approximately N2,000-N2,500 per day. Realistic testing starts at N5,000-N10,000 per day (N150,000-N300,000 per month). Conversion campaigns need N15,000+ per day."}},{"@type":"Question","name":"Can I run Facebook Ads without a website?","acceptedAnswer":{"@type":"Answer","text":"Yes, for some objectives. Lead forms (inside Facebook), Messaging (WhatsApp), Engagement, and Awareness campaigns do not require a website. Sales and Traffic campaigns do."}},{"@type":"Question","name":"Should I use naira or USD billing?","acceptedAnswer":{"@type":"Answer","text":"Naira for simplicity if you only run Facebook Ads. USD if you also run Google Ads or TikTok (both require USD). See How to Pay for Facebook Ads in Nigeria for the full comparison."}},{"@type":"Question","name":"How long does it take for Facebook Ads to work?","acceptedAnswer":{"@type":"Answer","text":"Meta's learning phase takes 48-72 hours. Meaningful data requires 5-7 days. Reliable optimisation data takes 2-4 weeks. Do not judge a campaign after 24 hours."}},{"@type":"Question","name":"Why was my ad rejected?","acceptedAnswer":{"@type":"Answer","text":"Common rejection reasons: misleading claims, prohibited products (certain supplements, financial schemes), discriminatory targeting, excessive text on image (keep under 20%), landing page mismatch. Edit the ad and resubmit. Rejected ads cost nothing."}},{"@type":"Question","name":"Should I use Advantage+ Audience or manual targeting?","acceptedAnswer":{"@type":"Answer","text":"Start with manual targeting so you understand who you are reaching. Test Advantage+ Audience after 2-4 weeks once you have conversion data. Meta's AI needs data to find the right people automatically."}},{"@type":"Question","name":"What is the difference between boosting a post and running an ad?","acceptedAnswer":{"@type":"Answer","text":"Boosting is a simplified ad with limited targeting, no conversion tracking, and no A/B testing. Running an ad through Ads Manager gives you full control over objectives, audiences, placements, creative testing, and optimisation."}},{"@type":"Question","name":"Can I run Facebook Ads targeting other countries from Nigeria?","acceptedAnswer":{"@type":"Answer","text":"Yes. You can target any country from a Nigerian ad account. But you will be competing in that country's auction at their price level. Targeting the US from Nigeria means paying US ad prices, not Nigerian prices. Your N10,000 daily budget buys much less reach in the US than in Nigeria."}},{"@type":"Question","name":"How do I know if my Facebook Ads are profitable?","acceptedAnswer":{"@type":"Answer","text":"Calculate ROAS: Revenue / Ad Spend. If you spend N100,000 and generate N400,000 in revenue, your ROAS is 4x. Calculate your break-even ROAS (product price / gross profit) and ensure your campaigns consistently exceed it."}},{"@type":"Question","name":"Does Facebook charge VAT in Nigeria?","acceptedAnswer":{"@type":"Answer","text":"Yes. 7.5% VAT on all ad spend since December 2021. Budget for it. N100,000 in ads costs N107,500 total."}}]}] </script>

How to run Facebook Ads in Nigeria (2026): Step-by-step guide

The Grey Team

TABLE OF CONTENT

SHARE THIS POST

As of July 2026, Nigeria had an estimated 46 million Facebook users. People aged 25 to 34 were the largest user group. Whether you sell fashion in Lagos, offer cleaning services in Abuja, run a real estate agency in Port Harcourt, or operate a fintech app nationwide, your customers are on Facebook. The question is how to reach them without wasting money.

This guide walks you through every step of creating and running a Facebook ad campaign from Nigeria: setting up your accounts, choosing objectives, building audiences, creating ads, setting budgets, and reading your results. It is written for people who have never used Facebook Ads Manager before, with Nigerian-specific targeting advice, budget recommendations, and payment setup.

Two things this guide does not cover in detail (because we have dedicated articles for them): how to pay for Facebook Ads from Nigeria (see How to Pay for Facebook Ads in Nigeria) and how much Facebook Ads cost (see Facebook Ads Cost in Nigeria). This article focuses on the campaign itself.

Before you start: what you need

You need four things before you can run your first Facebook ad:

1. A Facebook Business Page. Not your personal profile. A Business Page for your business. If you do not have one: go to facebook.com/pages/create, choose a category, add your business name, upload a profile photo and cover image, fill in your business details. This takes 5 minutes.

2. A Meta Business Suite account. This is your business dashboard. Go to business.facebook.com and click Create Account. Enter your name, business name, and email. Link your Facebook Page. This is where you manage pages, ad accounts, and team access. Keep your business and personal ad accounts separate to avoid problems if one gets flagged.

3. A Facebook Ads Manager account. Inside Meta Business Suite, go to All Tools > Ads Manager. If you do not have an ad account, create one. Set your billing country to Nigeria, choose your currency (NGN or USD), and set your time zone to West Africa Time.

4. A payment method. For naira accounts: add funds via bank transfer, USSD, or Payu (Visa/Mastercard). For USD accounts: add a Grey virtual dollar card. Full payment setup guide: How to Pay for Facebook Ads in Nigeria.

Understanding the campaign structure

Every Facebook ad has three levels. Understanding this hierarchy is essential because each level controls different things:

Level What It Controls What You Set Here
Campaign Your objective (what you want the ad to achieve) Objective: awareness, traffic, engagement, leads, sales
Ad Set Who sees your ad and how much you spend Audience targeting, budget, schedule, placements
Ad What your audience actually sees Creative: image/video, headline, body text, call to action, link

‍

One campaign can contain multiple ad sets (testing different audiences). One ad set can contain multiple ads (testing different creatives). This structure lets you test systematically: same objective, different audiences, different creatives.

How the Facebook ad auction determines what you pay

Before you build your campaign, understand how Meta decides which ads to show and what they cost. Every time there is an opportunity to show an ad to someone, Meta runs an auction. The winner is not the highest bidder. Meta uses a formula:

Total Value = Bid Amount x Estimated Action Rate x Ad Quality

Your bid is the maximum you will pay for your desired action. Your estimated action rate is Meta's prediction of how likely the user is to take that action. Your ad quality is Meta's assessment of your creative, relevance, and user feedback.

This means a high-quality ad with a lower bid can beat a low-quality ad with a higher bid. For Nigerian advertisers, this is the most important principle: creative quality reduces cost. A well-crafted N5,000/day ad can outperform a generic N20,000/day ad if the first one gets stronger engagement. Invest in your creativity before increasing your budget.

Ads with high negative feedback (people hiding or reporting them) see their quality score drop and their costs rise. Ads with strong positive engagement see the opposite. Meta is telling you: make ads people want to see, and you pay less.

Step 1: Choose your campaign objective

When you click Create in Ads Manager, the first step is to choose your objective. This tells Meta what result you want, and the algorithm optimizes delivery accordingly. Choose wrong, and Meta optimizes for the wrong action.

Objective What It Optimises For Best For (Nigerian Businesses) Budget Needed
Awareness Maximum impressions (people seeing your ad) Product launches, event announcements, new brands entering a market N2,000-N5,000/day
Traffic Link clicks to your website or app Driving visitors to a landing page, blog post, or product page N3,000-N10,000/day
Engagement Post reactions, comments, shares, page likes Building social proof, growing your page following N2,000-N5,000/day
Leads Form submissions (inside Facebook or on your website) Collecting phone numbers, emails, booking requests N5,000-N15,000/day
Sales / Conversions
Purchases, signups, or other website actions E-commerce sales, app signups, paid subscriptions N10,000-N20,000/day
App Promotion
App installs and in-app events Mobile app downloads N10,000-N20,000/day

‍

The most common mistake Nigerian beginners make: choosing Engagement when they want sales. Engagement optimises for likes and comments, not purchases. If you want people to buy, choose Sales. If you want leads, choose Leads. The objective drives everything that follows.

For your first campaign, Traffic is the safest starting point. It is cheap enough to test at N5,000/day, gives you data on which audiences click, and does not require conversion tracking. Move to Sales or Leads after you install the Meta Pixel.

Step 2: Build your audience

This is where Nigerian-specific knowledge matters most. Meta's targeting options are powerful, but you need to know how to use them for the Nigerian market.

Location targeting

You can target all of Nigeria, specific states, specific cities, or a radius around a pin (for example, 10km around your shop in Lekki). For local businesses, radius targeting is the most efficient because every impression reaches someone who can physically visit you. For online businesses, target the cities where your customers concentrate: Lagos, Abuja, Port Harcourt, Ibadan, Kano.

One important setting: Meta defaults to "People living in or recently in this location." For Nigerian businesses, change this to People living in this location. Otherwise, your ad also reaches travellers and people who were recently in Nigeria but do not live there.

Nigerian Facebook user data by city

City Estimated Facebook Users Key Advertiser Insight
Lagos
22-25 million Largest audience. Most competitive. Highest CPCs.
Abuja 5-7 million High-income demographic. Strong for fintech, real estate, professional services.
Port Harcourt
3-4 million Oil and gas economy. Good for luxury, automotive, real estate.
Ibadan 3-4 million Large student population. Good for education, fashion, FMCG.
Kano 2-3 million Northern market. Lower competition, cheaper CPMs. Requires Hausa-language creative for some segments.
Benin City
1.5-2 million Growing digital adoption. Lower competition.
Enugu
1-2 million Southeast hub. Lower competition than Lagos.

‍

User estimates are approximate based on available platform data and internet penetration rates. Actual targetable audience sizes are visible in Ads Manager when building your ad set.

If your business only serves one city, target that city specifically. A Lagos restaurant should target a 5-10km radius around its location, not all of Lagos. A nationwide e-commerce store should test Lagos, Abuja, and Port Harcourt as separate ad sets to compare performance by city.

Demographics

Set the age range and gender based on your actual customer base. Nigeria’s Facebook users skew young: the largest group is 25-34, followed by 18-24. If your product targets 40+ (insurance, retirement planning, medical services), your audience is smaller on Facebook but also faces less ad competition, which means lower costs.

Interest targeting

Meta lets you target people based on their interests, behaviours, and connections. Nigerian-specific interest targeting examples:

Business Type Interest Targets
Fashion brand Fashion (general), Ankara, Aso Ebi, online shopping, Jumia, Payporte
Restaurant (Lagos) Lagos restaurants, food delivery, Chowdeck, eating out, nightlife
Fintech app Mobile banking, online payments, cryptocurrency, savings, Piggyvest, Cowrywise
Real estate Real estate Nigeria, property investment, home ownership, Lagos property
Online course Online education, self-improvement, digital marketing, career development
Beauty/cosmetics Beauty, skincare, natural hair, makeup tutorials, Zaron cosmetics

‍

Start with 3 to 5 interests per ad set. An audience of 500,000 to 2,000,000 is the sweet spot for Nigeria. Below 100,000, costs spike because of limited inventory. Above 5,000,000, the algorithm has too many low-intent users to sift through.

Custom Audiences

These are audiences built from people who already know you: website visitors (requires Meta Pixel), email lists, app users, people who engaged with your Facebook Page or Instagram profile. Custom Audiences are for retargeting, not prospecting. They are your most valuable audience because they have already shown interest.

Lookalike Audiences

Meta finds people similar to your Custom Audience. Upload your customer list or use your website visitors, and Meta creates an audience of Nigerians who share similar characteristics. Start with a 1% Lookalike (most similar), then test 2-3% if you need more reach. Lookalike Audiences are the bridge between retargeting and prospecting.

Step 3: Set your budget and schedule

At the ad set level, you set how much to spend and when to run the ads.

Daily budget vs lifetime budget. Daily budget spends a consistent amount each day. Lifetime budget spends a total amount over a set period, with Meta deciding how to distribute it across days. For beginners, daily budget is simpler. Use lifetime budget only for campaigns with a fixed end date (event promotions, product launches).

Meta's minimum for Nigerian naira accounts is approximately N2,000-N2,500 per day. Realistic starting budgets:

Goal Recommended Daily Budget Monthly Cost
Testing audiences and creative N5,000-N10,000 N150,000-N300,000
Traffic and messaging campaigns N5,000-N15,000 N150,000-N450,000
Lead generation N10,000-N20,000 N300,000-N600,000
Conversion campaigns (sales) N15,000-N25,000 N450,000-N750,000

‍

For cost benchmarks and what each budget level actually delivers, see Facebook Ads Cost in Nigeria.

Scheduling: You can run ads continuously or set a start and end date. For always-on campaigns (lead generation, e-commerce), run continuously with a daily budget. For time-sensitive promotions (events, sales, launches), set specific dates. You can also schedule ads to run only during certain hours, which is useful if your business needs to respond to leads in real time.

Step 4: Choose your placements

Placements are where your ads appear. Meta offers placements across Facebook, Instagram, Messenger, and Audience Network.

Advantage+ placements (recommended): Let Meta automatically choose where to show your ads based on where it gets the best results for your objective. This typically delivers 20-30% lower costs than manual placement because Meta can find cheaper inventory across its network.

Manual placements: Choose specific placements yourself. Only do this if you have a specific reason (for example, Instagram Reels only for a video campaign targeting 18-24 year olds). Manual placements limit Meta's optimisation ability.

For your first campaign, use Advantage+ placements. Test manual placements later once you have data on which placements perform best for your business.

Step 5: Create your ad

At the ad level, you build what your audience actually sees. This is where most Nigerian businesses either win or waste their budget.

Ad formats

Format Best For Creative Specs Nigerian Tip
Single image Simple offers, product showcases, announcements 1080x1080px (square) or 1080x1350px (portrait). Under 20% text on image. Use real photos of your product, not stock images. Nigerian audiences respond to authentic visuals.
Video Product demos, testimonials, tutorials, brand storytelling 15-60 seconds. Vertical (9:16) for Stories/Reels, square (1:1) for Feed. Keep it under 30 seconds. Hook in the first 3 seconds. Use captions (many watch on mute on Facebook).
Carousel Multiple products, step-by-step processes, before/after 2-10 cards. 1080x1080px per card. Show your top 4-5 products. Each card should work as a standalone ad.
Collection E-commerce product browsing experience Requires product catalog. Cover image/video + product grid. Works well with Shopify or WooCommerce product feeds.

‍

Detailed creative specifications

Format Image Size Video Length Aspect Ratio Text Limits
Single Image (Feed) 1080x1080px (square) or 1080x1350px (portrait) N/A 1:1 or 4:5 Primary: 125 chars. Headline: 40 chars. Description: 30 chars.
Single Image (Stories) 1080x1920px N/A 9:16 (full screen vertical) Minimal text. Keep focus on visual.
Video (Feed) 1080x1080px or 1080x1350px 15-60 sec (under 30 sec recommended) 1:1 or 4:5 Same as image. Hook in first 3 seconds.
Video (Stories/Reels) 1080x1920px 15-60 sec (under 15 sec for Reels) 9:16 Use text overlays (many watch on mute on Facebook, sound on for Reels).
Carousel 1080x1080px per card N/A (or video per card) 1:1 2-10 cards. Each card has its own headline.
Collection 1080x1080px cover + catalog Cover can be video 1:1 cover Requires product catalog in Commerce Manager.

‍

For Nigerian mobile users on slower connections (3G), optimise file sizes. Keep images under 1MB and videos under 15MB. Compress video without losing clarity. A beautiful ad that takes 10 seconds to load on a Nigerian 3G connection is an ad that never gets seen.

Writing ad copy that works in Nigeria

Headline: Short, direct, benefit-focused. "Get Your Dream Apartment in Lagos" beats "Check Out Our Latest Property Listings." Nigerian audiences respond to specificity and immediacy.

Primary text: 1-3 short paragraphs. Lead with the biggest benefit or the problem you solve. Include a clear call to action. Avoid corporate speak. Write the way your customers talk. If your audience responds to Pidgin, test Pidgin copy against English. Some Nigerian brands see 30-50% higher engagement with Pidgin ad copy.

Call to action button: Choose the one that matches your objective. Shop Now for e-commerce. Learn More for traffic. Sign Up for leads. Send Message for WhatsApp. The button should match the action you want.

Creative rules that apply in Nigeria

Real photos outperform stock photos. Show the actual product, the actual result, the actual people who use your service. Nigerian audiences spot generic stock images immediately and scroll past them.

Include price if possible. Nigerian shoppers want to know the price before clicking. Showing the price in the ad filters out people who cannot afford it, reducing wasted clicks and improving your cost per conversion.

Use social proof. "500+ Nigerians have switched" or "Trusted by businesses in Lagos, Abuja, PH" builds credibility. Nigerians are cautious about online purchases. Social proof reduces friction.

Click-to-WhatsApp Ads: the most popular format for Nigerian SMEs

WhatsApp is the dominant business communication channel in Nigeria. Most Nigerian small businesses close sales through WhatsApp conversations, not website checkouts. Click-to-WhatsApp ads put a "Send Message" button on your Facebook or Instagram ad that opens a WhatsApp chat with your business directly.

Why Click-to-WhatsApp works in Nigeria

Nigerian consumers prefer to ask questions before buying. They want to negotiate, see more photos, confirm availability, and arrange delivery through a conversation. A website checkout feels impersonal. A WhatsApp conversation feels like buying from a trusted seller. Click-to-WhatsApp ads meet this preference directly.

How to set up a Click-to-WhatsApp campaign

  1. Link your WhatsApp Business account to your Facebook Page (Page Settings > Linked Accounts > WhatsApp).
  2. In Ads Manager, create a new campaign with the Engagement or Leads objective.
  3. At the ad set level, choose Messaging Apps as the conversion location, then select WhatsApp.
  4. Set your audience, budget, and placements as normal.
  5. At the ad level, write your ad copy and choose your creative. The CTA button automatically becomes "Send WhatsApp Message."
  6. Set up a greeting message that appears when someone opens the chat (for example: "Hi! Thanks for reaching out. How can we help you today?").

Cost benchmarks for WhatsApp campaigns in Nigeria

Messaging campaigns in Nigeria typically cost N200 to N1,000 per conversation started. That is more expensive per action than a link click (N30-N100) but the lead quality is significantly higher because the person has actively chosen to start a conversation with your business. Conversion rates from WhatsApp conversations to sales are 3x to 10x higher than from website landing pages for most Nigerian SMEs.

Handling WhatsApp leads at scale

If your ads generate 50+ WhatsApp conversations per day, you need a system. WhatsApp Business supports quick replies (pre-written responses to common questions), labels (categorise leads by status), and catalogs (show products inside WhatsApp). For higher volume, the WhatsApp Business API integrates with CRM tools that route conversations to team members automatically.

Step 6: Install the Meta Pixel (before running conversion campaigns)

The Meta Pixel is a piece of code you add to your website that tracks what visitors do after clicking your ad. Without it, Meta cannot optimise for purchases or signups, cannot build retargeting audiences, and cannot report on conversion metrics.

Install the Pixel before you spend money on conversion campaigns. For traffic and awareness campaigns, the Pixel is optional but still recommended because it collects data for future retargeting.

How to install

  1. In Ads Manager, go to Events Manager > Connect Data Sources > Web.
  2. Name your Pixel and enter your website URL.
  3. Choose your installation method:

For Shopify: use the Facebook & Instagram sales channel. It installs the Pixel automatically.

For WordPress: use the Meta Pixel plugin or insert the code in your theme header.

For custom websites: copy the Pixel base code and paste it in the head section of every page.

  1. Set up events: PageView (automatic), ViewContent, AddToCart, Purchase, Lead, CompleteRegistration.
Pixel Event When It Fires What It Tracks When to Set Up
PageView Every page load All website traffic from ads Immediately (automatic with base Pixel code)
ViewContent Product or service page viewed Which products people look at Before running traffic or conversion campaigns
AddToCart Item added to cart Purchase intent Before running e-commerce conversion campaigns
InitiateCheckout Checkout process started Checkout abandonment data When running e-commerce campaigns
Purchase Order completed Revenue, ROAS, conversion rate Before running any Sales objective campaign
Lead Form submitted (email, phone, booking) Lead volume and cost per lead Before running Lead objective campaigns
CompleteRegistration Account created or signup completed Signup conversions For SaaS, apps, membership businesses
Search Site search used What visitors are looking for Optional. Useful for large product catalogs.

‍

Start with PageView (automatic) and the one event that matches your campaign objective: Purchase for e-commerce, Lead for lead generation, CompleteRegistration for signups. Add others as your campaigns mature. Every event you install gives Meta more data to optimise delivery.

  1. Verify with the Meta Pixel Helper browser extension. It should show a green checkmark on your site.

The Pixel takes minutes to install but transforms your advertising. Without it, you are guessing. With it, Meta's algorithm knows exactly which users convert and finds more people like them.

For the complete installation walkthrough with platform-specific instructions for Shopify, WordPress, WooCommerce, and custom sites, see How to Set Up Meta Pixel for Your Nigerian Business.

Step 7: Launch and monitor

Review everything before clicking Publish:

Campaign: correct objective?

Ad set: right audience, correct location (Nigeria/city), budget set, schedule correct?

Ad: creative looks right on mobile (over 80% of Nigerian Facebook users are on mobile), text has no typos, link goes to the right page, CTA button is correct?

Click Publish. Meta reviews your ad (usually within 1-24 hours). Once approved, delivery begins. Do not touch anything for the first 48 to 72 hours. Meta's algorithm needs time to learn. Making changes during this period restarts the learning phase.

Step 8: Read your results (the metrics that matter)

After 3 to 5 days, check your results in Ads Manager. Do not look at vanity metrics. Focus on the numbers that tell you whether the campaign is working:

Metric What It Means Good Benchmark (Nigeria) If It Is Bad
CTR (Click-Through Rate) % of people who saw your ad and clicked 1-3% for traffic campaigns Ad creative or targeting needs work
CPC (Cost Per Click) How much each click costs N30-N300 depending on objective Targeting too narrow or creative is weak
CPM (Cost Per 1,000 Impressions) How much it costs to reach 1,000 people N450-N5,000 depending on objective Audience too competitive or ad quality is low
Frequency Average times each person saw your ad Under 3 for prospecting, under 5 for retargeting Audience is exhausted. Expand or refresh creative.
Conversion Rate % of clicks that resulted in your desired action 2-5% for landing pages Landing page needs work, not the ad
CPA (Cost Per Acquisition) How much each conversion costs Depends on your product value Pause if CPA exceeds your target
ROAS (Return on Ad Spend) Revenue generated per naira spent on ads 3x-5x for e-commerce Below break-even = change creative, audience, or offer

‍

Check these metrics at the ad set level (not the campaign level) to see which audiences perform best. Then check at the ad level to see which creatives perform best. This is how you find winning combinations.

Step 9: Optimise, scale, or kill

After 7 to 14 days of data, make decisions:

Scale winners

If an ad set has CPA below your target and ROAS above your minimum, increase the budget by 20-30% every 3 to 5 days. Do not double the budget overnight. Sudden large increases push the ad set back into the learning phase. Gradual scaling maintains performance.

Kill losers

If an ad set has CPA above your target after 7+ days of data (and it has exited the learning phase), pause it. Do not wait hoping it will improve. Move the budget to your winners.

Test new creative

Even winning ads eventually fatigue. When frequency exceeds 3 and CTR starts dropping, refresh the creative. Test 3 to 5 new ad variations. Keep the winning audience, change the image/video and headline. This extends the life of your campaign.

Build retargeting

After 2 to 4 weeks of running traffic campaigns, your Meta Pixel has collected enough data to build retargeting audiences. Create a new ad set targeting website visitors from the last 30 days. Retargeting audiences convert at 2-5x the rate of cold audiences and cost 30-50% less per click.

ARCON compliance

The Advertising Regulatory Council of Nigeria requires a Certificate of Approval for all advertisements before they go live in Nigeria, including Facebook Ads. A Federal High Court ruling in April 2025 confirmed ARCON's authority over digital advertising. Enforcement is intensifying in 2026 with fines up to N1 million per violation.

In practice, enforcement targets larger campaigns. Most small self-serve advertisers do not obtain pre-approval, but the legal requirement exists. For regulated industries (fintech, health, alcohol, pharmaceuticals), ARCON compliance is especially important. For full details, see the ARCON section in our TikTok Ads guide.

Common mistakes Nigerian Facebook Ads beginners make

Boosting posts instead of using Ads Manager

The Boost button on your page is convenient but limited. No conversion tracking, no A/B testing, no retargeting, basic targeting. Ads Manager gives you full control. A boosted post is like shouting in a market. Ads Manager is like placing your product in front of the exact person who wants to buy it.

Choosing the wrong objective

Engagement gets you likes. Traffic gets you clicks. Sales gets you purchases. They are not interchangeable. If you want sales, choose Sales. Meta's algorithm will optimise for whatever you tell it to optimise for.

Not testing creative

One ad with one image is not a campaign. It is a gamble. Run 3 to 5 variations per ad set: different images, different headlines, different copy. After 5 days, kill the underperformers. This reduces your CPA by 30-50%.

Changing the campaign during the learning phase

Meta needs 48 to 72 hours to learn who in your audience responds to your ad. Editing the budget, audience, or creative during this window resets the learning. Wait at least 3 days before making changes.

Ignoring mobile

Over 80% of Nigerian Facebook users are on mobile. Your ad and your landing page must look perfect on a phone screen. Test on mobile before launching. A landing page that loads in 8 seconds on 4G is a landing page that loses 90% of its visitors.

No Meta Pixel

Without the Pixel, you cannot run conversion campaigns, cannot retarget, and cannot measure what actually matters. Install it before spending on anything beyond awareness or traffic campaigns.

Frequently asked questions

How much money do I need to start Facebook Ads in Nigeria?

Meta's minimum is approximately N2,000-N2,500 per day. Realistic testing starts at N5,000-N10,000 per day (N150,000-N300,000 per month). Conversion campaigns need N15,000+ per day.

Can I run Facebook Ads without a website?

Yes, for some objectives. Lead forms (inside Facebook), Messaging (WhatsApp), Engagement, and Awareness campaigns do not require a website. Sales and Traffic campaigns do.

Should I use naira or USD billing?

Naira for simplicity if you only run Facebook Ads. USD if you also run Google Ads or TikTok (both require USD). See How to Pay for Facebook Ads in Nigeria for the full comparison.

How long does it take for Facebook Ads to work?

Meta's learning phase takes 48-72 hours. Meaningful data requires 5-7 days. Reliable optimisation data takes 2-4 weeks. Do not judge a campaign after 24 hours.

Why was my ad rejected?

Common rejection reasons: misleading claims, prohibited products (certain supplements, financial schemes), discriminatory targeting, excessive text on image (keep under 20%), landing page mismatch. Edit the ad and resubmit. Rejected ads cost nothing.

Should I use Advantage+ Audience or manual targeting?

Start with manual targeting so you understand who you are reaching. Test Advantage+ Audience after 2-4 weeks once you have conversion data. Meta's AI needs data to find the right people automatically.

What is the difference between boosting a post and running an ad?

Boosting is a simplified ad with limited targeting, no conversion tracking, and no A/B testing. Running an ad through Ads Manager gives you full control over objectives, audiences, placements, creative testing, and optimisation.

Can I run Facebook Ads targeting other countries from Nigeria?

Yes. You can target any country from a Nigerian ad account. But you will be competing in that country's auction at their price level. Targeting the US from Nigeria means paying US ad prices, not Nigerian prices. Your N10,000 daily budget buys much less reach in the US than in Nigeria.

How do I know if my Facebook Ads are profitable?

Calculate ROAS: Revenue / Ad Spend. If you spend N100,000 and generate N400,000 in revenue, your ROAS is 4x. Calculate your break-even ROAS (product price / gross profit) and ensure your campaigns consistently exceed it.

Does Facebook charge VAT in Nigeria?

Yes. 7.5% VAT on all ad spend since December 2021. Budget for it. N100,000 in ads costs N107,500 total.

Related reading

How to Set Up Meta Pixel for Your Nigerian Business covers installation for Shopify, WordPress, WooCommerce, and custom sites with event setup and verification.

How to Pay for Facebook Ads in Nigeria (2026) covers all payment methods, bank compatibility, and troubleshooting.

Facebook Ads Cost in Nigeria (2026) covers cost benchmarks, budget tiers, ROAS calculations, and platform comparisons.

How to Pay for Google Ads in Nigeria (2026) covers Google's USD-only billing for Nigerian advertisers.

How to Pay for TikTok Ads in Nigeria (2026) covers TikTok's $50 minimum and USD billing.

Best Virtual Dollar Cards in Nigeria (2026) compares card options for international payments.

Last updated:

October 2, 2026

Open a free Grey account to get startedJoin 1 million digital nomads
IF YOU ENJOYED THIS, CHECK THESE OUT

How to use Apple Pay worldwide with your Grey card

•

•

2 min read

There’s a specific kind of fatigue that comes from living globally. Not from flights or visas, but from the tiny negotiations of daily life. Figuring out which card will work. Wondering if the terminal will accept it. Keeping mental notes of what to try next.

When you add your Grey virtual card to Apple Pay, you remove one layer of uncertainty. All you need to do is tap, and the payment goes through.

Why your Grey virtual card pairs so well with Apple Pay

If you’ve ever struggled with cards that randomly fail abroad or get blocked on international platforms, you’ll feel the difference immediately. We built the Grey virtual card built for global use, and Apple Pay simply amplifies that experience.

Let's discuss why the Grey card + Apple Pay  combination works so seamlessly.

One card that adapts to your life

Your Grey virtual card is directly linked to your balance. There’s no need to top up before paying or shuffle funds between wallets. You choose what you want to buy, Apple Pay handles the tap, and the payment goes through.

Designed for international spending

Fewer card declines. Better compatibility with global merchants. Clearer transactions. Whether you’re paying locally or online, Apple Pay with Grey is consistent and predictable, at home and abroad

Contactless, effortless, and global

Apple Pay is accepted in millions of locations worldwide. From supermarkets and cafés to trains, taxis, and co-working spaces, your phone becomes your payment tool. Combined with Grey’s global card functionality, spending across countries becomes second nature.

Built-in security that travels with you

Apple Pay never shares your full card details with merchants, and the Grey virtual card supports 3D Secure for online transactions. Together, they offer a safer way to shop, subscribe, and spend internationally without constant worry.

Also read: How to use your Grey card to manage all your subscriptions

Who benefits most from using Apple Pay with the Grey Visa card?

This Grey Card + Apple Pay setup is designed for people who spend often across borders.

Travellers and frequent movers

When your Grey Visa card is added to Apple Pay, you can move through airports, metros, shops, and cafés with just your phone. No fumbling, no cash exchanges, no stress at the counter.

Freelancers and remote professionals

If you earn from international clients or pay for tools hosted abroad, Apple Pay gives you a fast, reliable way to manage everyday spending. Subscriptions, software, ads, and services all become easier to handle.

Business owners and creators

From running ads to paying for platforms like Canva, Google Workspace, or Notion, Apple Pay with Grey keeps your operations smooth and interruption-free.

How to add your Grey Visa card to Apple Pay

Setting up Apple Pay with your Grey virtual card takes just a minute:

__wf_reserved_inherit

Once added, you can use Apple Pay for in-store contactless payments, online checkouts, in-app purchases, and public transport wherever Apple Pay is accepted.

Where you can use Apple Pay with your Grey virtual card

With Apple Pay accepted in dozens of countries, your Grey virtual card becomes a global companion. You can use it to:

  • Pay in cafés, shops, and supermarkets worldwide
  • Book flights, hotels, and short stays
  • Subscribe to services like Spotify, Apple Music, Netflix, Canva, and YouTube
  • Pay for transport, food delivery, and everyday essentials
  • Handle online payments securely across international platforms

Your Grey balance does the heavy lifting, while Apple Pay keeps everything fast and contactless.

Why is it important to use a virtual card with Apple Pay?

Too many people are still dealing with cards that weren’t built for global lives. Unexpected declines. Confusing restrictions. Payments that work one day and fail the next.

The Grey virtual card changes that. Paired with Apple Pay, it creates a payment experience that feels modern, reliable, and genuinely global.

Create your Grey virtual card now, add it to Apple Pay, and tap your way through the world with confidence.

often spend

Grey virtual card vs Chipper, Geegpay, and others: 2026 comparison

•

•

2 min read

Different virtual cards work differently depending on how you spend, where you shop, and which currencies you use. Some excel at simple travel spending, others at multi-currency holding. Some support crypto, others don’t. Understanding the real differences helps you pick which one works for you.

Today, I’m comparing the Grey card with six other well-known virtual card options, just so you know which one works best for you.

1. Wise multi-currency card

If you’ve ever needed a card that is like a multi-currency wallet first and a spending card, Wise probably fits that bill. Wise is widely used as a borderless account with a card that lets you tap into more than 50 currencies and spend internationally at transparent exchange rates.

For many global workers and travellers, such simplicity is appealing. You get the real exchange rate plus a small, clear fee. There are generally no hidden surprises, and you can hold currencies like USD, EUR, or GBP in one place.

Wise also doesn’t support crypto balances, so if you’re someone who keeps part of your funds in digital assets and wants to spend crypto, your Wise card won’t help.

People who want to hold and spend multiple currencies with clear exchange pricing, especially for everyday purchases and travel, will love the Wise card.

Also read: How to shop in the US or Europe with your Grey card

2. Revolut card

Revolut is one of the most talked-about fintech platforms in the world, and its card ecosystem reflects that breadth. You can have both virtual and physical cards, generate disposable virtual cards for added security, and even manage budgeting, investments, and crypto trading all in one app.

It ticks many boxes: multi-currency support, budgeting tools, and virtual card creation. However, the complexity of features can become a hurdle, especially when key perks are tucked behind paid tiers.

Revolut is strong as part of a broader lifestyle finance app, especially for travellers and users who want added perks like travel insurance, purchase protection, and trip disruption coverage, which are included in higher-tier plans such as Premium, Metal, or Ultra. However, these benefits depend on subscription level and eligibility requirements, and coverage is provided through third-party insurers rather than built directly into the card experience.

Its virtual cards can still face issues on international platforms, and the way it converts currencies, including weekend markups, adds a layer of unpredictability for some users.

3. Payoneer card

Payoneer is a name many freelancers, online sellers, and international businesses know quite well. Its card, especially the virtual prepaid card, is excellent for receiving payments from global marketplaces, handling international transfers, and covering business expenses in multiple currencies.

However, many users report sudden card blocks, limited personal support, and slow resolution times, which can be frustrating when you’re trying to pay for everyday subscriptions or online purchases.

In many regions, Payoneer is ideal for business payouts and marketplace earnings; however, it may not be the best option if you require a card for personal multi-currency spending or flexible international use.

Freelancers and businesses requiring comprehensive currency support with global payouts, especially via marketplaces, will appreciate the Payoneer card.

Also read: How to pay online and in stores worldwide with your phone

4. N26 Card

N26 operates as a digital bank primarily across the EU and EEA. Its cards, both physical and virtual, are built around simplicity, with no foreign transaction fees for many currencies and straightforward Mastercard exchange rates.

It works well for everyday spending both within and outside the Eurozone, and virtual cards can be issued quickly as part of the account opening process.

The big limitation, a practical one, is its availability. N26’s services were pulled back from the U.S. and some other markets in recent years, and it remains focused on European customers.

So if you travel frequently within Europe or spend in EUR, N26 cards can be a solid choice. But outside that context, it’s less flexible, especially for global needs.

LDMAG1

5. Crypto-linked cards

Crypto cards deserve their own mention. Cards like the Coinbase Card and Crypto.com Visa Card allow you to spend cryptocurrency by instantly converting it to fiat at the point of sale. These are especially interesting for people who live or earn in digital assets and want to use them without extra conversion steps.

For example, Binance’s card (in regions where it is still supported) offers significant cashback rewards in BNB, and Coinbase lets you spend multiple crypto assets directly, with rewards in crypto.

The downside is that these cards often tie you into a specific exchange ecosystem, may carry higher fees for some transactions, and their rewards are typically token-based — valuable if you’re bullish on crypto, less so if you’re not.

I’ll recommend these cards for crypto holders who want to spend digital assets with conversion at checkout and enjoy token rewards.

6. Traditional bank virtual cards

There’s a whole category of virtual cards issued by traditional or app-based banks, like Monzo (UK), Starling (UK), or wallet-front cards like Curve.

These are solid for everyday use, especially in their home markets, and often integrate well with Apple Pay/Google Pay. However, international currency support varies widely; some have foreign transaction fees, others rely on slower underlying banking rails, and they’re sometimes limited in where they’ll work for recurring payments or certain ad platforms.

For many users, these cards are excellent backups or complementary payment methods. But if your life or work relies on consistent, global spending, their limitations become noticeable.

7. Grey card offers a more flexible virtual global spending experience

By now, it should be clear: not all virtual cards are the same. Some are designed for holding money, others for daily banking, and others still for specific ecosystems.

Grey’s approach sits in a different space from the others above. Your card works across fiat (USD, EUR, GBP, local currency) and stablecoins (USDC), eliminating the need to get an extra crypto card. Your Grey card automatically pulls funds from your available balances in the following order: USD, USDC, and then the next highest available balance.

You can also create multiple cards for different purposes, such as travel, subscriptions, personal, and business. Still, each card will work seamlessly without requiring you to select which balance to spend from. We built the Grey virtual card for people who:

  • Spend in multiple currencies regularly
  • Want predictable outcomes at checkout
  • Value clear messaging and control
  • Need support for both fiat and crypto balances

Instead of requiring top-ups or rigid currency conversion steps, your Grey card automatically draws from your available balances, making spending across fiat and stablecoin currencies effortless.

Many of the other options we’ve discussed above are great in their contexts. However, each has trade-offs that make it difficult to be everything to everyone.

Also read: How to budget in foreign currencies using the Grey card

So, which card is right for you?

There’s no single answer, but here’s a quick way to think about it:

  • If you want clear, no-nonsense multi-currency holding and spending, Wise or N26 are strong choices.
  • If you’re looking for a financial super app with perks, Revolut is a great fit.
  • If you earn or spend in crypto and enjoy token rewards, crypto cards like Coinbase or Crypto.com are worth exploring.
  • If you want a card that automatically draws from different balances, supports multiple cards, and makes international or multi-currency spending predictable globally, we built Grey for your lifestyle.

Different cards shine in various life scenarios. The key is knowing which trade-offs matter to you, and how your day-to-day spending looks.

Choose with clarity, and let your card work for you, not the other way around. Create your Grey visa card and enjoy a smoother, more inclusive, and more predictable global spending experience.

‍

How to budget in foreign currencies using the Grey card

•

•

2 min read

Budgeting used to be simple. You earned money, spent money, and tracked what was left. At that time, you had only one account with one currency, which required just one mental model.

Then remote work happened.

Now you might earn in EUR, pay for tools in USD, and travel in between. Discipline isn’t enough for budgeting anymore; you also need structure because, without proper structure, even the most careful spender can lose track of where their money is going.

Your Grey card is a practical budgeting tool for people who live, work, earn, and spend across borders. I’ll explain.

Why budgeting in multiple currencies breaks down so easily

Many people who overspend don't do so because they’re irresponsible. But because their money isn’t organised in a way that reflects how they live.

It’s pretty common to be juggling subscriptions in USD, running ads in EUR, buying coffee in GBP, and somehow all on the same card. Eventually, everything blurs together. You can no longer track your Netflix renewal, that Facebook ad campaign, the flight you booked last week, or the coworking space membership. Then one day you check your balance and think, “Where did all that money go?” You know you spent it. You just can’t figure out where, or why, it felt like so much more than you expected.

It’s not that you’re careless. It’s that your money isn’t organised in a way that matches how you actually live and work. And once things start blurring, it’s nearly impossible to untangle without spending an hour combing through statements, converting currencies in your head, and still not feeling certain you’ve caught everything.

At that point, your budget is broken.

Also read: How to use your Grey card to manage all your subscriptions

What should budgeting look like when you earn and spend globally?

Clarity, separation, and control are the most crucial factors when budgeting across multiple currencies. You should be able to:

  • See exactly what each type of spending is costing you.
  • Stop or pause spending instantly when needed.
  • Protect one part of your budget from another.
  • Make changes without disrupting everything else.

The Grey card is designed around solving these exact needs.

How does the Grey card help with budgeting?

Use multiple cards to separate your spending

One of the most effective budgeting habits is separation. Instead of using a single card for everything, you can create multiple cards with clear purposes. Your Grey virtual card helps you structure your spending as such.

For example, you can create:

  • One card for subscriptions and recurring tools
  • One card for ads and growth experiments
  • One card for travel or everyday spending
  • One card per client or project

Each card acts like its own budget lane, pulling from the same balance. You don’t need to guess where the money went because you already know.

This is especially useful if you freelance, manage ads, or run multiple income streams. When spending is separated, budgeting becomes more straightforward.

Also read: How to pay for ads easily with your Grey card

Freeze cards instantly when spending goes off-track

Budgets fail when you can’t act fast enough.

With the Grey card, you can instantly freeze or unfreeze any card in the app. If a digital ad campaign starts burning through too cash, freeze the card. If a subscription you forgot about renews unexpectedly, freeze the card. If you’re travelling and want to lock down non-essential spending, freeze the card.

Freezing a card doesn’t affect your other cards or balances. It simply stops that specific spending lane, which is precisely how budgeting should work.

Set limits that protect your budget

Budgets can fail when they’re too rigid. Grey’s spending limits work more like guardrails.

You can set daily or monthly limits per card, receive alerts when you’re approaching your limit, and still stay flexible. The goal isn’t to punish spending. I mean, who wants that? It’s to keep you aware before things drift too far.

For shared cards or subscriptions, limits are especially useful. You know exactly how much can be spent, and nothing sneaks past unnoticed.

Track spending clearly in one place

When you’re budgeting across currencies, visibility matters more than perfection. Every Grey card transaction appears clearly in your app, linked to the card you used. That means you’re not just seeing how much you spent, but why you spent it.

When budgeting time comes around, you’re not sitting there trying to remember what that mysterious €47 charge was three weeks ago or why your USD balance dropped. Everything’s already categorised. The structure did the work for you.

Spend confidently across borders

Trust helps with budgeting too. When you’re shopping internationally, paying for ads, or travelling, declined payments and unexpected charges can throw everything off. The Grey Card works across global merchants and even supports Apple Pay and Google Pay, so everyday spending feels normal, even when you’re far from home.

A quick note on protection when spending abroad

An often-overlooked aspect of budgeting is preparing for contingencies in case things go wrong.

When you pay with your Grey card, you have access to Visa benefits, including purchase protection, extended warranties, and price protection, depending on the transaction and your activation status. It’s not something you think about daily, but it adds a layer of reassurance when you’re buying electronics, booking travel, or shopping internationally.

It’s one less thing to worry about while managing money across borders.

Also read: How to claim your Visa card benefits

What budgeting in foreign currencies is like with the Grey card

When your card and your accounts are aligned, budgeting stops being guesswork. You know what you’re spending, which currency your spend is coming from and more importantly, when something changes.

Instead of constantly reacting to your balance, you’re now making decisions with clarity. And that’s what good budgeting should be like, whether you’re at home, travelling, or working remotely.

If you’re ready to make your budget work wherever you are, create or update your Grey card today and start spending and budgeting in the ways that matter to you.

‍

How to shop in the US or Europe with your Grey card

•

•

2 min read

A few months ago, I was eyeing a pair of sneakers on a US website for weeks. Then the store started running sales and I decided to buy them (hashtag #YOLO), but my bank card declined the payment.

Not once, not twice… but four times!.

The same card that worked perfectly in Nigeria where I live, and the same details I’d used for years. I tried to get another card, but by then, sales had ended, and the sneakers were out of stock. It was annoying, but I just had to accept my L.

If you’ve ever tried to shop internationally, on sites like ASOS UK, Amazon US, Zara EU, or even the Apple Store, you may already be familiar with this pain. Sometimes the website rejects your card. Sometimes your bank blocks the transaction. Sometimes the currency conversion takes too long, and the payment times out.

It shouldn’t be this difficult to buy something online in big 2026… yet for many people, it still is.

But if you use a Grey card, you'll eliminate the uncertainty of thoughts like, “Will this payment go through?”, and transform your international shopping into a simple and predictable process.

Why shopping abroad is often frustrating

Shopping from US or European stores usually comes with these hurdles:

1. Many foreign merchants decline local cards

Some US/UK online stores automatically reject certain African-issued cards, even if you have more than enough balance.

2. Stores bill strictly in USD, GBP, or EUR

If your card requires manual currency conversion, it can cause payment delays that may result in declines.

3. Banks block “suspicious” international transactions

This usually happens when the merchant is unfamiliar.

4. Conversion errors and hidden fees

Some cards convert long after the purchase, leading to surprises on your statement.

These problems are common, but they’re also exactly what Grey card is built to avoid.

How your Grey card makes shopping internationally easy

Smart spending across multiple currencies and USDC

Your Grey card doesn’t require you to pick or switch wallets before paying. Instead, it automatically spends from your balances. Your USD account is debited first; if that’s empty, your USDC, and then the highest of your remaining balances.

This means your payment goes through as long as you have funds available in your account, without requiring you to consider currencies at checkout.

Works across major US and European stores

Your Grey card is an international spend card, so you can pay at 150 million merchants worldwide.

Use Apple Pay and Google Pay

For stores that support mobile wallets, you can simply add your Grey Visa card to Apple Pay or Google Pay. This is more secure and makes for much faster checkouts.

Create multiple cards for better organisation

If you shop frequently or mix personal and business purchases, you can:

  • Use one card for personal shopping
  • another for business imports
  • another for gift purchases

It keeps your spending clean and easy to track.

Freeze and unfreeze anytime

You can always freeze your cards to control your spending.

Better protection for online transactions

You receive real-time notifications, card controls, and instant limits - everything you need for peace of mind when buying from foreign sites.

LDMAG1

How to shop in the US or Europe with your Grey card

1. Request your Grey visa card

Create a Grey account and go to the cards section of your Grey app to request a Grey card for $5.

2. Add your card to the store’s checkout

Enter your card details or simply pay through Apple Pay/Google Pay.

3. Make your purchase normally

Shipping, duties, and taxes will be displayed as they are for every other international shopper.

4. Track everything in your Grey app

Every charge, refund, or verification appears instantly, so there are no surprises later.

Tips for smarter international shopping

  • Use a separate card for business or bulk purchases so you can easily track expenses.
  • Keep a bit extra in your wallet for shipping fees and taxes.
  • Use Apple Pay/Google Pay when available. It’s the most seamless way to tap and pay, and also supports contactless payments.

Shopping abroad doesn’t have to be stressful

Your Grey card helps you shop with confidence. There are no random declines or conversion drama. Ahead of your next international purchase, you can create your Grey card and enjoy a smoother, more predictable shopping experience.

‍

Best way to receive US dollar payments in India

•

•

2 min read

The default way Indian banks handle inbound USD is: receive the wire, convert to INR immediately at their own rate, credit your account in rupees, and deduct fees at every step. You never see the dollars. You never choose the conversion rate. You never decide when to convert. The bank decides all three, and the bank's rate is never the mid-market rate. That automatic conversion is where freelancers, consultants, and remote workers lose the most money on international payments.

The cost of this setup is not small. A 2% to 3% FX spread on every transfer, intermediary deductions on SWIFT wires, and receiving bank charges add up to lakhs lost annually for anyone earning regular USD income. This guide covers the four main ways to receive US dollar payments in India, what each one actually costs on a real invoice, the compliance requirements (purpose codes, FIRC, FEMA) that most payment guides skip entirely, and how to set up an infrastructure that gives you control over when and at what rate your dollars become rupees.

The four main ways to receive USD in India

1. US ACH or Fedwire transfers

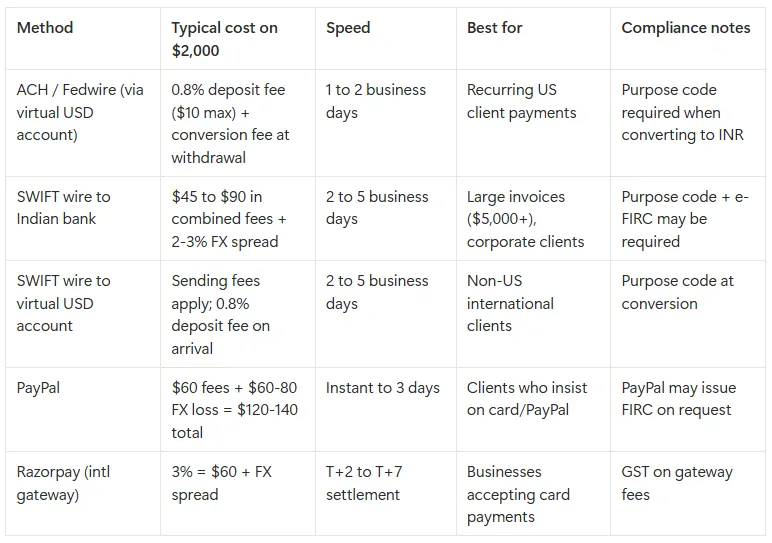
ACH (Automated Clearing House) and Fedwire are US domestic transfer systems. When a US client pays you via ACH or Fedwire, the money moves within the US banking system to a US-based account. This is important because US companies strongly prefer paying vendors through their domestic payment rails. Their finance teams process ACH payments the same way they pay local contractors, which means less friction on the client side and faster approval on yours.

ACH transfers typically cost the sender nothing or a small flat fee (usually under $1). Fedwire transfers may cost the sender $15 to $30, depending on their bank. On your end, the cost depends on where the funds land. If you are receiving into a virtual USD account from a fintech provider, the provider charges a deposit fee (Grey charges 0.8%, minimum $2, maximum $10). There is no intermediary bank deduction because the payment never leaves the US banking system.

ACH is best for recurring payments from US-based clients, such as monthly retainers, project milestones, or regular consulting fees. If most of your clients are American, setting up a virtual USD account that supports ACH and Fedwire deposits is typically the lowest-cost option for regular income.

2. International wire transfers (SWIFT)

SWIFT is the global messaging network that banks use to route cross-border payments. When a client outside the US (or a US client whose bank does not support ACH to your provider) sends you a wire transfer, it travels through the SWIFT network. This is the most universally accepted method, but it is also the most expensive.

The costs stack up at multiple points. The sending bank charges a wire fee, typically $20 to $50, depending on the country and bank. If the payment routes through an intermediary (correspondent) bank, that bank deducts another $10 to $25 from the transfer amount. Your receiving bank may charge an additional inward remittance fee of $5 to $15. On a $2,000 invoice, total fees can range from $45 to $90, which is 2.25% to 4.5% before any currency conversion. Settlement takes 2 to 5 business days.

SWIFT makes sense for large, infrequent payments where the fixed fees represent a smaller percentage of the total: invoices above $5,000, corporate contracts, or one-off project payments. For smaller recurring payments, the per-transfer cost makes SWIFT significantly more expensive than ACH.

Also read: Top platforms to earn US dollars in India

3. Payment aggregators

Payment aggregators collect funds from your client (usually via card or local bank transfer) and remit the proceeds to your Indian bank account. The most common ones Indian freelancers encounter are PayPal, Razorpay (for businesses accepting international payments), and Stripe (with limited availability for payouts in India).

PayPal charges 2.99% on incoming goods and services payments, plus a currency conversion spread of 3% to 4% above mid-market when you withdraw to INR. On a $2,000 payment, that is roughly $60 in transaction fees plus $60 to $80 in conversion loss, totalling $120 to $140. Razorpay's international payment gateway charges 3% per transaction for international cards. These platforms are convenient for clients who prefer paying by card or who are not set up for bank transfers, but the cumulative cost is the highest of all four methods.

Aggregators are best for small, one-off projects where the client insists on paying by card, or for marketplace payouts (Upwork, Fiverr) where the platform dictates the payment method.

4. Cross-border transaction caps

India's cross-border payment framework includes transaction-level limits in certain categories. Some payment setups cap individual cross-border transactions at ₹25 lakh per unit of goods or services. If your invoice size approaches that range, bank-led rails such as SWIFT are usually more suitable than aggregator platforms. Having access to a USD receiving account through a provider like Grey gives you more flexibility when handling higher-value international payments, because the funds arrive in USD first and you control the conversion timing and method.

How the four methods compare

__wf_reserved_inherit

The compliance layer most freelancers overlook

Receiving USD payments in India is regulated under the Foreign Exchange Management Act (FEMA) and RBI reporting guidelines. Getting the compliance right upfront prevents delays, frozen transfers, and problems during audits.

Purpose codes

Indian banks require a purpose code on every inward remittance to classify the transaction under FEMA. Common codes for freelancers include those for software development, consulting, and marketing services. These codes are defined under the RBI purpose code list for inward remittances. Providing the correct code on your invoice and communicating it to your client's bank reduces the risk of your payment being held for manual review. Vague or missing purpose codes are one of the most common reasons for delayed credits.

You may also like: How to receive money from UK clients in India

FIRC and e-FIRC

If you export services (which includes freelancing for foreign clients), you may need a Foreign Inward Remittance Certificate (FIRC or e-FIRC) for GST export documentation, audits, and platform compliance. Only authorised dealer banks issue e-FIRC documentation. Confirm your bank's process for issuing these certificates in advance, because requesting them after the fact can take weeks. If you receive payments through a virtual USD account and then transfer to your Indian bank, the e-FIRC is issued by the Indian bank that receives the final INR credit.

‍

Export realisation timelines

India requires that export proceeds be realised (received in India) within a prescribed period. Long-pending invoices can create compliance issues. Keep your documentation organised and follow up on overdue payments early. For a complete explanation of FIRC requirements, tax implications, and RBI compliance rules, see Grey's guide on FIRC, taxes, and compliance for Indians earning foreign currency.

Which setup is right for your situation

The right payment method depends on three factors: where your clients are located, your average invoice size, and whether you want to hold USD or convert to INR immediately.

For most clients in the US, a virtual USD account that supports ACH and Fedwire is typically the lowest-cost option. Your US client pays you the same way they pay a local vendor. You receive the funds in USD, hold them until you are ready to convert, and withdraw to your Indian bank at a rate and time you choose. SWIFT works as a backup for clients whose banks do not support ACH to their provider.

Global clients across multiple countries: Ensure your account can receive international SWIFT wires without intermediary deductions eating into your payment. A multi-currency account lets you hold USD, GBP, or EUR and convert only when the rate is favourable, rather than accepting your bank's automatic conversion on arrival.

Large invoices ($5,000+): Direct bank rails (SWIFT or Fedwire) are preferable to aggregator platforms. The fixed fees are lower as a percentage of the total than the percentage-based fees aggregators charge. A $10,000 invoice through PayPal costs roughly $600-$700 in combined fees and FX losses. The same invoice received via SWIFT to a virtual USD account costs $10 in deposit fees plus the conversion cost when you move to INR.

Priority is maximising take-home INR. Compare the total cost at every step: incoming transfer fees, deposit fees, FX margin versus the mid-market rate, and withdrawal fees. Small differences in FX margins compound significantly over a year of regular payments. A 1% difference on $3,000 per month is $360 annually.

Also read: A guide for Indians getting paid by clients abroad

Common mistakes to avoid

Relying on a single payment method leaves you exposed if that channel has downtime, compliance issues, or fee changes. The safest setup is ACH or Fedwire as your primary rail with SWIFT as a fallback. Ignoring FX spreads is the most expensive mistake: the difference between mid-market and a 3% markup on $2,000 is $60 per transfer. Waiting until a compliance request arrives to organise your documentation can delay your funds for days or weeks. Sending invoices without detailed service descriptions triggers manual review at Indian banks because the purpose of the remittance is unclear. Include the service type, project reference, and your client's details on every invoice.

How Grey works for Indian freelancers receiving USD

Grey provides Indian freelancers, consultants, and remote professionals with USD, GBP, and EUR foreign currency accounts that can receive payments via ACH, Fedwire, or international SWIFT wire transfers. The setup is fully digital: sign up at grey.co or download the Grey app, complete KYC verification with your PAN card, Aadhaar, and proof of address, and your account details are available within 24 hours.

When a payment arrives via ACH or Fedwire, Grey charges a 0.8% deposit fee (minimum $2, maximum $10). The funds sit in your USD wallet. You can hold them in dollars for as long as you need, which is useful if you want to wait for a more favourable exchange rate or if you have USD expenses (software subscriptions, SaaS tools, advertising spend) that you can pay directly using a Grey virtual card. The virtual card costs $5 to create with no monthly maintenance fee. Transactions on USD-priced sites incur no additional fee; purchases on non-USD websites carry a 2% + $0.50 cross-border fee.

When you are ready to convert to INR, Grey charges a 1% conversion fee capped at $6 per transaction. The conversion rate is displayed before you confirm, so you see exactly how much INR you will receive. Transfers to your Indian bank account require your IFSC code and typically arrive the same day. You can check Grey's fee calculator to see the exact cost for any transaction amount before you commit.

Instead of relying on automatic bank conversions that happen at arrival, or juggling multiple platforms for different currencies, you receive USD through one account, manage your balance in dollars, and convert to INR when the timing and rate suit you.

Grey charges a 0.8% fee on deposits (minimum $2, maximum $10), a 1% conversion fee (capped at $6), and a withdrawal fee that varies by currency. Exchange rates on Grey are variable and include a margin over the mid-market rate. Cross-border card transactions on non-USD websites incur a 2% + $0.50 fee. Always review fees and the conversion rate before confirming a transaction.

How creators receive payouts from international platforms

•

•

2 min read

I remember my first international payout like it was yesterday. I’d spent months building an audience, finally hit the YouTube monetisation threshold, and eagerly waited for the payment from Google AdSense. When the notification came through saying the money had been sent, I felt brilliant. Proper creator now, getting paid for my work. “Tell Mr Beast to come outside!” I said.

When I checked my account, the platform had sent the money, yes, but somewhere between California and my bank account, a part of it just vanished.

That moment taught me that understanding how you get paid is just as crucial as understanding how to create content people want to watch. Over the years, I’ve learned the hard way how international payouts actually work, where money gets lost, and how to structure things so you keep more of what you earn. This is what I wish someone had told me before that first disappointing payout.

Also read: How remote employees receive salaries from abroad

How international platforms actually pay creators

Platforms don’t just send money directly to your bank account like a friend transferring you a tenner. They use intermediaries called payout processors because they’re dealing with millions of creators across dozens of countries, all expecting payment, some even in their local currency.

YouTube pays through Google AdSense. TikTok uses various regional processors. Patreon, Twitch, and Substack all rely on third-party systems to handle the actual movement of money across borders. This makes sense from their perspective. They can’t open bank accounts in every country or navigate every local banking regulation themselves.

LDMAG1

The most common payout methods

I’ve used nearly every payout method available to creators, and each has taught me something different.

Direct bank transfers

Direct bank transfers via wire seemed more professional when I started getting larger payments. But international wire transfers involve multiple banks, each charging fees. I once received a $2,000 payment that cost me nearly $90 in combined bank charges and poor exchange rates. The sender paid $25, an intermediary bank took $20, my bank charged a receiving fee, and then converted USD at a rate significantly worse than the mid-market rate. It added up fast.

Platform-specific systems

Platform-specific systems like Payoneer work better for creators on freelance marketplaces. Payoneer integrates smoothly with platforms like Upwork and Fiverr, and it’s cheaper than PayPal. I still lost 1-2% on currency conversion, though, and withdrawal fees applied depending on how I accessed the money.

Multi-currency fintech accounts

The breakthrough for me came when I discovered multi-currency fintech accounts. Services like Wise, Revolut, and Grey offer virtual bank accounts in multiple currencies, such as USD, EUR, and GBP, so you can receive payments easily. This changed everything for me.

Also read: How Nigerians working remotely protect income from FX swings

How smart creators structure their payout systems

After years of losing money unnecessarily, I finally sorted out a proper system, and it made an immediate difference.

First, I opened a multi-currency account that let me receive USD, EUR, and GBP without forced conversion. I went with Grey because it gave me proper banking details with an account number, sort code, and routing number so that platforms and clients could pay into it directly.

Next, I updated my payout details across every platform. YouTube, Patreon, freelance platforms, and direct clients, I gave them all my new account details. Some platforms required verification periods, others had specific payout cycles. But once everything was switched over, the difference was clear.

Finally, I started converting currency strategically instead of immediately. If I’m not spending the money right away, I hold it in USD until the exchange rate improves. Sometimes this saves me 2-3%, which compounds significantly over months.

Also read: How to budget in foreign currencies using the Grey card

How Grey simplifies international payouts

I’m not here to give you a sales pitch, but I do want to explain why Grey made such a difference for me specifically.

Grey gives you virtual bank accounts in USD, EUR, and GBP with proper banking details. When a platform or client pays you, the funds are deposited directly into the relevant currency account. There’s no forced conversion, no intermediary banks taking unexpected fees, and no waiting two weeks for international wires to clear.

The exchange rates are transparent. Whenever I convert, I know exactly what I’m paying, as there are no hidden fees buried in exchange-rate spreads.

For creators earning from multiple countries and platforms, having one system that handles everything is genuinely valuable. I used to juggle different platforms, but now everything flows into Grey, and I manage it all in one place.

The clarity this provides also makes tax filing significantly easier. I have clean records of what I earned, in which currency, and when.

Also read: Switching from banks to global accounts: What to know

Getting paid is part of the strategy

Treating your payout infrastructure as part of your overall creator strategy isn’t boring back-office admin. It’s keeping more of the money you’ve worked hard to earn. It’s having control over your finances instead of just accepting whatever arrives in your account. It’s being professional about your business.

The platforms will keep paying you, but they won’t optimise how you receive that money. That’s your job. Understand the fees, use the right tools, and structure your systems intelligently. Your future self will thank you.

Open your free Grey account or download the app and start receiving international payouts transparently, efficiently, and without losing money you’ve already earned.

‍

Arrow (up)

Back to top