


<script type="application/ld+json" data-schema-version="grey-blog-v4"> [{"@context":"https://schema.org","@type":"BlogPosting","@id":"https://grey.co/blog/how-to-receive-and-convert-foreign-currencies-to-usdc-in-portugal#article","headline":"How to receive and convert foreign currencies to USDC in Portugal","description":"Learn how freelancers in Portugal can receive foreign payments and convert them to USDC easily with Grey","inLanguage":"en","url":"https://grey.co/blog/how-to-receive-and-convert-foreign-currencies-to-usdc-in-portugal","mainEntityOfPage":{"@id":"https://grey.co/blog/how-to-receive-and-convert-foreign-currencies-to-usdc-in-portugal#webpage"},"datePublished":"2024-11-29T12:45:31.424Z","dateModified":"2026-06-15T17:44:03.443Z","author":{"@type":"Person","@id":"https://grey.co/authors/olayoyin-olorunmota#person","name":"Olayoyin Olorunmota","url":"https://grey.co/authors/olayoyin-olorunmota","jobTitle":"Content Writer","sameAs":["http://www.linkedin.com/in/olayoyinolorunmota","http://x.com/yoyin_michael"]},"publisher":{"@type":"Organization","@id":"https://grey.co/#organization","name":"Grey","url":"https://grey.co","logo":{"@type":"ImageObject","url":"https://cdn.prod.website-files.com/6360022338a81bd6fdbb1145/6564ae1077a67e39d3c491a6_Grey%20Logo%20Lockup%20Black.svg"}},"image":{"@type":"ImageObject","@id":"https://grey.co/blog/how-to-receive-and-convert-foreign-currencies-to-usdc-in-portugal#primaryimage","url":"https://cdn.prod.website-files.com/636a85d290ee58e70c17e1c0/6a30186667d82cf053c2039f_6a301865ee103d2c91bd2284_how-to-receive-and-convert-foreign-currencies-to-usdc-in-portugal__header-image.webp","contentUrl":"https://cdn.prod.website-files.com/636a85d290ee58e70c17e1c0/6a30186667d82cf053c2039f_6a301865ee103d2c91bd2284_how-to-receive-and-convert-foreign-currencies-to-usdc-in-portugal__header-image.webp","width":1200,"height":675}},{"@context":"https://schema.org","@type":"WebPage","@id":"https://grey.co/blog/how-to-receive-and-convert-foreign-currencies-to-usdc-in-portugal#webpage","url":"https://grey.co/blog/how-to-receive-and-convert-foreign-currencies-to-usdc-in-portugal","name":"How to receive and convert foreign currencies to USDC in Portugal","description":"Learn how freelancers in Portugal can receive foreign payments and convert them to USDC easily with Grey","inLanguage":"en","primaryImageOfPage":{"@id":"https://grey.co/blog/how-to-receive-and-convert-foreign-currencies-to-usdc-in-portugal#primaryimage"},"breadcrumb":{"@id":"https://grey.co/blog/how-to-receive-and-convert-foreign-currencies-to-usdc-in-portugal#breadcrumb"}},{"@context":"https://schema.org","@type":"BreadcrumbList","@id":"https://grey.co/blog/how-to-receive-and-convert-foreign-currencies-to-usdc-in-portugal#breadcrumb","itemListElement":[{"@type":"ListItem","position":1,"name":"Home","item":"https://grey.co/"},{"@type":"ListItem","position":2,"name":"Blog","item":"https://grey.co/blog"},{"@type":"ListItem","position":3,"name":"How to receive and convert foreign currencies to USDC in Portugal","item":"https://grey.co/blog/how-to-receive-and-convert-foreign-currencies-to-usdc-in-portugal"}]}] </script>

How to receive and convert foreign currencies to USDC in Portugal

Olayoyin Olorunmota

TABLE OF CONTENT

SHARE THIS POST

If you’re a freelancer working with international clients in Portugal, managing your payment process doesn’t need to be hectic. USD Coin (USDC) offers a streamlined, stable solution for this.

This guide explains how freelancers and remote workers in Portugal can efficiently receive foreign currencies, convert them into USDC, and take control of their earnings with Grey.

Also read: How to receive and convert foreign currencies to USDC

Why convert foreign payments to USDC as a freelancer in Portugal?

For freelancers in Portugal working with international clients, converting foreign currencies to USDC offers several advantages:

Stable value: USDC is a stablecoin tied to the U.S. dollar, offering predictable value and avoiding the volatility of other cryptocurrencies.

Low fees: Compared to traditional bank transfers, USDC transactions come with significantly lower fees.

Quick access to funds: Blockchain technology ensures near-instant processing, so you get paid faster.

Flexible conversion: Hold USDC securely and convert it to Euros (EUR) when exchange rates are favourable.

Also Read: Send instant USDC payouts to 40+ countries with Grey

How to receive and convert foreign currency to USDC

Grey offers a seamless way to receive and convert foreign currencies into USDC. Here's how:

Open the Grey app

Log in to your Grey account via the app or website to securely access your USD and other currency balances.

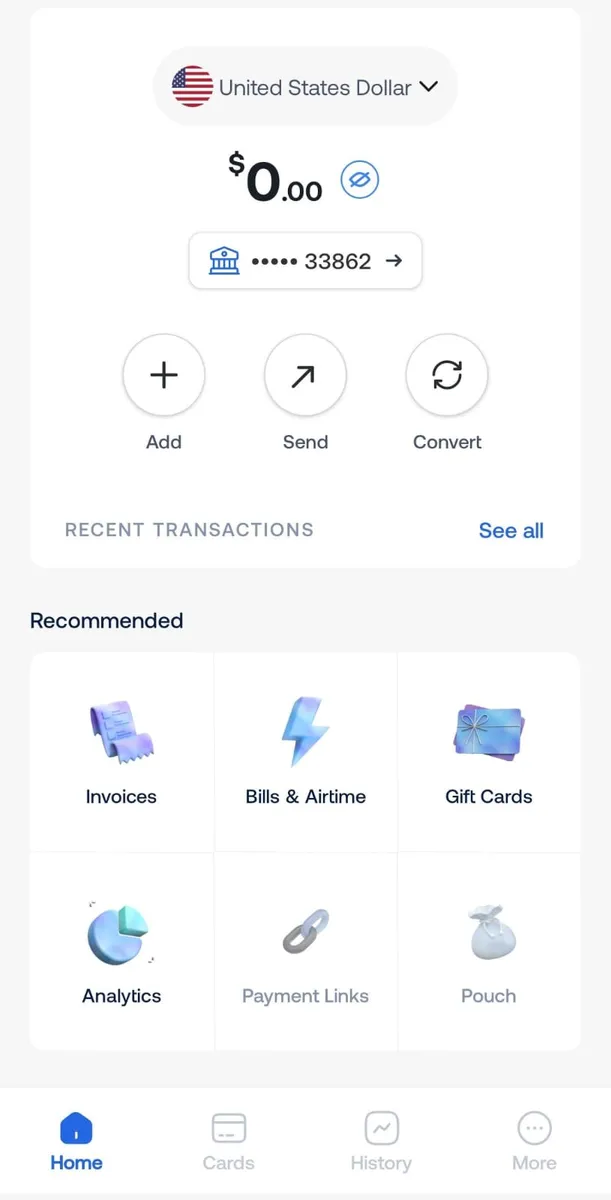
Select your USD balance

Navigate to the “Accounts” section and select your USD balance to initiate a USDC transfer.

How to receive and convert foreign currencies to USDC in Portugal

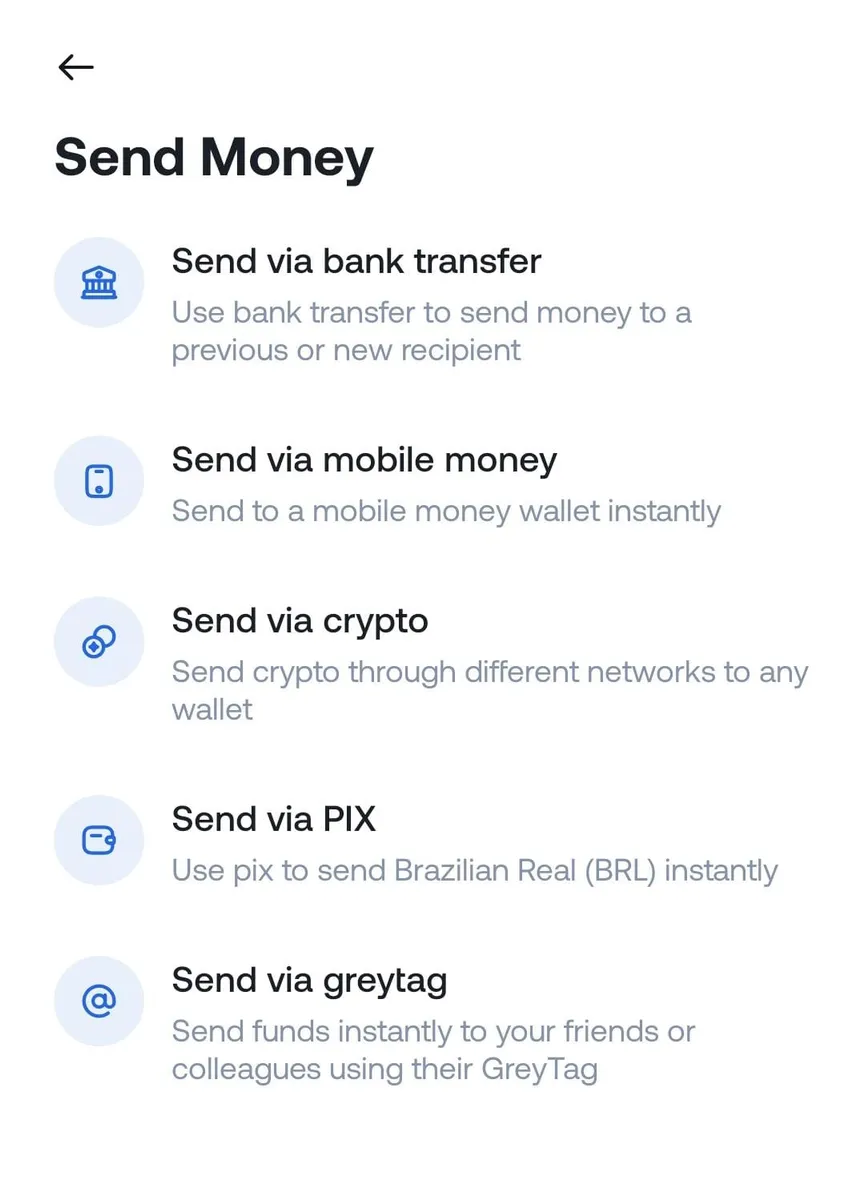
Tap “Send via crypto”

Select “Send money,” then choose “Send via crypto” to begin the process of sending USDC.

How to receive and convert foreign currencies to USDC in Portugal

Enter transaction details

Carefully input the recipient’s wallet address and choose the correct network (Solana or Binance Smart Chain) to ensure a successful transfer.

How to receive and convert foreign currencies to USDC in Portugal

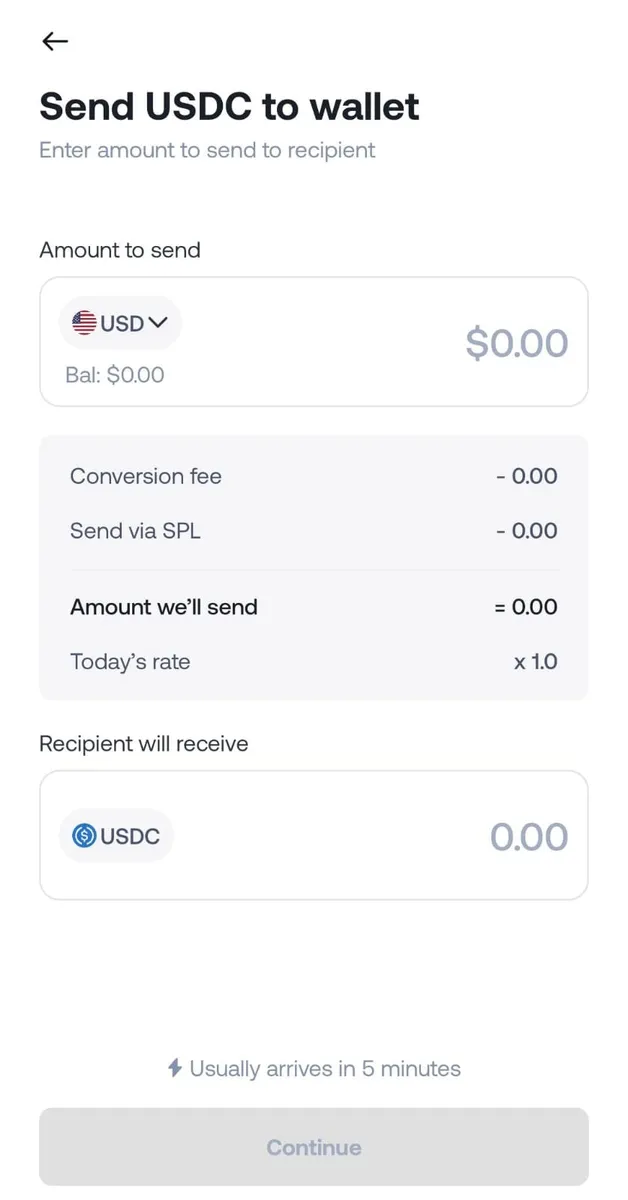
Input the transfer amount and review the details

Enter the amount of USDC to send. Double-check all information, including the wallet address and network, before proceeding.

How to receive and convert foreign currencies to USDC in Portugal

Confirm and complete the transfer

Once all details are verified, tap “Send” to complete the transaction. Grey will request two-factor authentication (2FA) for added security.

Transaction success

The recipient will receive the USDC shortly after processing. They can hold it, convert it to local currency, or use it for other purposes.

Also read: How to receive dollar payments and convert to USDC in Mexico

How to convert USDC to euros

To convert USDC into euros, use a crypto exchange or a local service that supports USDC-to-EUR conversions. Some exchanges offer competitive rates and direct conversions. Alternatively, you can convert through an intermediary currency like USD if needed.

What are the considerations for freelancers holding and converting USDC?

While holding USDC is convenient, here are a few factors to consider:

  • Network compatibility: Ensure the network used for USDC matches your wallet and the conversion service you use.
  • Fee awareness: Although USDC transactions generally have low fees, network charges can vary.
  • Tax compliance: Portugal has specific tax regulations regarding cryptocurrency earnings. Consult a local tax advisor to ensure you meet all obligations.

Also read: How to receive dollar payments and convert to USDC in Chile

Using Grey to simplify USDC management

With Grey, you can send USDC to supported wallets, manage funds with ease, and take advantage of robust security measures like two-factor authentication (2FA).

Create your Grey account today to unlock the full potential of USDC as a freelancer in Portugal.
‍

__wf_reserved_inherit

‍

Last updated:

October 2, 2026

Open a free Grey account to get startedJoin 1 million digital nomads
IF YOU ENJOYED THIS, CHECK THESE OUT

The best virtual debit cards in India for safe and easy online payments

•

•

2 min read

As the world becomes increasingly digital, the way we spend and receive money is rapidly evolving. For Indian users navigating online shopping, international subscriptions, freelancing gigs, or running remote businesses, virtual debit cards offer a safe, flexible, and borderless way to handle payments. From avoiding card rejection issues on global platforms to enjoying better security and real-time control, these digital cards are transforming how we manage money online.

Also read: Grey vs. local banks: The best way to exchange currency in India

In this guide, we’ll explore some of the top platforms offering virtual debit cards in India and explain   why Grey stands out as the recommended option for users looking to make seamless international payments.

Top reasons Indians are turning to virtual cards

  • Increased online spending: With the rise of e-commerce, more Indians are shopping online than ever before. From grocery shopping to fashion, electronics, and entertainment subscriptions, the online marketplace is booming. Platforms like Amazon, Flipkart, Netflix, Canva, and Spotify have become integral to daily life.
  • Cross-border payments: A significant number of Indian professionals work remotely or freelance for international clients, earning in foreign currencies such as USD, GBP, or EUR. Platforms like Upwork, Fiverr, Freelancer, and PayPal have created a global workforce, and payments often come from foreign sources.
  • Bypass restrictions: Virtual debit cards, especially those issued by fintech companies, can often bypass these geographical restrictions. These cards can be used for payments on global platforms, allowing consumers to access a wider range of services, from Amazon US to Google Play, without facing issues with acceptance.
  • Convenience: These cards can be instantly generated and used for online transactions, making them perfect for individuals who need quick access to payment methods without waiting for physical cards to arrive.

Also read: How to get an instant USD debit card in India

Virtual debit card alternatives in India

  • Grey: Grey is perfect for freelancers, remote workers, and global shoppers. It offers  virtual USD cards and the ability to create US, UK, and EU bank accounts to spend like a local.  Users benefit from great exchange rates, fast transactions and no hidden fees, making it a reliable choice for global payments and subscriptions.
  • Niyo: Niyo , powered by Equitas Small Finance Bank, is ideal for students and travellers who spend abroad, offering zero forex markup on international transactions. It comes with a  widely accepted Visa global card and is linked to a savings account that supports multi-currency spending.
  • Zolve: Zolve is designed for Indian students and professionals relocating to the U.S., providing virtual USD cards and access to a U.S. checking account. It even helps users start building credit before they arrive in the States. While it's an excellent option for those planning to move abroad, it doesn’t cater to freelancers or users who remain based in India.
  • Open Money: Open Money caters specifically to startups and small businesses, offering a business banking platform with corporate virtual cards that simplify managing team expenses, vendor payments, and recurring subscriptions. However, it’s designed for business use and may not be the best fit for individual users.

Why you should use the Grey virtual card

Real-time transaction alerts

Get notified the moment your card is used. These real-time alerts help you track spending and quickly spot any suspicious activity.

No hidden fees

Grey is upfront with its charges. There are no surprise fees or hidden charges, so you always know how much you're spending and how your funds are being used.

Secure international payments

Grey supports payments on trusted global platforms like Netflix, Spotify, Canva, Upwork, and PayPal, while using encrypted systems to protect your data and transactions.

Multi-currency accounts

Supports US, UK, and EU bank accounts, allowing you to receive money like a local from clients and platforms

Also read: Best ways to send money to India: Grey, Wise, Revolut, or PayPal?

Simplify your online payments

Grey offers a secure way to make global payments with virtual debit cards. Enjoy real-time currency conversion, low fees, and seamless international transactions. Sign up on Grey and get a virtual card today for stress-free global payments.

‍

How to activate an eSIM: A step-by-step guide

•

•

2 min read

Getting a new phone or switching to a different mobile plan usually means dealing with a physical SIM card. With an eSIM, there is no small plastic card to insert or remove, but you still need to activate the digital SIM before you can use your mobile plan.

The activation process is usually straightforward, although the steps can look slightly different depending on your phone and carrier. Instead of inserting a physical SIM, you add the eSIM through your phone settings using a QR code or the activation details provided by your carrier.

To activate an eSIM, open your phone settings, go to Mobile Data or Connections, and choose Add eSIM. Scan the QR code from your carrier or enter the details by hand, then follow the prompts to install the plan. Finally, set the eSIM as your line for data, calls or both.

Once the plan is installed, checking your mobile data and call settings can help make sure the eSIM is active and ready to use.

What you need before you start

Before you start the eSIM activation process, it helps to have everything you need within reach. Nothing is more frustrating than getting halfway through setup and realising you are missing the activation details or your phone does not support eSIMs.

First, make sure your phone is compatible with eSIM technology. If you are unsure, check which phones support eSIM before you begin, as compatibility can vary by device, model and region. You will also need an eSIM plan from a carrier that supports eSIM activation.

Your carrier should provide either a QR code or activation details that you can enter manually. Keep these details available before opening your phone settings, as you may need them during installation.

With a compatible phone, a carrier eSIM plan and your QR code or activation details ready, you can move on to the activation process and install the eSIM on your device.

Also read: eSIM vs physical SIM: What is the difference?

How to activate an eSIM on iPhone: a step-by-step guide to installing your mobile plan

Activating an eSIM on your iPhone lets you connect to a mobile network without inserting a physical SIM card. Before you begin, make sure you have your carrier’s activation details or QR code ready and your iPhone connected to Wi-Fi.

1. Connect to Wi-Fi

Connect your iPhone to a stable Wi-Fi network before you begin. A reliable internet connection helps your device communicate with your carrier and complete the eSIM setup without interruptions. If you are activating a new iPhone, complete the device setup before adding your mobile plan.

2. Open Cellular Settings

Open Settings on your iPhone and tap Cellular or Mobile Service, depending on your region. Select Add eSIM, then choose the available activation option. Your iPhone may offer several methods, including transferring from another iPhone or using a QR code supplied by your carrier directly.

3. Scan the QR Code

Select the option to use a QR code if your carrier has one. Point your iPhone camera at the code and follow the prompts on screen. Depending on your carrier, you may need to confirm activation or enter details before the plan downloads as expected.

4. Label Your Plan

Once the eSIM has been added, give the cellular plan a clear label, such as Personal or Work, so you can identify it easily. If you have multiple lines, choose which number should handle calls, messages and mobile data, then finish the setup process completely.

How to activate an eSIM on Android

Learn how to activate an eSIM on your Android phone, from scanning your carrier’s QR code to downloading the mobile plan and completing setup.

Samsung Galaxy

  1. Open Settings and tap Connections.
  2. Select SIM manager, then choose Add eSIM.
  3. Tap the Scan QR code from the service provider and scan your carrier’s QR code.
  4. Follow the on-screen instructions to download the eSIM and complete activation.

Google Pixel

  1. Open Settings and select Network & Internet.
  2. Tap the + (Add) icon beside SIMs.
  3. Select Download a SIM instead?, then tap Next.
  4. Scan your carrier’s QR code and follow the prompts to download and activate your eSIM.

Motorola

  1. Open Settings, then select Network & Internet.
  2. Tap Mobile network, choose Advanced, and select Carrier.
  3. Tap Add carrier, then select Start to open the scanner.
  4. Scan your QR code and tap Done to complete eSIM activation.

Xiaomi / Redmi

  1. Open Settings and select SIM cards & mobile networks.
  2. Turn on Use eSIM, then tap Manage eSIM.
  3. Select Add mobile plan and scan your provider’s QR code.
  4. Tap Download and follow the prompts to install and activate your eSIM.

OnePlus

  1. Open Settings and tap Mobile network.
  2. Select eSIM and turn on the eSIM feature.
  3. Tap Add eSIM, then select Next to continue.
  4. Scan your carrier’s QR code and follow the on-screen instructions to complete the setup.

Activating an eSIM without a QR code or using two eSIMs

You may not always need a QR code to activate an eSIM. Depending on your carrier and Android phone, you may be able to enter the activation details manually or download the eSIM through your carrier’s app. Manual activation typically requires information such as an activation code or SM-DP+ address provided by your carrier. If your carrier supports app-based activation, download its official app, sign in, and follow the instructions to add your mobile plan. The exact steps can vary by carrier and Android device.

Some Android phones also support two eSIMs, allowing you to keep two mobile plans on one device. This can be useful if you want to separate personal and work numbers, use different carriers when travelling, or keep a local plan alongside your main number. Your phone must support multiple active eSIMs, and the exact options vary by model. Check your device’s SIM settings to see whether you can add and manage more than one eSIM.

You may also like: How to pay online and in stores worldwide with your phone

Get a Grey eSIM and stay connected across 100+ countries

With a Grey eSIM, you can stay connected while travelling across more than 100 countries without worrying about traditional roaming charges. You can purchase a data plan through the Grey app, select your destination, choose the plan that suits your trip, and complete the payment.

Once you have purchased your plan, install the eSIM on your compatible phone and follow the activation steps for your device. After activation, turn on the eSIM for mobile data and make sure data roaming is enabled for the Grey line where required. Your plan will then connect to a supported local network when you arrive.

The Grey app also makes it easier to hold and spend multiple currencies while you travel. You can manage your available balances, exchange currencies when needed, and use your Grey card for eligible purchases, giving you more flexibility when moving between countries. Download the Grey app to get started

Frequently asked questions about activating an eSIM card

How do I activate an eSIM?

Open your phone’s Settings and find the Cellular, Mobile network, or SIM manager menu. Select Add eSIM or the equivalent option, then follow your carrier’s instructions. You may need to scan a QR code or enter activation details manually.

Do I need a QR code?

A QR code is the most common way to activate an eSIM, as carriers typically provide one with your plan. However, some devices and networks also support manual activation, allowing you to enter details such as an activation code or SM-DP+ address.

Can I activate an eSIM without Wi-Fi?

You generally need an internet connection to download and activate an eSIM profile. Wi-Fi is usually the simplest option, although some devices may allow activation using mobile data. Check your carrier’s instructions before starting, especially when travelling without an active connection.

How long does activation take?

eSIM activation usually takes only a few minutes once you have downloaded the digital profile. However, the exact time depends on your carrier, device, and network. If your eSIM does not connect immediately, restart your phone and check that the correct line is enabled.

Can I move an eSIM to a new phone?

You can move an eSIM to another compatible phone, but the process depends on your carrier and device. Some phones support direct eSIM transfer, while others require you to deactivate the old profile and request a new activation code or QR code.

How do I get a Grey eSIM?

Open the Grey app, go to the Lifestyle section, and select eSIM. Choose your destination country and the data plan that suits your trip, then complete your purchase. Download the eSIM to your compatible device and follow the activation instructions.

How to send money from the US to the Philippines in 2026

•

•

2 min read

The Philippines receives more remittances from the United States than from any other country. Over four million Filipino Americans send money home regularly to cover everything from monthly household expenses and school fees to hospital bills and property payments. The Bangko Sentral ng Pilipinas (BSP) reported record remittance inflows in recent years, with the US remaining the largest source.

The good news is that sending money from the US to the Philippines has become significantly cheaper and faster than it was even five years ago. The bad news is that the cheapest option depends on how your recipient wants to receive: bank transfer, mobile wallet (GCash, Maya), or cash pickup. This guide covers the fees, speed, and delivery methods available in 2026, so you can find the right option for your specific situation. If you also send to other countries, see our broader.

What it costs to send money from the US to the Philippines with Grey

Grey charges a 1% conversion fee when converting USD to PHP, plus a $0.85 payout fee. The payout fee is the same whether you send the money to a Philippine bank account or a supported mobile wallet.

Here’s what the total fees look like at different transfer amounts:

Transfer amount Conversion fee (1%) Payout fee Total fees
$500 $5.00 $0.85 $5.85
$1,000 $10.00 $0.85 $10.85
$2,000 $20.00 $0.85 $20.85

‍

For example, sending $500 costs $5 to convert USD to PHP, plus the $0.85 payout fee, bringing the total fees to $5.85.

You can send PHP by bank transfer or mobile money. Grey supports wallets including GCash and Maya, and both bank and mobile money transfers are typically completed instantly or up to 1 business day. Processing can occasionally take longer depending on the recipient's bank or network conditions.

Bank transfer or mobile wallet: how your recipient gets the money

Bank transfer

Grey delivers PHP to all major Philippine banks. Your recipient needs a peso bank account, and you need their full name (as it appears on the account), the bank name, and the account number. The funds arrive as a standard deposit.

Bank transfer is the right choice for larger payments: hospital bills, tuition fees, property transactions, or any amount where the recipient needs the funds in their bank account. There are no receiving limits on the bank side beyond whatever the bank itself imposes.

Mobile wallets: GCash and Maya

If your recipient uses GCash or Maya, you can send directly to their mobile wallet using their registered name and mobile number. Mobile wallet delivery is often faster than bank transfer for smaller amounts and more convenient for recipients who do not use a bank account regularly.

Mobile wallets typically have per-transaction and monthly receiving limits set by the wallet provider. For larger medical bills or tuition payments, a bank transfer is usually the better option. For regular household support, groceries, or smaller medical expenses, a mobile wallet is practical and fast.

Also read: Best apps to send money internationally from the US in 2026

What Filipino Americans are sending money home for

Understanding the common use cases helps you choose the right delivery method and timing.

Monthly family support. Regular transfers to parents, siblings, or extended family can help cover household expenses, groceries, utilities, and daily needs. Grey charges a 1% conversion fee when converting USD to PHP, plus a $0.85 payout fee. Before sending, you can review the fees and the final PHP amount your recipient will receive.

Medical bills. Philippine hospital bills are typically paid to the hospital's bank account. Ask the hospital for their full business name, bank name, and account number. Send the exact PHP amount of the bill so the hospital receives the full payment without any shortfall from fees. Grey shows the exact amount your recipient will receive before you confirm, so you can match it to the billing statement.

Education and tuition. Philippine universities and schools accept bank transfers. Tuition payments tend to be large and time-sensitive (with fixed due dates). Send via bank transfer and keep the transaction receipt as proof of payment.

Property and investments. Buying property, paying mortgage instalments, or investing in the Philippines from the US can involve larger transfers. For these payments, it helps to check the exchange rate, fees, and recipient details carefully before confirming the transfer.

Emergency expenses. Typhoons, medical emergencies, or unexpected costs. Speed matters. Check whether mobile wallet delivery is instant and whether it fits within the amount limits. For larger emergency amounts, a bank transfer with confirmed delivery timing is more reliable.

How to send money from the US to the Philippines with Grey

1. Open your Grey account. Download the Grey app, sign up, and verify your identity. US residents need a government-issued ID. Grey is licensed by FinCEN as a Money Services Business.

2. Fund your account. Transfer USD from your US bank account into your Grey wallet. You can fund via ACH (free, arrives same day) or wire transfer.

3. Choose your destination. Tap Send, select PHP (Philippine Peso), and choose bank transfer or mobile wallet.

4. Enter your recipient's details. For bank transfer: their full name, bank name, and account number. For mobile wallet: their registered name and mobile number. Grey shows the exchange rate, conversion fee, payout fee, and the exact PHP amount your recipient will receive before you confirm.

5. Confirm and send. Review the summary and confirm with your PIN. Your recipient does not need a Grey account. The funds arrive as a standard deposit in their bank account or mobile wallet.

Three ways to save on US-to-Philippines transfers

Check the total cost before you send. Grey charges a 1% conversion fee when converting USD to PHP, plus a $0.85 payout fee. Before confirming your transfer, you can review the exchange rate, fees, and exact PHP amount your recipient will receive, so there are no surprises after you send.

Use ACH to fund your Grey account. ACH transfers from your US bank to your Grey wallet are free and arrive the same day. Wire transfers cost $25 (SWIFT) and are unnecessary for most users. Fund via ACH unless you need to move a very large sum urgently.

Send the exact PHP amount for bills. When paying a hospital bill, tuition fee, or any fixed-amount obligation, enter the amount in PHP rather than USD. Grey will calculate exactly how much USD is needed to deliver that PHP amount after all fees. This ensures the recipient receives the full bill amount with no shortfall.

You may also like: How to receive an international wire transfer: Fees, timing, and what to tell the sender

Frequently asked questions about sending money from the US to the Philippines

What is the cheapest way to send money from the US to the Philippines?

The cheapest option depends on the amount, exchange rate, fees, and delivery method. With Grey, USD-to-PHP conversions have a 1% conversion fee, plus a $0.85 payout fee. Before confirming, you can see the applicable fees and final PHP amount your recipient will receive, making it easier to compare the total cost with other transfer options.

How long does it take to send money from the US to the Philippines?

Bank transfers to the Philippines typically arrive within 1 to 2 business days. Mobile wallet transfers, including GCash and Maya, may arrive faster. Actual delivery times can vary depending on the recipient’s bank or mobile wallet provider and network conditions.

Can I send money from the US to GCash in the Philippines?

Yes. Grey supports delivery to GCash using the recipient's registered name and mobile number. Per-transaction and monthly limits may apply based on GCash's own policies." If no, replace with: "Grey currently delivers PHP via bank transfer to all major Philippine banks.

How do I pay a hospital bill in the Philippines from the US?

Ask the hospital for their full business name, bank name, and bank account number. Send the exact PHP amount of the bill through Grey, using the hospital's bank details as the recipient. Grey shows the exact PHP amount your recipient will receive before you confirm, so you can match it to the billing statement. Keep the transaction receipt as proof of payment.

Do I need to pay tax on money sent to the Philippines from the US?

Personal remittances sent from the US to the Philippines are generally not taxable for the sender. The US does not tax outgoing personal transfers. However, if you send more than $16,000 to a single individual in a calendar year, you may need to file a gift tax return (IRS Form 709), though no tax is typically owed until you exceed the lifetime exemption. Consult a tax professional for your specific situation.

What exchange rate does Grey use for USD to PHP?

The exchange rate available for USD to PHP is shown in the Grey app before you confirm the conversion. Grey charges a 1% conversion fee, and you can review the rate, applicable fees, and final PHP amount before completing the transaction.

Exchange rates on Grey are variable and include a margin over the mid-market rate. Always review the rate before confirming a conversion. Grey is a financial technology company, not a bank. Banking services are provided by licensed banking partners. This article is general information, not financial or tax advice. Consult a qualified professional for tax questions.

What is the currency of Vietnam? Dong symbol and code

•

•

2 min read

Vietnam has become one of Southeast Asia's fastest-growing destinations for tourists and digital nomads, thanks to its affordable cost of living, rich culture and easy-to-obtain e-visa. In 2025, more than 21 million international visitors travelled to the country, while many remote workers continue to choose Vietnam for its vibrant cities and low living costs.

Living in Vietnam is remarkably affordable by international standards. Many digital nomads enjoy a comfortable lifestyle on $1,000 to $1,500 per month, making the country one of Asia's best-value destinations without sacrificing modern conveniences, reliable internet or an exciting food and café culture.

The official currency of Vietnam is the Vietnamese dong, currency code VND and symbol d with a bar through it. It is issued by the State Bank of Vietnam and circulates mainly as polymer banknotes. Because the dong has a low unit value, everyday prices often run into the tens or hundreds of thousands.

This guide explains Vietnam's currency, its symbol and code, the banknotes you'll use every day and what you should know before spending money across the country.

What is the currency of Vietnam?

The currency of Vietnam is the Vietnamese dong, abbreviated as VND. It is the only official currency used throughout the country, from the busy streets of Ho Chi Minh City to the mountain towns in the north. Whether you're paying for a bowl of pho, booking a hotel or taking a taxi, almost every transaction is priced in Vietnamese dong.

The Vietnamese dong is issued and regulated by the State Bank of Vietnam, the country's central bank. It is responsible for printing banknotes, managing the money supply and maintaining financial stability. Today, most circulating denominations are durable polymer banknotes, introduced to improve security and withstand Vietnam's hot, humid climate better than traditional paper notes.

The dong has been part of Vietnam's monetary system for decades, although it has evolved through several currency reforms since its introduction after independence. While its high denominations may seem unusual to first-time visitors, you'll quickly get used to seeing prices quoted in thousands or even millions of dong during everyday spending.

How to recognise Vietnam's currency symbol and code

The Vietnamese dong is identified by the currency code VND and the symbol ₫. While you'll sometimes see the symbol placed before an amount, prices in Vietnam are more commonly written with the amount first, followed by the symbol, such as 50.000₫. The code VND is mainly used by banks, travel websites, exchange services and financial institutions when referring to the currency internationally.

One detail that surprises many first-time visitors is how numbers are written. Vietnam uses dots (.) as thousands separators, so 50.000₫ simply means fifty thousand dong, not fifty with decimal places. Because the dong has a relatively low value compared to currencies like the US dollar or euro, everyday purchases are often priced in thousands or even hundreds of thousands of dong.

You'll mainly encounter VND when checking exchange rates, using banking apps or withdrawing cash, while local shops, restaurants and markets simply display prices in dong. Understanding both the symbol and the code makes paying and converting money much easier throughout your trip.

Also read: Best ways to receive payments from international clients

What denominations of Vietnamese dong are in circulation?

Denomination Colour Common use
10,000₫ Dark yellow-green Usually used for small purchases, local transport fares, bottled water and inexpensive street food.
20,000₫ Dark blue Commonly spent on coffee, convenience store shopping, snacks and other everyday expenses.
50,000₫ Pinkish-purple Frequently used for restaurant meals, taxi fares, market shopping and attraction entrance tickets.
100,000₫ Dark yellowish-green One of the most widely circulated notes, suitable for shopping, dining and medium-sized daily transactions.
200,000₫ Reddish-brown Often used for hotel payments, larger restaurant bills, guided tours and higher-value purchases.
500,000₫ Cyan-blue Vietnam's highest denomination, commonly dispensed by ATMs and used for accommodation, larger purchases and cash withdrawals.

What is the exchange rate for the Vietnamese dong?

Vietnam's exchange rate is managed rather than left to move entirely with market forces. Each business day, the State Bank of Vietnam publishes a central reference rate for the Vietnamese dong against major foreign currencies. Commercial banks and licensed foreign exchange providers are then required to buy and sell within a regulated trading band around that official rate, helping reduce sharp currency fluctuations.

Many first-time visitors are surprised by how large the numbers look. Seeing exchange rates in the tens of thousands of dong for one US dollar or euro is completely normal. This is the result of decades of inflation and currency devaluations that reduced the dong's purchasing power. Instead of introducing a redenomination by removing zeros, Vietnam retained its existing denominations.

Before exchanging money or transferring funds, it's worth checking the latest rates. The State Bank of Vietnam publishes the official daily reference rate, while Vietcombank displays live retail exchange rates that reflect what customers typically receive when buying or selling foreign currency.

How much is the Vietnamese dong worth against the US dollar?

Rate type Who uses it Exchange rate
(per US$1)
Estimated fees / Spread VND received
(for US$100)
Best for
Mid-market rate Global markets and fintech platforms 26,280₫ 0₫ (no hidden markup) 2,628,000₫ Digital transfers and comparing real exchange rates
Commercial bank Banks and authorised exchange desks 26,100₫ ≈18,000₫ (around 0.7% spread) 2,610,000₫ Secure, regulated in-person currency exchange
Gold shop bureau Licensed independent exchange shops 26,270₫ ≈1,000₫ (around 0.04% spread) 2,627,000₫ Getting the highest cash value for larger exchanges

The example above uses US$100 to show how different exchange rates and spreads can affect the amount of Vietnamese dong you actually receive.

The Gold shop advantage: Because gold shops compete aggressively for physical foreign currency, they offer a rate almost identical to the true mid-market rate, allowing you to walk away with an extra 17,000₫ per $100 compared to a bank

How do travellers get and spend Vietnamese dong?

Most travellers get Vietnamese dong by withdrawing cash from ATMs or exchanging foreign currency at banks and licensed exchange counters. While hotels, shopping malls and larger restaurants in cities like Hanoi and Ho Chi Minh City usually accept Visa and Mastercard, many street food stalls, local markets and smaller businesses still prefer cash, so it's worth carrying some dong every day.

Managing your travel money is easier with Grey. You can hold foreign currencies in your multi-currency account before your trip and use the Grey virtual card wherever Visa is accepted across Vietnam. If you also need to send money to someone in Vietnam, Grey doesn't currently support direct NGN-to-VND bank transfers. Instead, you can convert your funds to USD Coin (USDC) and send them instantly to a crypto wallet or platform that supports payouts in Vietnam, providing a better alternative for cross-border transfers.

Frequently asked questions

What is the symbol for the Vietnamese dong?

The official symbol for the Vietnamese dong is ₫, while the international currency code is VND. In Vietnam, prices are usually written with the amount first and the symbol afterwards, such as 50,000₫. You'll also see VND on banking apps, exchange services and travel websites when viewing exchange rates.

Is USD accepted in Vietnam?

The Vietnamese dong is the only legal currency for everyday transactions. Although some luxury hotels, tour operators and selected tourist businesses may accept US dollars, most shops, restaurants and markets expect payment in dong. Carrying local currency is the safest option for travellers exploring beyond major tourist areas.

How much is 1 USD in Vietnamese dong?

Exchange rates change daily, but US$1 usually converts to around 25,000-26,300₫, depending on market conditions and where you exchange your money. Banks, exchange counters and digital financial platforms may all offer slightly different rates, so it's worth comparing before making larger currency exchanges.

Can I use my card in Vietnam?

Yes, international Visa and Mastercard cards are widely accepted in hotels, shopping malls, supermarkets and many restaurants across Vietnam's larger cities. Smaller businesses and street food vendors often accept cash only. If you're travelling with a Grey virtual card, you can use it anywhere Visa is accepted.

Should I exchange money before I travel?

It's usually better to wait until you arrive in Vietnam before exchanging large amounts of money. Local banks, authorised exchange counters and ATMs often provide more competitive rates than exchange services in your home country. Compare rates first and avoid exchanging money at airports unless absolutely necessary.

How do I send money to Vietnam?

Grey doesn't currently support direct NGN-to-VND bank transfers. Instead, you can convert your funds to USD Coin (USDC) within the Grey app and send them instantly to a crypto wallet or platform that supports payouts in Vietnam. This provides a practical alternative for cross-border transfers where supported.

Digital and eGift Visa cards : what's the difference?

•

•

2 min read

Digital gift cards have become one of the fastest and most convenient ways to send money and gifts online. Whether it's a birthday, holiday, last-minute celebration or employee reward, they eliminate the need to visit a shop or wait for physical delivery, making gifting almost instant.

A Visa eGift card is a prepaid digital card loaded with a fixed amount of money and delivered by email. Instead of receiving a plastic card, the recipient gets a digital card that can be used for eligible online purchases wherever Visa is accepted.

Although Visa eGift cards are convenient, they're often confused with virtual Visa cards used for everyday spending. They serve different purposes, come with different limitations and offer different levels of flexibility. Understanding how they work will help you decide which option best suits your needs.

What is a Visa eGift card?

A Visa eGift card is a prepaid digital gift card loaded with a fixed amount of money that can be used for online or phone purchases wherever Visa is accepted. Unlike a credit card, it doesn't let you borrow money or spend beyond the balance available on the card. Once the funds are used up, the card cannot be topped up unless the issuer specifically allows it.

One of the biggest advantages of a Visa eGift card is convenience. Instead of waiting for a physical card to arrive in the post, it's delivered almost instantly by email or text message. That makes it a popular choice for birthdays, holidays, employee rewards and last-minute gifts.

Because the card already contains a set value, recipients can start spending immediately without linking a bank account or applying for credit. It offers a simple, secure way to shop online while giving the sender full control over how much money is loaded onto the card.

Also read: How to add your Grey card to Apple Pay or Google Pay

Digital Visa eGift card vs physical Visa gift card

Both digital and physical Visa gift cards let you spend prepaid funds, but they differ in how they're delivered, where they're used and how easily they can be replaced if something goes wrong.

Feature Digital Visa eGift Card Physical Visa Gift Card
Delivery method Sent instantly by email or text message Shipped by mail or purchased in retail stores
Speed Usually available within minutes May take several days if ordered online
Online use Ready for online and phone purchases immediately Can be used online after the billing address is registered, where required
In-store use Typically requires adding the card to a digital wallet such as Apple Pay or Google Wallet Can be tapped, inserted or swiped directly at supported payment terminals
Replacement Easier to recover if the original email or text is still available Usually harder to replace and may require the original receipt, card details or serial number

How to buy and send a Visa eGift card

Buying a Visa eGift card takes only a few minutes. While the exact process varies by issuer, the steps below are generally the same across most providers.

  • Choose the gift amount: Select the value you want to load onto the Visa eGift card. Most issuers offer preset amounts, while others allow you to enter a custom value within their limits.
  • Enter the recipient's details: Add the recipient's email address or mobile number, depending on the delivery option. You can usually include a personalised message for birthdays, holidays or special occasions.
  • Pay for the card: Complete your purchase using an accepted payment method, such as a debit card, credit card or bank account. Double-check the details before confirming your order.
  • Send and check delivery: Once payment is approved, the Visa eGift card is sent digitally, often within minutes. Keep in mind that many issuers charge a purchase or processing fee in addition to the card's value.

Also read:  How to use Google Pay worldwide with your Grey virtual card

How to redeem and use a digital Visa gift card

Once your Visa eGift card arrives, you'll need to activate it before making purchases. Follow these simple steps to start spending your prepaid balance.

  • Open the delivery message: Find the email or text containing your Visa eGift card, then open it and review any instructions provided by the card issuer before activating or using the card.
  • Access the card securely: Click the secure activation or access link included in the message to reveal your card number, expiry date and CVV needed for eligible purchases.
  • Register your billing address: If required by the issuer, register your billing address online. This helps verify your identity and allows the card to work smoothly with online merchants.
  • Add the card to your digital wallet: Save the card to Apple Pay, Google Wallet or another supported wallet if you want to make contactless purchases where digital wallets are accepted.
  • Shop and check your balance: Enter the card details at online checkout like any Visa card, then monitor your remaining balance through the issuer's website or app before making another purchase.

Visa eGift card fees, expiry and spending limits

Knowing the common fees and restrictions before buying a Visa eGift card can help you avoid unexpected surprises and get the most value from your purchase.

  • Activation fees: Most Visa eGift cards include a one-time activation or purchase fee, typically ranging from $3 to $7, depending on the issuer and the value loaded onto the card.
  • Dormancy fees: Some issuers charge an inactivity fee of $2 to $5 per month after the card has remained unused for around 12 consecutive months, so always check the issuer's terms.
  • Expiry dates: The money loaded onto the card generally does not expire, although the card itself may expire after five to nine years. If this happens, you can usually request a replacement card.
  • Spending limitations: Many Visa eGift cards are not accepted for recurring subscriptions, hotel bookings, car rentals or pay-at-the-pump fuel purchases, as these merchants often require additional payment authorisation.

When a reloadable virtual card is the better choice

A Visa eGift card is great for one-time gifting, but it isn't designed for everyday spending. Once the prepaid balance runs out, you'll usually need to buy another card. It also comes with spending restrictions and often can't be used for subscriptions, travel bookings or ongoing online purchases, making it less practical for regular use.

If you need a card for repeat payments or managing money across borders, a Grey Visa card offers far more flexibility. Instead of spending a fixed prepaid amount, you can fund your Grey account, create your Visa card in minutes and continue using it for online purchases wherever Visa is accepted. It's especially useful for freelancers, remote workers and travellers who receive or send foreign currencies, giving you a more practical long-term payment solution than repeatedly buying one-off gift cards.

Frequently asked questions

Is a Visa eGift card the same as a debit card?

No. A Visa eGift card is a prepaid card loaded with a fixed amount of money, while a debit card is linked directly to your bank account. Once the eGift card balance is spent, you usually can't add more funds unless the issuer specifically offers reloadable cards for customers.

Can I use it internationally?

It depends on the card issuer. Some Visa eGift cards work internationally wherever Visa is accepted, while others are restricted to domestic purchases only. Always check the issuer's terms before buying if you plan to use the card outside your home country or with overseas merchants online.

Do Visa eGift cards expire?

The funds on most Visa eGift cards generally do not expire, although the card itself usually has an expiry date printed or displayed digitally. If the card expires while money remains, many issuers allow you to request a replacement so you can continue using your remaining balance later.

Can I reload a Visa gift card?

Most Visa eGift cards cannot be reloaded after purchase. They are designed for one-time gifting with a fixed prepaid balance. If you need a card for regular spending, look for a reloadable prepaid card or a virtual Visa card linked to a funded account instead for flexibility.

Can I add it to Apple Pay or Google Pay?

Yes, if the card issuer supports digital wallets. Many Visa eGift cards can be added to Apple Pay or Google Pay, allowing contactless payments in stores that accept these services. Check your issuer's instructions, as support and activation requirements vary between providers and card programmes available.

What happens to leftover balances?

Any remaining balance stays on the card until it is fully spent, subject to the issuer's terms and any inactivity fees that may apply. You can usually continue using the remaining funds for future eligible purchases or combine the balance with another payment method during checkout.

Whether you're buying a last-minute present or looking for a safer way to shop online, understanding how Visa eGift cards work helps you choose the right option. If you need something more flexible for everyday spending, travel or international payments, download the Grey app and create your Grey Visa card in just a few minutes.

Capital One virtual card number: How to generate one for shopping

•

•

2 min read

Sharing your real credit card details with every online store still comes with unnecessary risk. There might be data breaches, accidental overcharges, and you might just forget to cancel the subscription until you get charged again. Capital One’s Eno virtual card numbers solve this by letting you create a unique card number for each online payment.

Capital One generates virtual card numbers through Eno, its browser assistant. Eno creates a unique card number for each merchant you shop at, masking your real card number. To set up, install the Eno browser extension or use Eno in the Capital One app, sign in to your account, and let Eno autofill virtual numbers at checkout.

Every time you enter your real card number at an online merchant, you risk the real card number falling into the wrong hands. In this guide, you’ll learn exactly how to generate a Capital One virtual card number, how to customise the controls, and the best places to use it so every online purchase stays protected.

What is a Capital One virtual card number?

A Capital One virtual card number is a temporary card number generated by Capital One’s virtual assistant, Eno. This number is specifically for an online merchant to complete a transaction.]

Instead of entering your actual card details at checkout, Eno uses a different number that is mathematically linked to your account but appears to be a completely separate card.

According to Capital One's official information on Eno, each virtual number is created specifically for a merchant. A number generated for one website will not work at another. This means that if a merchant's database is compromised, the stolen number is useless anywhere else.

You can create and manage virtual cards by either using the Eno browser extension or through the Capital One mobile app if your card is eligible.

How Capital One Eno virtual card numbers work

Eno's virtual card numbers work differently from those of some other virtual card providers because the numbers are unique to the merchant. Here is how the numbers work.

Each virtual number is linked to only one merchant at the time of creation. If you generate a number for Netflix, that number can only be charged by Netflix. This removes the risk of the card number being used to shop on Amazon if the number falls into the wrong hands.

When you visit an online checkout page in a supported browser, Eno detects the payment form and automatically offers to fill in a virtual card number. You do not need to manually copy and paste anything.

You can view all your active virtual card numbers in one place from the Eno dashboard. It shows you which merchant each number is linked to, recent transactions, and whether the card is active or locked. All card numbers draw directly from your Capital One account balance and don’t require manual top-ups.

If a merchant you have a virtual number with gets breached, or you don’t want to be charged whenever a card expires, you can lock or replace just that number. Your real card is unaffected, and your other virtual numbers for other merchants continue working normally.

How to get a Capital One virtual card number

You can generate a virtual card using either the Eno browser extension or the Capital One mobile app.

If you prefer to use a browser extension:

  1. Go to eno.capitalone.com or search "Capital One Eno browser extension" in your browser's extension store.
  2. Install the Eno extension in Chrome, Firefox, or Microsoft Edge.
  3. When prompted, sign in to your Capital One account through the extension.
  4. The next time you visit an online checkout page, Eno will appear automatically and offer to create or use a virtual card number for that merchant.

If you prefer to use the mobile app:

  1. Open the Capital One mobile app.
  2. Tap the Eno button (the chat interface within the app).
  3. Ask Eno to generate a virtual card number, or navigate to the virtual card feature within the app.
  4. Copy the virtual number and use it manually at checkout, or let Eno fill it in if you are browsing on mobile.

Not every Capital One credit card supports Eno virtual cards. If you don't see the feature, your card may not be eligible. You can reach out to Support to confirm.

Using Capital One Eno for online shopping

Virtual card numbers are particularly useful in certain situations.

1. Subscriptions you might want to cancel.

When you sign up for a streaming service, a SaaS tool, or any subscription, your card is stored and charged monthly. Using an Eno virtual number means you can lock or remove that specific number to stop being charged, without affecting any of your other subscriptions or your real card.

2. Free trials with auto-renewal

Many free trials require your card details at signup and automatically start charging if you don’t cancel before the trial expires. Using a virtual number that you lock at the end of the trial period is a clean way to make sure the charge does not go through if you forget.

3. Buying from a merchant you have not used before.

A virtual number limits potential damage if the merchant turns out to be unreliable or has poor security. Your real card details are never exposed.

Capital One virtual card limitations

Eno virtual card numbers are useful, but they are not always suitable.

  • Browser compatibility: Eno works in the popular browsers, including Chrome, Firefox, and Microsoft Edge. However, it may be limited or unavailable in some other browsers.
  • Online only: Virtual card numbers cannot be used for in-person purchases. They only work at online checkout forms. You cannot tap or swipe a virtual number at a physical shop.
  • Some merchants reject tokenised numbers: Some merchants, particularly hotels and car rental companies, may reject virtual cards because they need a card for security deposits or incidental charges.
  • Eligible cards only: Not all Capital One products include Eno virtual card numbers. If you do not see the option in the app or extension, your card may not be eligible.

Alternatives to Capital One virtual cards

If Eno does not work for your browser or device, or if you need a virtual card that works across currencies, there are other options.

Other US bank virtual cards

Some US banks also issue virtual card numbers. These are tied to that specific bank account.

  • Citi Virtual Account Numbers let you generate unique numbers tied to a Citi credit card, set monthly or per-transaction limits, and cancel them at any time without affecting the main card.
  • American Express offers virtual card numbers on selected products, allowing single-use or limited-duration numbers for online purchases.
  • Chase Bank provides limited temporary number functionality through Click to Pay on some cards, though it is less flexible than Eno’s dedicated system.

These bank options work best when you already hold a credit card with that institution and primarily shop in a single currency (almost always USD). They keep rewards, credit history, and customer service within one relationship, but they offer little help if you need to hold or spend balances in euros, pounds, or other currencies.

Fintech virtual cards

Fintech platforms issue virtual cards that work differently. Instead of generating a temporary number that draws from one existing credit card, they let you hold balances in multiple currencies and issue virtual cards that spend directly from those balances. Some offer disposable/single-use cards that work just like virtual card numbers.

The Grey Plus Card is a virtual Visa card connected to USD, GBP, or EUR balances. Unlike Eno, it is not tied to an existing bank account card. For USD purchases on a USD-funded Grey card, no cross-border conversion fee applies. You can create multiple cards for various payments with set limits, and instantly freeze and unfreeze cards.

Grey is particularly useful for freelancers, remote workers and anyone who regularly pays for international subscriptions or shops on US and European sites. Conversion happens only when you choose, at a rate shown before confirmation, rather than being forced at the point of every purchase.

Learn about how Mastercard virtual cards work.

Let's compare the Grey virtual card and the Capital One Eno virtual card numbers:

Feature Capital One Eno Grey virtual card
How to get it Install Eno extension or use
Capital One app
Sign up with Grey, create card instantly
Browser support
Chrome, Firefox, Edge only Any browser (enter number manually)
Multi-currency
No (tied to USD Capital One card) Yes (USD, GBP, EUR)
Per-merchant numbers Yes No (single reusable card), but supports multiple cards
In-store use No Yes (via Apple Pay, Google Pay in eligible regions)
Requires existing bank card
Yes (Capital One card) No
One-time fee
None $5

Open a multi-currency account with Grey to manage international purchases in USD, GBP, or EUR from one place.

Get a Grey virtual card for cross-currency online shopping that works in any browser, on any device.

Frequently asked questions

Is Capital One Eno free?

Yes. Eno is a free feature included with eligible Capital One accounts. There is no charge to install the browser extension, generate virtual card numbers, or use Eno to manage your cards. The only cost is the standard fees and interest that apply to your underlying Capital One card.

Can I generate multiple virtual card numbers with Capital One?

Yes. Eno generates a separate, unique number for each merchant where you shop. You can have many active virtual numbers at once, one per merchant. You manage all of them through the Eno dashboard.

Does the Eno virtual card number change for each merchant?

Yes. Each merchant gets its own unique virtual number. The number Eno generates for one merchant cannot be used at another merchant, even if someone obtains it. This is the key security feature: per-merchant numbers limit the damage from any single compromise.

Can I use Eno on Safari?

No. The Eno browser extension is available for Chrome, Firefox, and Microsoft Edge. It does not work in Safari. If you use Safari on a Mac, iPhone, or iPad, the Eno extension will not function. You can use the Capital One mobile app to generate virtual numbers manually and copy them to use at checkout.

What is the best multi-currency alternative to Capital One Eno?

For shoppers who buy in multiple currencies or who want a virtual card independent of their existing bank account, the Grey Plus Card is a strong alternative. It is a virtual Visa card connected to USD, GBP, or EUR balances, works in any browser, and has no foreign transaction fee for same-currency purchases.

How do I get a Grey virtual card?

Sign up at grey.co, complete identity verification, open a USD, GBP, or EUR account, and create the Grey Plus Card from the Cards section. A one-time $5 fee applies. Card details are available immediately in the app, ready to enter at any online checkout.

Arrow (up)

Back to top

