


<script type="application/ld+json" data-schema-version="grey-blog-v4"> [{"@context":"https://schema.org","@type":"BlogPosting","@id":"https://grey.co/blog/how-to-receive-and-convert-foreign-currencies-to-usdc-in-chile#article","headline":"How to receive and convert foreign currencies to USDC in Chile","description":"Learn how freelancers in Chile can receive foreign payments and convert them to USDC easily with Grey.","inLanguage":"en","url":"https://grey.co/blog/how-to-receive-and-convert-foreign-currencies-to-usdc-in-chile","mainEntityOfPage":{"@id":"https://grey.co/blog/how-to-receive-and-convert-foreign-currencies-to-usdc-in-chile#webpage"},"datePublished":"2024-11-19T17:16:32.317Z","dateModified":"2026-06-15T18:10:49.238Z","author":{"@type":"Person","@id":"https://grey.co/authors/olayoyin-olorunmota#person","name":"Olayoyin Olorunmota","url":"https://grey.co/authors/olayoyin-olorunmota","jobTitle":"Content Writer","sameAs":["http://www.linkedin.com/in/olayoyinolorunmota","http://x.com/yoyin_michael"]},"publisher":{"@type":"Organization","@id":"https://grey.co/#organization","name":"Grey","url":"https://grey.co","logo":{"@type":"ImageObject","url":"https://cdn.prod.website-files.com/6360022338a81bd6fdbb1145/6564ae1077a67e39d3c491a6_Grey%20Logo%20Lockup%20Black.svg"}},"image":{"@type":"ImageObject","@id":"https://grey.co/blog/how-to-receive-and-convert-foreign-currencies-to-usdc-in-chile#primaryimage","url":"https://cdn.prod.website-files.com/636a85d290ee58e70c17e1c0/673cc6fb1f3568eb41d88af6_How_to_receive_USDC_payments_as_a_freelancer_in_Chile.webp","contentUrl":"https://cdn.prod.website-files.com/636a85d290ee58e70c17e1c0/673cc6fb1f3568eb41d88af6_How_to_receive_USDC_payments_as_a_freelancer_in_Chile.webp","width":1200,"height":675}},{"@context":"https://schema.org","@type":"WebPage","@id":"https://grey.co/blog/how-to-receive-and-convert-foreign-currencies-to-usdc-in-chile#webpage","url":"https://grey.co/blog/how-to-receive-and-convert-foreign-currencies-to-usdc-in-chile","name":"How to receive and convert foreign currencies to USDC in Chile","description":"Learn how freelancers in Chile can receive foreign payments and convert them to USDC easily with Grey.","inLanguage":"en","primaryImageOfPage":{"@id":"https://grey.co/blog/how-to-receive-and-convert-foreign-currencies-to-usdc-in-chile#primaryimage"},"breadcrumb":{"@id":"https://grey.co/blog/how-to-receive-and-convert-foreign-currencies-to-usdc-in-chile#breadcrumb"}},{"@context":"https://schema.org","@type":"BreadcrumbList","@id":"https://grey.co/blog/how-to-receive-and-convert-foreign-currencies-to-usdc-in-chile#breadcrumb","itemListElement":[{"@type":"ListItem","position":1,"name":"Home","item":"https://grey.co/"},{"@type":"ListItem","position":2,"name":"Blog","item":"https://grey.co/blog"},{"@type":"ListItem","position":3,"name":"How to receive and convert foreign currencies to USDC in Chile","item":"https://grey.co/blog/how-to-receive-and-convert-foreign-currencies-to-usdc-in-chile"}]}] </script>

How to receive and convert foreign currencies to USDC in Chile

Olayoyin Olorunmota

TABLE OF CONTENT

SHARE THIS POST

I’m starting this article rather unconventionally — two truths and a lie. Pick the lie from these three facts about Chile.

If you chose “English is the official language”, then you’re right, that’s the lie. The official language of Chile is Spanish. I know the first option  may have thrown you off. Perhaps the “Penguins of Madagascar” should have been the “Penguins of Chile” since in reality, there are no Penguins in Madagascar.

Let’s talk about the third option: converting foreign currencies to USDC. If you’re a freelancer in Chile, USD Coin (USDC) is emerging as a practical solution to manage your foreign payments.

This guide explains how freelancers in Chile can easily receive foreign payments, convert them into USDC, and manage their funds efficiently with Grey.

Why convert foreign payments to USDC as a freelancer in Chile?

For freelancers working with clients abroad, converting foreign currencies to USDC offers several advantages:

Stable value: As a stablecoin tied to the U.S. dollar, USDC provides a predictable value, helping freelancers avoid the volatility of other cryptocurrencies.

Low fees: USDC transactions often come with lower fees than traditional bank transfers, making them cost-effective for international payments.

Quick access to funds: Blockchain technology allows for near-instant transfers, so freelancers have quick access to their funds.

Flexible conversion: Freelancers can hold USDC for stability and convert it to Chilean pesos (CLP) when exchange rates are favourable.

Also read: Send instant USDC payouts to 40+ countries with Grey

Receiving and converting foreign currency to USDC

Grey offers a secure and straightforward method for freelancers to manage USDC payments. Here’s how you can send and convert USDC using Grey:

Open the Grey app

Log in to your Grey account through the app or website for secure access to your USD and other currency balances.

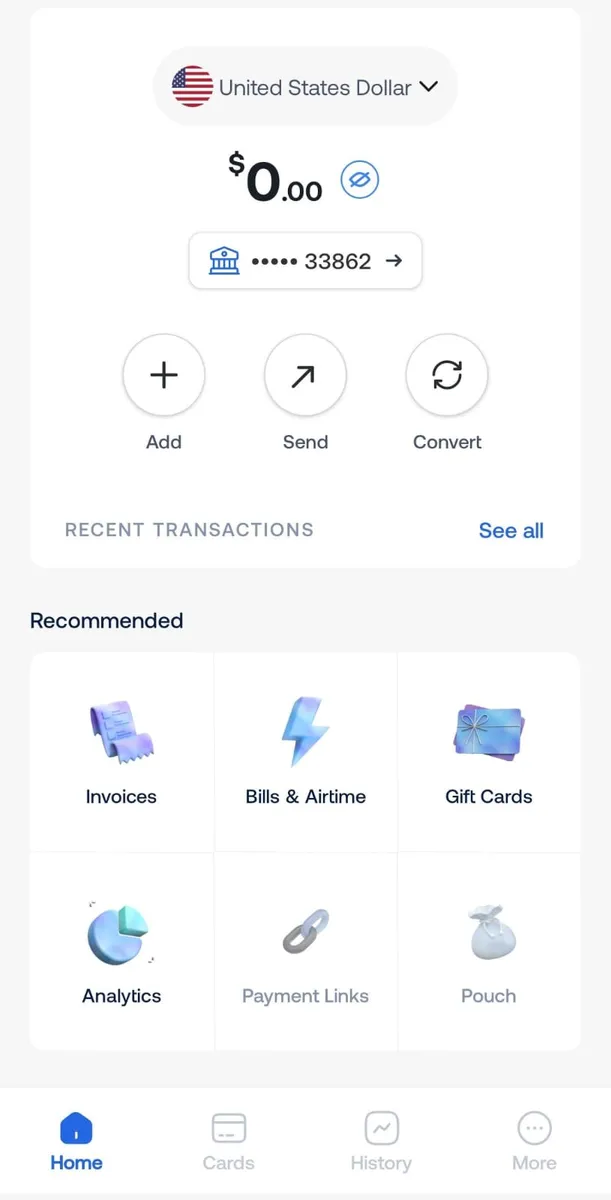
Select your USD balance

Navigate to the “Accounts” section and select your USD balance. This will serve as the starting point for initiating USDC transfers.

__wf_reserved_inherit

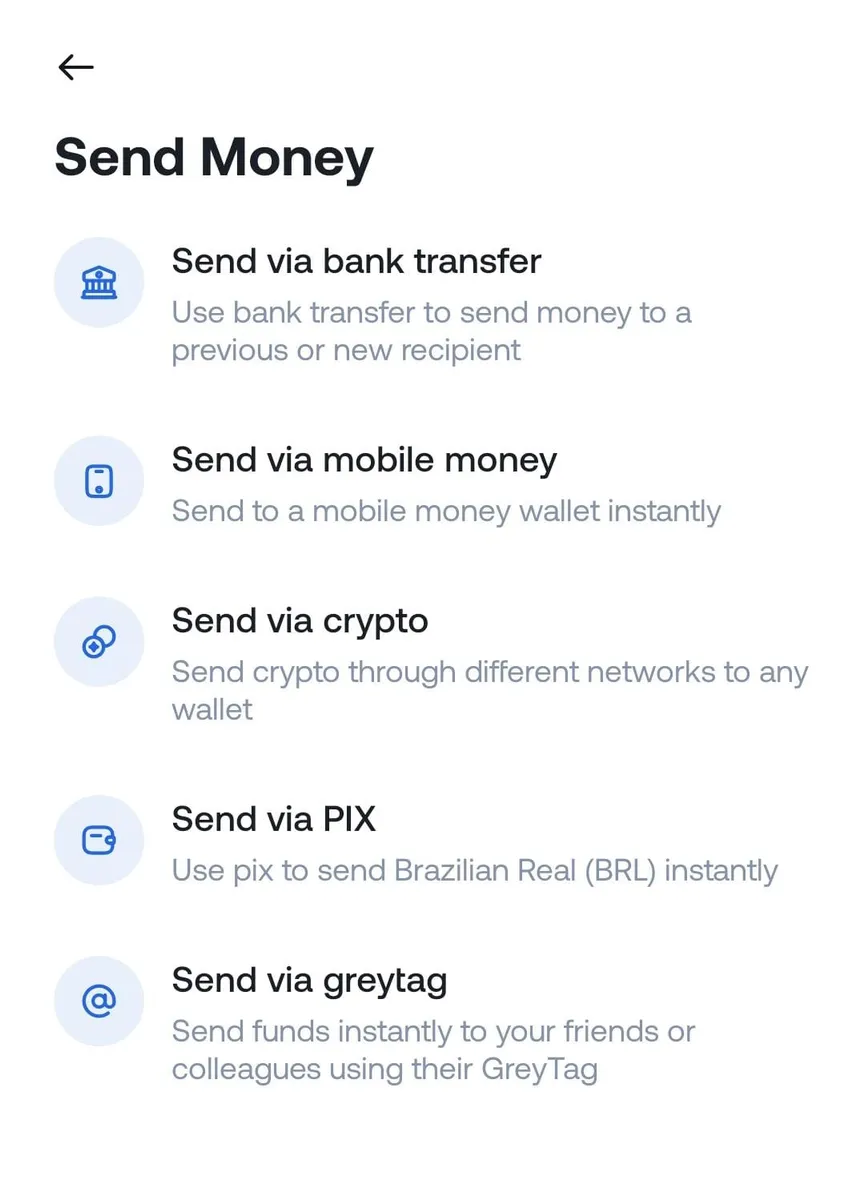
Tap “Send via crypto”

Choose the “Send money” option, then select “Send via crypto” to begin the USDC transfer process.

__wf_reserved_inherit

Enter transaction details

Input the recipient’s wallet address carefully. Ensure you select the correct network, as Grey supports Solana (SOL) and Binance Smart Chain (BEP-20).

__wf_reserved_inherit

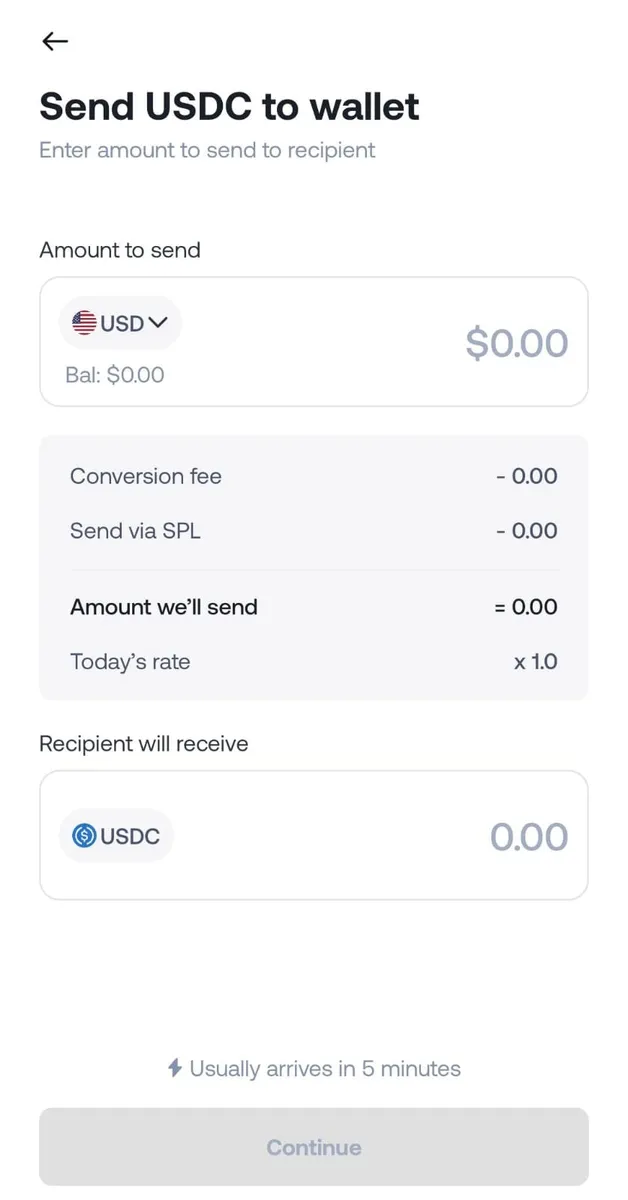
Input the transfer amount and review the details

Specify the amount you want to send, and make sure to double-check the wallet address and network to ensure your transaction goes in the right place.

__wf_reserved_inherit

Confirm and complete the transfer

Once satisfied with the details, tap “Send.” Grey will prompt you to enter your two-factor authentication (2FA) code for added security.

Transaction success

The USDC will arrive in the recipient’s wallet after processing. The recipient can keep the USDC, convert it into local currency, or use it as needed.

Also Read: How to receive dollar payments and convert to USDC in Mexico

Converting USDC to Chilean pesos

To convert USDC into Chilean pesos (CLP), use a crypto exchange or a local service that supports USDC-to-CLP transactions. Some platforms offer direct conversion, while others may require intermediary trades through USD or BTC.

Considerations for freelancers holding and converting USDC

While holding USDC is convenient, here are a few factors to consider:

Network compatibility: Ensure the network used for USDC matches your wallet and conversion services to avoid transaction issues.

Fee awareness: Although USDC has low transaction fees, network fees may vary depending on the blockchain.

Tax compliance: Chilean tax laws treat cryptocurrency as an asset. Consult a local tax advisor to understand your obligations when holding or converting USDC.

Using Grey to simplify USDC management

With Grey, you can securely send USDC to supported wallets, manage funds with ease, and take advantage of robust security measures like two-factor authentication (2FA).

Grey makes receiving and managing USDC payouts effortless for freelancers in Chile. Start today by creating your Grey account and unlock the benefits of global financial freedom.

The future of global banking is here, designed for you to carry your dreams across borders.

‍

Last updated:

October 2, 2026

Open a free Grey account to get startedJoin 1 million digital nomads
IF YOU ENJOYED THIS, CHECK THESE OUT

11 reasons your KYC verification is failing (and how to fix them)

•

•

2 min read

Seeing "KYC verification failed" can be confusing, especially when you’re not sure which part of the verification process went wrong.

KYC, or Know Your Customer, is the broader process financial companies use to verify their customers. It can include collecting personal information, checking identity documents and carrying out identity verification to confirm that the person creating the account is who they say they are.

Identity verification is one part of that process. This is typically where you’re asked to provide a valid ID and complete a selfie or face verification.

Across financial platforms, verification can fail for different reasons, from an unclear or expired ID to information that doesn’t match your documents. The exact requirements and steps vary by provider, so you should always follow the instructions provided by the service you’re using.

In this guide, we’ll first cover common KYC and identity verification issues that can occur across financial platforms and how to address them. Then, we’ll look specifically at how verification works on Grey and what Grey customers can do if they’re having trouble getting verified.

Most common KYC fixes at a glance

Problem Quick fix
Blurry ID photo Retake the photo in good lighting
Expired document Upload a valid, unexpired ID
Name doesn't match Make sure your profile exactly matches your ID
Face verification fails Retake the selfie without hats or glasses
Address doesn't match Upload a recent proof of address if required
Unsupported document Check which IDs your provider accepts

What does it mean when KYC verification fails?

Know Your Customer (KYC) is the process regulated financial companies use to understand and verify who their customers are. It usually begins with information you provide when creating your profile, including details like your full name, date of birth and address.

Identity verification is an important part of KYC. This is where a provider checks that you are who you say you are, usually by asking for a valid government-issued identity document and some form of face or selfie verification.

Other checks may also form part of the wider KYC process, depending on the provider and applicable regulatory requirements.

When people see a message saying their "KYC verification failed", the problem may actually relate to a specific part of the process. For example, the platform may have been unable to verify an identity document, match the information provided to the document, or complete a face verification.

The exact process varies between financial providers, so a failed verification on one platform does not necessarily mean the same thing as a failed verification on another.

11 common reasons KYC or identity verification can fail

The reasons below are common issues people may encounter when completing KYC or identity verification with financial platforms. Requirements vary between providers and countries, so not every point will apply to every service.

If you’re having trouble with a specific platform, check its verification requirements and support guidance before submitting your information again.

1. Your ID photo is blurry

A common reason identity verification fails is an image that the verification system cannot read clearly.

Important information like your name, date of birth, document number or photograph needs to be visible. A blurry image can prevent the platform from confirming these details.

How to fix it: Retake the photo in a well-lit area, keep your camera steady and make sure the entire document is visible and in focus. Follow any additional photo requirements provided by the platform.

2. Your identity document has expired

Financial platforms generally require a current, valid identity document.

An expired passport, driving licence or national ID may not meet the provider’s identity verification requirements, even if it expired recently.

How to fix it: Check the expiry date before submitting your document. If it has expired, use another accepted form of identification or renew the document before trying again.

3. Your personal information doesn't match your document

The personal information you provide during KYC generally needs to correspond with the information on your identity document.

Differences in your name, date of birth or other details can prevent the platform from confirming your identity. This can be something as simple as a spelling mistake or entering a nickname instead of your legal name.

It can also happen after a legal name change if your profile and identification documents have not all been updated.

How to fix it: Compare the information on your profile with your identity document before submitting your verification. If you’ve legally changed your name, check what supporting documents the provider requires.

4. The lighting is too poor

Even if a photo looks clear on your phone, shadows or poor lighting can make it difficult for a verification system to read your document or confirm your identity.

This can affect both document photos and selfie or face verification.

How to fix it: Complete the verification in a well-lit environment where your document and face are clearly visible. Avoid dark rooms or strong shadows.

5. Glare is covering part of your document

Reflections from camera flashes, overhead lights or sunlight can hide text, photographs and security features on an identity document.

If the system cannot clearly read the required information, it may not be able to verify the document.

How to fix it: Turn off your camera flash if necessary and adjust the angle of your document until there are no reflections covering important information.

6. You're using a document the provider doesn't accept

Accepted identity documents vary between financial providers and countries.

One service may accept a national identity card, for example, while another may require a passport, driving licence or different form of government-issued identification.

Submitting a valid document that the particular provider does not support can still prevent you from completing identity verification.

How to fix it: Check the provider’s list of accepted documents for your country before uploading your ID. Make sure you also select the correct document type during the verification process.

7. There's a problem with your proof of address

Some financial providers require proof of address as part of KYC.

If proof of address is required, the provider may have rules covering the type of document you can use, how recently it must have been issued and which information needs to appear on it.

Differences between the address you entered and the address shown on your supporting document can also require further review.

How to fix it: Check the provider’s proof-of-address requirements carefully and make sure you’re submitting an accepted, recent document with the correct information.

8. You don't meet the provider's age requirements

Financial services usually have minimum age requirements, which can vary depending on the provider, country and service.

If the date of birth you provide shows that you don’t meet the eligibility requirements, you may not be able to complete KYC.

How to fix it: Check the provider’s eligibility requirements before creating an account. If you don’t meet the minimum age, you’ll need to wait until you become eligible.

9. You've created more than one account

Some financial providers only allow one personal account per customer.

Creating additional accounts using the same personal information or identity documents can trigger further checks. This can also happen accidentally if you previously created an account and later registered again with another email address.

How to fix it: Check whether you already have an account before creating another one. If you can’t access an existing account, contact the provider’s support team rather than repeatedly registering new accounts.

10. Your internet connection interrupted the verification

Identity verification often involves uploading photographs, documents or video, so an unstable connection can interfere with the process.

If your connection drops while something is being uploaded, the provider may not receive everything it needs to complete the verification.

How to fix it: Use a stable internet connection and wait until each step has finished uploading before closing the app, browser or verification page.

11. Your face verification couldn't be completed

Many financial providers use a selfie, short video or another form of face verification to confirm that the person completing verification matches the person shown on the ID.

Poor lighting, an unclear image or anything obscuring your face can make this more difficult.

How to fix it: Follow the instructions displayed by the provider carefully. Complete the verification in good lighting, make sure your face is clearly visible and remove anything that could prevent the system from seeing your face properly.

How to fix a failed KYC or identity verification step by step

If your verification has failed, repeatedly submitting the same information may not solve the problem. It’s better to first identify which part of the process needs attention.

1. Read the error message carefully

Start with any message the financial provider has given you.

It may tell you that your document couldn’t be read, your personal information didn’t match, your document wasn’t accepted or there was a problem completing identity verification.

The more specific the error message is, the easier it will be to determine what you need to change.

2. Review the information you submitted

Compare the personal information on your profile with your identity document.

Pay particular attention to your legal name, date of birth and any other details the provider asks you to confirm. Also check that the identity document you’re using is valid and accepted by the provider.

If the problem relates to a wider KYC requirement rather than your identity document, check the provider’s instructions to see if any other information or supporting documents are required.

3. Retake your document photo or selfie if needed

If the problem relates to image quality, take a new photo instead of submitting the same one again.

Use good lighting, avoid glare and make sure the required parts of the document are clearly visible. If you’re completing a selfie or video verification, follow the instructions on screen and make sure your face can be seen clearly.

4. Try the verification again

Once you’ve corrected the problem, follow the provider’s instructions to submit your verification again.

Avoid making repeated attempts without changing anything. If the same error continues to appear, there may be another issue that needs to be reviewed.

5. Contact the provider's support team

If you’ve checked your information and followed the verification instructions but still can’t complete the process, contact customer support.

Share the error message you’re receiving and explain which steps you’ve already completed. The support team can tell you if you need to provide different information, try another document or take another action.

Why legitimate customers sometimes fail KYC

A failed KYC or identity verification attempt doesn’t automatically mean that the customer has provided false information.

Many parts of identity verification rely on technology that reads documents, compares information and checks whether the person completing the process matches the identification provided.

A legitimate customer may still encounter problems if the system can’t read a document clearly, information doesn’t match exactly or a selfie or video doesn’t meet the required quality.

Technical issues can also interrupt uploads or prevent a verification step from being completed.

That’s why it’s important to look at which part of the process failed before trying again. In many cases, correcting the information, submitting a clearer document or following the provider’s verification instructions again can resolve the issue.

If it doesn’t, the next step should be contacting the provider directly rather than continuing to submit the same information.

How long does KYC verification take?

There is no universal timeframe for KYC because each financial provider has its own verification process.

Some identity checks can be completed automatically within minutes when the information and documents can be verified immediately.

Others take longer if a document needs additional review, information cannot be confirmed automatically or the provider requests additional documentation.

The timeframe can also depend on the type of verification being completed and the provider’s internal review process.

If your verification has been pending longer than the timeframe given by the financial service you’re using, check your email and in-app notifications for requests for more information. If there are no updates, contact its support team to find out whether you need to take any further action.

KYC and identity verification on Grey

The information above applies generally to KYC and identity verification across financial platforms. If you’re trying to verify your Grey account specifically, the process and requirements are more defined.

On Grey, KYC begins with the information you provide when setting up your account. This includes personal information used to establish and verify your profile.

Identity verification is a specific step within this wider KYC process. Every Grey user completing verification is required to provide a valid government-issued identity document and complete a short video of their face.

Depending on the information required during your account setup, you may also need to provide other details or supporting documents as part of the wider KYC process.

How identity verification works on Grey

When you reach the identity verification stage, Grey asks you to provide a photo of an accepted, valid government-issued ID and complete a short video of your face.

The identity document you can use depends on your country of residence. Accepted documents can include a passport, national ID, driving licence, resident card or other supported government-issued identification.

Your document needs to be valid and clearly legible. You should submit a photo of the original document rather than a scan, photocopy, screenshot or edited version.

Make sure all the required parts of your ID are visible and that the information on it matches the information on your Grey account.

For the video verification, your face needs to match the person shown on the identity document. Complete the recording in a well-lit environment and make sure your face is clearly visible.

Why your Grey identity verification might fail

If you’re specifically having trouble completing identity verification on Grey, check for these common issues:

  • Your legal name doesn't match the name on your ID.
  • Your date of birth is incorrect.
  • Your identity document has expired or is close to expiry.
  • The document is blurry or important information isn’t visible.
  • You submitted a screenshot, photocopy or altered version instead of a photo of the original document.
  • The document type or issuing country you selected doesn’t match the document you uploaded.
  • Your face isn’t clearly visible in the selfie video.
  • Someone else appears in the selfie video.
  • The person completing the selfie video doesn’t match the person on the ID.
  • You’re trying to verify more than one Grey account.
  • You’re using a VPN or another service that changes your IP address during verification.

If you’re having trouble with another part of Grey’s KYC process, the issue may not be related to identity verification at all. Check the message shown in the app to understand which information or document needs attention.

What to do if your Grey verification fails

Start by checking the reason provided during the verification process.

If the problem is with your identity document, make sure you’re using an accepted document for your country and that the document is valid, original and clearly visible.

Check that the personal information on your Grey account, particularly your legal name and date of birth, matches your identification.

If the problem involves your selfie video, complete it again in a well-lit environment with only your face visible and follow the instructions provided during the verification process.

You should also turn off any VPN or service that changes your IP address before trying again.

If you’ve checked these requirements and still can’t complete your verification, contact Grey Support through the in-app chat for help with your specific case.

How long does Grey verification take?

Grey identity verification is usually reviewed within a few minutes, although it can take up to 24 hours.

Once the review is complete, you’ll receive confirmation of your verification status.

If your verification has been pending longer than expected, check your email and Grey account for any requests for additional information. You can also contact Grey Support if you need help understanding the status of your verification.

If you’re opening your first Grey account, our guide on why KYC is required and how to do it easily explains the process and what you can expect when verifying your account.

Frequently asked questions

What is the difference between KYC and identity verification?

KYC is the broader process a financial company uses to identify and verify its customers and meet its regulatory obligations.

Identity verification is one part of KYC. It focuses specifically on confirming that you are the person you claim to be, typically using an identity document and a selfie, video or another identity check.

Other information and checks may also be required as part of KYC, depending on the financial provider.

What happens if I don't complete KYC?

This depends on the provider. Regulated financial services commonly require customers to complete KYC before they can access some or all of their services.

If you’re using Grey, you need to complete the required account verification before you can start using the services that require a verified account.

Why do legitimate customers fail identity verification?

Identity verification can fail because the system can’t clearly read an ID, the information provided doesn’t match the document or a selfie or video can’t be verified successfully.

Technical problems during the verification process can also cause an attempt to fail.

Can I use my account without completing KYC?

This depends on the financial provider. You may be able to create an account before completing KYC, but access to financial services can remain restricted until the required verification is complete.

For Grey, you need to complete your account verification before you can make transactions and access the services available to verified customers.

Is my KYC information deleted after verification?

Financial providers may be required to retain KYC and verification records to comply with applicable laws and regulations. How long information is retained depends on the provider, its policies and the regulatory requirements that apply to it.

Check the financial provider’s privacy policy if you want more information about how your personal and verification data is handled.

How many times can I retry identity verification?

This varies between financial providers, so there isn’t a universal number of attempts.

If your verification keeps failing, avoid repeatedly submitting the same information without understanding the problem. Check the error message and the provider’s verification guidance first. If you still can’t complete the process, contact customer support.

Grey users who continue to have trouble with verification should contact Grey Support through the in-app chat for assistance with their specific case.

Can I complete KYC using a digital copy of my ID?

This depends on the provider and the type of identification it accepts.

If you’re completing identity verification on Grey, you should provide a photo of your original valid identity document. Scans, photocopies, screenshots and edited or altered documents are not accepted.

Complete your verification and start using Grey

KYC covers more than uploading an ID. It starts with the information you provide about yourself and can include different checks that help a financial provider confirm who its customers are.

Identity verification is one important part of that process. Paying attention to the information on your profile, the validity and quality of your ID and the instructions for your selfie or video verification can help you avoid common problems.

And remember that verification requirements aren’t identical across financial platforms. If you’re using another provider, always follow its own KYC and identity verification guidance.

If you’re verifying a Grey account, make sure your personal information is accurate, use an accepted and valid identity document, complete your selfie video as instructed and check any message you receive if something needs attention.

Once you’re ready, open a Grey account and complete your verification to access your available foreign currency accounts and international money services.

‍

Open a Grey account and get verified today

A failed KYC check can be frustrating, but it doesn't usually mean you've reached the end of the process. In most cases, the issue comes down to something that can be corrected, such as unclear photos, information that doesn't match your documents, or an unsupported form of identification.

Taking a few minutes to review your application before submitting it again can save you time and help you avoid repeated verification failures.

If you're ready to manage money across borders, open a Grey account and get verified in minutes today. With clear guidance throughout the verification process, you'll be able to access foreign currency accounts and international transfers as soon as your identity has been confirmed.

Bank of America virtual card: How to set one up

•

•

2 min read

Virtual cards are beginning to out-muscle physical cards in terms of functionality and ease. And for times when you might need a physical card, many virtual card providers now link with Google Pay, Apple Pay and Samsung Pay, allowing users to pay via contactless options where available.

A Bank of America virtual card is a digital version of your physical BoA card that you can use for online and in-app purchases. It is set up through the BoA mobile app: open the app, select your card, and tap "Set up digital wallet" or "Virtual card" depending on the card type. The virtual number can be used wherever the physical card is accepted.

This guide explains what the BoA virtual card is, how to set it up, where it works, and what to do if you need more than BoA offers.

What is a Bank of America virtual card?

Bank of America doesn't offer standalone virtual card numbers for most consumer credit and debit cards, unlike some other banks. Instead, it supports digital wallets such as Apple Pay, Google Pay, and Samsung Pay, which use tokenisation to protect your real card details during payments.

When you add an eligible Bank of America card to a digital wallet, your actual card number is replaced with a unique digital token called a device account number. Merchants receive this token instead of your real card number, helping reduce the risk of card fraud if payment data is compromised.

Because the token is linked to your device rather than your physical card, your real card number remains hidden during contactless and supported online purchases.

Which cards are eligible:

  • Bank of America personal debit cards
  • Bank of America personal credit cards (selected products)
  • Bank of America business debit cards
  • Certain co-branded cards may also be eligible

Bank of America virtual cards explained

Bank of America allows eligible customers to generate virtual debit and credit card numbers through the mobile app. While the process looks similar, the two options work differently behind the scenes and suit different situations.

Bank of America virtual debit card

A virtual debit card is linked directly to your Bank of America checking account. In essence, it is an online form of your physical card. When you make a purchase, the funds are immediately withdrawn from your available balance. This transaction doesn’t affect your credit in any way, as it doesn’t involve the credit line.

Your BoA debit card can be added to Apple Pay, Google Pay, or Samsung Pay. When you add the card to a digital wallet, the wallet generates a device account number (a token) that is used for payments instead of your physical debit card number. This tokenised number is what merchants receive during a contactless or in-app purchase.

Bank of America virtual credit card

On the other hand, a virtual credit card is linked to one of your Bank of America credit cards. Transactions are completed using your available credit limit instead of your checking balance. And just like physical credit cards, you still get the usual credit card benefits, including purchase protection, rewards points or cash back, and the ability to dispute charges more easily.

Choosing between a virtual debit card and a virtual credit card

Whether you choose a virtual credit card or a virtual debit card, neither is exactly better than the other. However, each has its best use case

A virtual debit card is better when:

  • You want to keep tight control over your checking balance and avoid any chance of going into debt
  • You’re making everyday online purchases (subscriptions, small orders, digital services)
  • You prefer not to use credit for certain merchants or categories
  • You’re helping someone manage spending without giving them access to a credit card

A virtual credit card is better when:

  • You want to earn rewards or cash back on the purchase
  • You’re buying higher-value items and prefer the extra purchase protection and dispute rights that come with a credit card
  • You want to keep a larger purchase off your checking account until the statement is due
  • You’re shopping with new or less-familiar online stores and value the stronger fraud protections of a credit product

How to get a Bank of America virtual card

Adding your BoA card to a digital wallet is straightforward and takes a few minutes.

Adding to Apple Pay:

  1. Open the Wallet app on your iPhone or iPad.
  2. Tap the plus icon to add a new card.
  3. Follow the prompts to add a new debit or charge card. You can scan your physical card or type the details manually.
  4. BoA will send a verification code to your registered phone number or email. Enter it to confirm.
  5. Once verified, your card appears in Apple Wallet and is ready for contactless payments in stores, in-app purchases, and on websites with an Apple Pay checkout button.

Adding to Google Pay:

  1. Open the Google Wallet app on your Android phone.
  2. Tap "Add to Wallet" and select "Payment card."
  3. Follow the prompts to add your BoA card. You can scan it or enter details manually.
  4. BoA will verify the addition through a code sent to your contact details.
  5. Your card is then available for contactless payments and Google Pay checkouts online.

Adding to Samsung Pay:

The process is similar: open the Samsung Wallet app, add your card, and complete BoA's verification step.

Once set up, tap your phone at any contactless terminal for in-store payments. For online purchases, use the Apple Pay or Google Pay button at checkout where available.

How to find your BoA virtual card number

The virtual card number is located in the Bank of America mobile app, not on any physical card.

Where to look:

  1. Open the BoA mobile app and navigate to the card you want to use.
  2. Look for a virtual card section, sometimes labelled "Virtual card number," "Digital card," or "Shop online."
  3. The screen shows the virtual card number, expiry date, and CVV for that card.
  4. Tap to copy the number, or write it down to use at checkout.

Why the virtual number matters for merchants: Some online merchants require the full Primary Account Number (PAN) to process a payment. The virtual card number functions as this PAN for online purchases. Enter it exactly as displayed in the app.

When the virtual number is not visible: For cards that work exclusively through digital wallets (Apple Pay, Google Pay), no separate virtual number is displayed. Tokenisation happens automatically when you use the card in the wallet. You see only the last four digits of the token in your wallet app.

Bank of America virtual card limitations

The virtual card is useful, but it does not solve every problem.

  • No standalone virtual card numbers: Unlike some banks, Bank of America doesn't let most consumer cardholders generate separate virtual card numbers for online shopping. Instead, it relies on digital wallets like Apple Pay and Google Pay to tokenise your card information.
  • Works only where digital wallets are accepted: To use a tokenised card online, the merchant must support Apple Pay or Google Pay. If a website only accepts manually entered card details, you'll typically need to use your physical card number.
  • Limited in-store use without a digital wallet: Tokenised payments work for contactless purchases only after you've added your card to a supported digital wallet. You can't tap to pay using your physical card details alone.
  • Device-specific protection: The payment token is tied to the device where you added the card. If you get a new phone or reset your wallet, you'll need to add the card again.
  • Standard card fees still apply: Using a tokenised card doesn't remove foreign transaction fees, interest charges, or any other fees associated with your Bank of America card.

Alternatives to BoA virtual cards

If the BoA virtual card does not fit your needs, either because your card is not eligible, because you shop on Safari, which does not support certain wallet integrations, or because you need multi-currency functionality, there are other options.

Other US bank virtual cards

Several major US banks offer their own virtual card number features for online shopping. These are tied to the specific bank account and card.

Capital One Eno generates virtual card numbers visible in the app or via the browser for Capital One cardholders. Chase and Citi Virtual Account Numbers also offer virtual card numbers that protect against data breaches. These are the closest alternatives to what many people expect from a virtual card, but they require accounts with those specific banks.

Fintech virtual cards

If you buy from international merchants, earn in multiple currencies, or want a virtual card that is not tied to an existing US bank account, a fintech virtual card offers more flexibility.

The Grey Plus Card is a virtual Visa card connected to USD, GBP, or EUR balances. Unlike the BoA virtual card, it is independent of any existing bank account and works at any online checkout in any browser. For same-currency purchases, no cross-border conversion fee applies.

See our guide on how Mastercard virtual cards work.

Feature BoA virtual card Grey virtual card
How to get it BoA mobile app (eligible cards only) Sign up with Grey, create instantly
Requires existing BoA card Yes No
Browser support Any browser Any browser
Multi-currency support No (USD only) Yes (USD, GBP, EUR)
Per-merchant unique numbers For some card types No (single reusable number)
Works in-store Via digital wallet Yes (Apple Pay, Google Pay in eligible regions)
One-time setup fee None $5 card creation

Get a Grey virtual card and open a multi-currency account with Grey to hold and spend in USD, GBP, or EUR without cross-currency fees on same-currency purchases.

Frequently asked questions

Is the Bank of America virtual card free?

Yes. Setting up a BoA virtual card through the mobile app or adding a card to a digital wallet does not cost anything beyond your standard account. There are no fees specific to the virtual card feature. Standard account fees, interest, and transaction charges that apply to your physical card continue to apply to purchases made with the virtual number.

Can I use the BoA virtual card abroad?

Yes, for online purchases from international merchants. Enter the virtual number at checkout, just as you would for any other card-not-present purchase. Standard foreign transaction fees that apply to your physical BoA card also apply to international purchases made with the virtual number. These fees are typically 3% on personal cards.

Does the virtual card number change?

For BoA cards that generate a static virtual card number, the number does not change with each purchase. It is a fixed alternative number tied to your account. For cards used through digital wallets, the tokenised device account number is static per device but different from your real card number.

Can I use a BoA virtual card in stores?

No, you can't use a virtual card number in stores. For in-store use, you need to add your BoA card to Apple Pay, Google Pay, or Samsung Pay and use your phone for contactless payment. This is technically a form of tokenisation similar to a virtual card, but the in-store payment process differs from online checkout.

What is the best alternative for international shopping?

For shopping across multiple currencies without paying a 3% foreign transaction fee on each purchase, a multi-currency virtual card is more cost-effective. The Grey Plus Card connects to a USD, GBP, or EUR balance and does not apply a cross-border fee when the purchase currency matches the card's funding currency.

How do I get a Grey virtual card?

Sign up at grey.co or download the mobile app and complete identity verification with a valid ID and proof of address. Open a USD, GBP, or EUR account. Navigate to the Cards section and create the Grey virtual card. A one-time $5 creation fee applies. Card details are available immediately in the app and ready to enter at any online checkout.

US banks international transfer daily limit: What you can send

•

•

2 min read

Let’s say you need to send $60,000 abroad for a property purchase. After you log in to your bank’s online portal, enter the recipient details and the amount, and the transfer is declined. After calling the bank, the representative tells you your online international wire limit is $25,000 per day, a limit you had no idea existed.

This is a situation many people discover mid-transaction, often at the worst possible moment, when a deadline is approaching, and a seller or landlord abroad is waiting. International wire transfer limits at US banks are real, sometimes surprisingly low for online transfers, and almost never prominently displayed before you try to send.

This article covers what every major US bank allows on international wire transfers, why the limits exist, how to increase them, and what to do when your bank won’t accommodate what you need to send. Understanding who pays wire transfer fees is useful context before you initiate any large transfer.

Do US banks have daily limits on international wire transfers?

Yes. Every major US bank sets limits on how much you can send via international wire transfer, and those limits vary significantly depending on three things: the bank you use, the account type you hold, and how you initiate the transfer.

The most important distinction is online versus branch-initiated transfers. International wires initiated online typically have limits of $25,000 to $100,000 per day. In-branch wires allow significantly more, often $250,000 to $500,000 or higher, because the bank verifies your identity face-to-face.

Why do these limits exist? Three reasons.

Fraud prevention
Large international wire transfers are a primary target for fraud, including business email compromise scams where criminals impersonate vendors or executives to redirect payments. Automated online systems can’t verify intent the way a human can, so banks apply tighter caps to online-initiated transfers.

Bank Secrecy Act compliance
Transfers of $10,000 or more trigger a mandatory Currency Transaction Report (CTR) to FinCEN, the Financial Crimes Enforcement Network. This doesn’t block your transfer, but it means large transfers receive additional scrutiny. Banks also monitor for structuring, the practice of making multiple transfers just under $10,000 to avoid reporting, which is itself illegal.

Operational risk management
Errors in international wire transfers are difficult and sometimes impossible to reverse. Banks apply limits partly to reduce exposure to irreversible mistakes.

What are the international wire transfer daily limits at major US banks?

Wire transfer limits vary significantly by bank, account type, and whether the transfer is initiated online, by phone, or in person. The table below shows the most current verified figures for international wire transfers at six major US banks.

Bank Online international
wire limit
Branch international
wire limit
Outgoing international
wire fee
How to request a limit increase
Chase $25,000/day online $250,000/day $40 online (USD); $5 online (foreign currency under $5,000) Speak with a representative
Bank of America $1,000/day online (personal); $5,000 (small business) Higher limits available in branch $45 outgoing international Contact branch or call customer service
Wells Fargo Varies; not publicly disclosed. Check online banking for current limit Higher limits at branch $0 to $25 digital; $40 branch Visit a Wells Fargo branch
Citibank $25,000/day; $50,000/month (standard online) Higher limits available $25 to $35 depending on method Contact Citibank directly
TD Bank $25,000/day online Higher limits available $25 to $50 international Contact TD Bank customer service

‍

All figures verified against published bank data and authoritative sources as of May to June 2026. Limits are subject to change and may vary based on account type, account history, and recipient. Always verify your specific limit by logging into online banking or calling your bank before initiating a large transfer.

Why do online wire limits and branch wire limits differ?

The gap between what you can send online and what you can send at a branch reflects how banks manage risk differently across channels.

Online wire transfers are initiated without any human review at the time of submission. The bank’s systems run automated checks against fraud patterns and compliance requirements, but no bank employee sees the transaction before it’s processed. This automated environment increases the risk of fraud, and banks respond by applying tighter limits.

Branch-initiated wire transfers undergo human review. A bank employee verifies your identity in person, may ask about the purpose of the transfer and the relationship to the recipient, and can escalate anything unusual to a compliance officer before the wire goes out. That human review layer justifies higher limits because the bank has a documented process.

Phone-initiated wires, available at some banks, typically sit between online and branch limits. The bank verifies your identity verbally and may ask screening questions, which provides some human review without requiring a branch visit.

The practical implication is that if your transfer exceeds the online limit, a branch visit in most cases resolves the issue without any formal request to increase the limit. You don’t need to apply for a higher limit or wait for approval. You show up, initiate the wire in person, and the branch limit applies.

How to increase your bank’s international wire transfer limit

When a branch visit isn’t practical, and you need to send more than your online limit allows, requesting a temporary or permanent limit increase is the next step. The process varies by bank but follows a similar pattern.

  1. Prepare your documentation
    Have ready the transfer amount, the recipient’s full details, the purpose of the transfer, and documentation of the source of funds if the amount is significant. Banks may ask for proof of funds, a contract, or an invoice, depending on the transfer size and purpose.
  2. Call the right person
    General customer service line agents typically can’t authorise limit increases. Ask specifically for a branch manager, a relationship banker, or a wire transfer specialist. At larger banks with relationship teams for higher-value customers, your relationship manager is the right first call.
  3. Use this script
    "Hi, I’m [name] and I have a [account type] with you. I need to initiate an international wire transfer for [amount], and I understand this exceeds my current online limit. I’d like to request a temporary limit increase. The transfer is for [property purchase/family support/business payment]. I have all the recipient details ready and can provide documentation of the source of funds if needed. Can you help me with this or connect me with someone who can authorise the increase?"
  4. Confirm the limit increase before initiating the transfer
    A verbal approval means nothing if it’s not recorded in the system before you submit. Ask the representative to confirm the increase is active before you log back in and try again.

What to do if your bank won’t increase the limit

If the bank declines your request to increase your limit, or the process takes longer than your transfer timeline allows, four practical options are available.

  1. Split the transfer across multiple days
    If your bank’s online limit is $25,000 and you need to send $75,000, three transfers of $25,000 each across multiple days achieve the same result. This works for many personal transfers. It doesn’t work when timing matters, such as a property purchase with a specific settlement date.
  2. Visit a branch instead of using online banking
    In-branch wires allow significantly higher limits, typically $250,000 to $500,000 or higher. For most transfers that exceed online limits but don’t approach branch limits, this is the simplest solution. No limit increase request needed.
  3. Use a different account at a different bank
    If you hold accounts at multiple institutions, each bank’s limit is independent. A transfer that exceeds Chase’s $25,000 online limit might be within Citibank’s limit for your account type there.
  4. Use an alternative international transfer service
    If you find bank wire limits or fees consistently prohibitive, switching to a lower-cost infrastructure for international transfers makes more sense than repeatedly navigating limit-increase requests.

Frequently asked questions

What is the maximum amount you can wire transfer internationally from the US?

There is no legal maximum on international wire transfers from the US for legitimate purposes. Banks set their own daily limits, which vary by account type and how the transfer is initiated. In-branch international wire transfers at major banks can reach $250,000 to $500,000 per day for standard accounts, with premium banking relationships handling $1,000,000 or more. Transfers above $10,000 trigger mandatory regulatory reporting, but this doesn’t limit or block the transfer.

Can I send $100,000 internationally in one wire transfer?

It depends on your bank and how you initiate the transfer. Chase’s online international wire limit is $25,000, which means a $100,000 transfer requires either a branch visit or a limit increase request. Bank of America’s online personal limit is $1,000, making branch initiation essential for any significant international transfer. At a branch, most major US banks can accommodate $100,000 in a single international wire for standard account holders.

Does Bank of America have a daily international wire limit?

Yes. Bank of America’s online international wire limit for personal accounts is $1,000 per day, and $5,000 for small business accounts. This is among the most restrictive limits on international wire transfers at any major US bank. Customers needing to send larger amounts must initiate the transfer at a branch, where higher limits apply. Bank of America Preferred Rewards customers at higher tiers may have access to increased limits.

How do I increase my Chase international wire transfer limit?

To send more than Chase’s standard daily limit, you need to speak with a representative who can authorise a limit increase. Call your branch directly and ask for a relationship banker or branch manager rather than the general customer service line. Have the transfer amount, recipient details, and purpose of transfer ready. For very large amounts, Chase may ask for source-of-funds documentation. Chase’s standard limit is $250,000 per day for branch-initiated international wires.

Is there a legal limit on how much money I can send abroad from the US?

No. There is no legal ceiling on international wire transfers from the US for legitimate purposes. Transfers of $10,000 or more must be reported to the IRS via a Currency Transaction Report filed by your bank, not by you. The reporting requirement doesn’t restrict or delay the transfer. Banks may also report patterns of transfers just under $10,000, as structuring transactions to avoid reporting thresholds is itself illegal.

Visit grey.co or download the Grey app to enjoy quick and easy transfers.

Capital One virtual card number: How to generate one for shopping

•

•

2 min read

Sharing your real credit card details with every online store still comes with unnecessary risk. There might be data breaches, accidental overcharges, and you might just forget to cancel the subscription until you get charged again. Capital One’s Eno virtual card numbers solve this by letting you create a unique card number for each online payment.

Capital One generates virtual card numbers through Eno, its browser assistant. Eno creates a unique card number for each merchant you shop at, masking your real card number. To set up, install the Eno browser extension or use Eno in the Capital One app, sign in to your account, and let Eno autofill virtual numbers at checkout.

Every time you enter your real card number at an online merchant, you risk the real card number falling into the wrong hands. In this guide, you’ll learn exactly how to generate a Capital One virtual card number, how to customise the controls, and the best places to use it so every online purchase stays protected.

What is a Capital One virtual card number?

A Capital One virtual card number is a temporary card number generated by Capital One’s virtual assistant, Eno. This number is specifically for an online merchant to complete a transaction.]

Instead of entering your actual card details at checkout, Eno uses a different number that is mathematically linked to your account but appears to be a completely separate card.

According to Capital One's official information on Eno, each virtual number is created specifically for a merchant. A number generated for one website will not work at another. This means that if a merchant's database is compromised, the stolen number is useless anywhere else.

You can create and manage virtual cards by either using the Eno browser extension or through the Capital One mobile app if your card is eligible.

How Capital One Eno virtual card numbers work

Eno's virtual card numbers work differently from those of some other virtual card providers because the numbers are unique to the merchant. Here is how the numbers work.

Each virtual number is linked to only one merchant at the time of creation. If you generate a number for Netflix, that number can only be charged by Netflix. This removes the risk of the card number being used to shop on Amazon if the number falls into the wrong hands.

When you visit an online checkout page in a supported browser, Eno detects the payment form and automatically offers to fill in a virtual card number. You do not need to manually copy and paste anything.

You can view all your active virtual card numbers in one place from the Eno dashboard. It shows you which merchant each number is linked to, recent transactions, and whether the card is active or locked. All card numbers draw directly from your Capital One account balance and don’t require manual top-ups.

If a merchant you have a virtual number with gets breached, or you don’t want to be charged whenever a card expires, you can lock or replace just that number. Your real card is unaffected, and your other virtual numbers for other merchants continue working normally.

How to get a Capital One virtual card number

You can generate a virtual card using either the Eno browser extension or the Capital One mobile app.

If you prefer to use a browser extension:

  1. Go to eno.capitalone.com or search "Capital One Eno browser extension" in your browser's extension store.
  2. Install the Eno extension in Chrome, Firefox, or Microsoft Edge.
  3. When prompted, sign in to your Capital One account through the extension.
  4. The next time you visit an online checkout page, Eno will appear automatically and offer to create or use a virtual card number for that merchant.

If you prefer to use the mobile app:

  1. Open the Capital One mobile app.
  2. Tap the Eno button (the chat interface within the app).
  3. Ask Eno to generate a virtual card number, or navigate to the virtual card feature within the app.
  4. Copy the virtual number and use it manually at checkout, or let Eno fill it in if you are browsing on mobile.

Not every Capital One credit card supports Eno virtual cards. If you don't see the feature, your card may not be eligible. You can reach out to Support to confirm.

Using Capital One Eno for online shopping

Virtual card numbers are particularly useful in certain situations.

1. Subscriptions you might want to cancel.

When you sign up for a streaming service, a SaaS tool, or any subscription, your card is stored and charged monthly. Using an Eno virtual number means you can lock or remove that specific number to stop being charged, without affecting any of your other subscriptions or your real card.

2. Free trials with auto-renewal

Many free trials require your card details at signup and automatically start charging if you don’t cancel before the trial expires. Using a virtual number that you lock at the end of the trial period is a clean way to make sure the charge does not go through if you forget.

3. Buying from a merchant you have not used before.

A virtual number limits potential damage if the merchant turns out to be unreliable or has poor security. Your real card details are never exposed.

Capital One virtual card limitations

Eno virtual card numbers are useful, but they are not always suitable.

  • Browser compatibility: Eno works in the popular browsers, including Chrome, Firefox, and Microsoft Edge. However, it may be limited or unavailable in some other browsers.
  • Online only: Virtual card numbers cannot be used for in-person purchases. They only work at online checkout forms. You cannot tap or swipe a virtual number at a physical shop.
  • Some merchants reject tokenised numbers: Some merchants, particularly hotels and car rental companies, may reject virtual cards because they need a card for security deposits or incidental charges.
  • Eligible cards only: Not all Capital One products include Eno virtual card numbers. If you do not see the option in the app or extension, your card may not be eligible.

Alternatives to Capital One virtual cards

If Eno does not work for your browser or device, or if you need a virtual card that works across currencies, there are other options.

Other US bank virtual cards

Some US banks also issue virtual card numbers. These are tied to that specific bank account.

  • Citi Virtual Account Numbers let you generate unique numbers tied to a Citi credit card, set monthly or per-transaction limits, and cancel them at any time without affecting the main card.
  • American Express offers virtual card numbers on selected products, allowing single-use or limited-duration numbers for online purchases.
  • Chase Bank provides limited temporary number functionality through Click to Pay on some cards, though it is less flexible than Eno’s dedicated system.

These bank options work best when you already hold a credit card with that institution and primarily shop in a single currency (almost always USD). They keep rewards, credit history, and customer service within one relationship, but they offer little help if you need to hold or spend balances in euros, pounds, or other currencies.

Fintech virtual cards

Fintech platforms issue virtual cards that work differently. Instead of generating a temporary number that draws from one existing credit card, they let you hold balances in multiple currencies and issue virtual cards that spend directly from those balances. Some offer disposable/single-use cards that work just like virtual card numbers.

The Grey Plus Card is a virtual Visa card connected to USD, GBP, or EUR balances. Unlike Eno, it is not tied to an existing bank account card. For USD purchases on a USD-funded Grey card, no cross-border conversion fee applies. You can create multiple cards for various payments with set limits, and instantly freeze and unfreeze cards.

Grey is particularly useful for freelancers, remote workers and anyone who regularly pays for international subscriptions or shops on US and European sites. Conversion happens only when you choose, at a rate shown before confirmation, rather than being forced at the point of every purchase.

Learn about how Mastercard virtual cards work.

Let's compare the Grey virtual card and the Capital One Eno virtual card numbers:

Feature Capital One Eno Grey virtual card
How to get it Install Eno extension or use
Capital One app
Sign up with Grey, create card instantly
Browser support
Chrome, Firefox, Edge only Any browser (enter number manually)
Multi-currency
No (tied to USD Capital One card) Yes (USD, GBP, EUR)
Per-merchant numbers Yes No (single reusable card), but supports multiple cards
In-store use No Yes (via Apple Pay, Google Pay in eligible regions)
Requires existing bank card
Yes (Capital One card) No
One-time fee
None $5

Open a multi-currency account with Grey to manage international purchases in USD, GBP, or EUR from one place.

Get a Grey virtual card for cross-currency online shopping that works in any browser, on any device.

Frequently asked questions

Is Capital One Eno free?

Yes. Eno is a free feature included with eligible Capital One accounts. There is no charge to install the browser extension, generate virtual card numbers, or use Eno to manage your cards. The only cost is the standard fees and interest that apply to your underlying Capital One card.

Can I generate multiple virtual card numbers with Capital One?

Yes. Eno generates a separate, unique number for each merchant where you shop. You can have many active virtual numbers at once, one per merchant. You manage all of them through the Eno dashboard.

Does the Eno virtual card number change for each merchant?

Yes. Each merchant gets its own unique virtual number. The number Eno generates for one merchant cannot be used at another merchant, even if someone obtains it. This is the key security feature: per-merchant numbers limit the damage from any single compromise.

Can I use Eno on Safari?

No. The Eno browser extension is available for Chrome, Firefox, and Microsoft Edge. It does not work in Safari. If you use Safari on a Mac, iPhone, or iPad, the Eno extension will not function. You can use the Capital One mobile app to generate virtual numbers manually and copy them to use at checkout.

What is the best multi-currency alternative to Capital One Eno?

For shoppers who buy in multiple currencies or who want a virtual card independent of their existing bank account, the Grey Plus Card is a strong alternative. It is a virtual Visa card connected to USD, GBP, or EUR balances, works in any browser, and has no foreign transaction fee for same-currency purchases.

How do I get a Grey virtual card?

Sign up at grey.co, complete identity verification, open a USD, GBP, or EUR account, and create the Grey Plus Card from the Cards section. A one-time $5 fee applies. Card details are available immediately in the app, ready to enter at any online checkout.

How to activate an eSIM: A step-by-step guide

•

•

2 min read

Getting a new phone or switching to a different mobile plan usually means dealing with a physical SIM card. With an eSIM, there is no small plastic card to insert or remove, but you still need to activate the digital SIM before you can use your mobile plan.

The activation process is usually straightforward, although the steps can look slightly different depending on your phone and carrier. Instead of inserting a physical SIM, you add the eSIM through your phone settings using a QR code or the activation details provided by your carrier.

To activate an eSIM, open your phone settings, go to Mobile Data or Connections, and choose Add eSIM. Scan the QR code from your carrier or enter the details by hand, then follow the prompts to install the plan. Finally, set the eSIM as your line for data, calls or both.

Once the plan is installed, checking your mobile data and call settings can help make sure the eSIM is active and ready to use.

What you need before you start

Before you start the eSIM activation process, it helps to have everything you need within reach. Nothing is more frustrating than getting halfway through setup and realising you are missing the activation details or your phone does not support eSIMs.

First, make sure your phone is compatible with eSIM technology. If you are unsure, check which phones support eSIM before you begin, as compatibility can vary by device, model and region. You will also need an eSIM plan from a carrier that supports eSIM activation.

Your carrier should provide either a QR code or activation details that you can enter manually. Keep these details available before opening your phone settings, as you may need them during installation.

With a compatible phone, a carrier eSIM plan and your QR code or activation details ready, you can move on to the activation process and install the eSIM on your device.

Also read: eSIM vs physical SIM: What is the difference?

How to activate an eSIM on iPhone: a step-by-step guide to installing your mobile plan

Activating an eSIM on your iPhone lets you connect to a mobile network without inserting a physical SIM card. Before you begin, make sure you have your carrier’s activation details or QR code ready and your iPhone connected to Wi-Fi.

1. Connect to Wi-Fi

Connect your iPhone to a stable Wi-Fi network before you begin. A reliable internet connection helps your device communicate with your carrier and complete the eSIM setup without interruptions. If you are activating a new iPhone, complete the device setup before adding your mobile plan.

2. Open Cellular Settings

Open Settings on your iPhone and tap Cellular or Mobile Service, depending on your region. Select Add eSIM, then choose the available activation option. Your iPhone may offer several methods, including transferring from another iPhone or using a QR code supplied by your carrier directly.

3. Scan the QR Code

Select the option to use a QR code if your carrier has one. Point your iPhone camera at the code and follow the prompts on screen. Depending on your carrier, you may need to confirm activation or enter details before the plan downloads as expected.

4. Label Your Plan

Once the eSIM has been added, give the cellular plan a clear label, such as Personal or Work, so you can identify it easily. If you have multiple lines, choose which number should handle calls, messages and mobile data, then finish the setup process completely.

How to activate an eSIM on Android

Learn how to activate an eSIM on your Android phone, from scanning your carrier’s QR code to downloading the mobile plan and completing setup.

Samsung Galaxy

  1. Open Settings and tap Connections.
  2. Select SIM manager, then choose Add eSIM.
  3. Tap the Scan QR code from the service provider and scan your carrier’s QR code.
  4. Follow the on-screen instructions to download the eSIM and complete activation.

Google Pixel

  1. Open Settings and select Network & Internet.
  2. Tap the + (Add) icon beside SIMs.
  3. Select Download a SIM instead?, then tap Next.
  4. Scan your carrier’s QR code and follow the prompts to download and activate your eSIM.

Motorola

  1. Open Settings, then select Network & Internet.
  2. Tap Mobile network, choose Advanced, and select Carrier.
  3. Tap Add carrier, then select Start to open the scanner.
  4. Scan your QR code and tap Done to complete eSIM activation.

Xiaomi / Redmi

  1. Open Settings and select SIM cards & mobile networks.
  2. Turn on Use eSIM, then tap Manage eSIM.
  3. Select Add mobile plan and scan your provider’s QR code.
  4. Tap Download and follow the prompts to install and activate your eSIM.

OnePlus

  1. Open Settings and tap Mobile network.
  2. Select eSIM and turn on the eSIM feature.
  3. Tap Add eSIM, then select Next to continue.
  4. Scan your carrier’s QR code and follow the on-screen instructions to complete the setup.

Activating an eSIM without a QR code or using two eSIMs

You may not always need a QR code to activate an eSIM. Depending on your carrier and Android phone, you may be able to enter the activation details manually or download the eSIM through your carrier’s app. Manual activation typically requires information such as an activation code or SM-DP+ address provided by your carrier. If your carrier supports app-based activation, download its official app, sign in, and follow the instructions to add your mobile plan. The exact steps can vary by carrier and Android device.

Some Android phones also support two eSIMs, allowing you to keep two mobile plans on one device. This can be useful if you want to separate personal and work numbers, use different carriers when travelling, or keep a local plan alongside your main number. Your phone must support multiple active eSIMs, and the exact options vary by model. Check your device’s SIM settings to see whether you can add and manage more than one eSIM.

You may also like: How to pay online and in stores worldwide with your phone

Get a Grey eSIM and stay connected across 100+ countries

With a Grey eSIM, you can stay connected while travelling across more than 100 countries without worrying about traditional roaming charges. You can purchase a data plan through the Grey app, select your destination, choose the plan that suits your trip, and complete the payment.

Once you have purchased your plan, install the eSIM on your compatible phone and follow the activation steps for your device. After activation, turn on the eSIM for mobile data and make sure data roaming is enabled for the Grey line where required. Your plan will then connect to a supported local network when you arrive.

The Grey app also makes it easier to hold and spend multiple currencies while you travel. You can manage your available balances, exchange currencies when needed, and use your Grey card for eligible purchases, giving you more flexibility when moving between countries. Download the Grey app to get started

Frequently asked questions about activating an eSIM card

How do I activate an eSIM?

Open your phone’s Settings and find the Cellular, Mobile network, or SIM manager menu. Select Add eSIM or the equivalent option, then follow your carrier’s instructions. You may need to scan a QR code or enter activation details manually.

Do I need a QR code?

A QR code is the most common way to activate an eSIM, as carriers typically provide one with your plan. However, some devices and networks also support manual activation, allowing you to enter details such as an activation code or SM-DP+ address.

Can I activate an eSIM without Wi-Fi?

You generally need an internet connection to download and activate an eSIM profile. Wi-Fi is usually the simplest option, although some devices may allow activation using mobile data. Check your carrier’s instructions before starting, especially when travelling without an active connection.

How long does activation take?

eSIM activation usually takes only a few minutes once you have downloaded the digital profile. However, the exact time depends on your carrier, device, and network. If your eSIM does not connect immediately, restart your phone and check that the correct line is enabled.

Can I move an eSIM to a new phone?

You can move an eSIM to another compatible phone, but the process depends on your carrier and device. Some phones support direct eSIM transfer, while others require you to deactivate the old profile and request a new activation code or QR code.

How do I get a Grey eSIM?

Open the Grey app, go to the Lifestyle section, and select eSIM. Choose your destination country and the data plan that suits your trip, then complete your purchase. Download the eSIM to your compatible device and follow the activation instructions.

How to enjoy Afro Nation on a budget

•

•

2 min read

There’s nothing quite like Afro Nation. The sun, the sand, the sound of Afrobeats blaring across the beach as Africa’s biggest music stars light up the stage. There aren’t enough superlatives to describe the thrill of being surrounded by people from every corner of the world whose sole aim is to enjoy African music. It’s an experience, a proper one.

Experiences like this don’t come cheap. The costs can pile up quickly between ticket prices, flights, accommodation, and “soft life” expenses.

However, you can organise an unforgettable Afro Nation trip on a budget with a little strategy and planning.

Why Afro Nation is worth every cent, even on a budget

Since its debut in Portugal in 2019, Afro Nation has grown from a niche event into one of the most anticipated music festivals worldwide. What started as a dream to unite people through music is now a global movement, pulling crowds from everywhere.

The headliners (even though the line-ups are always insane) aren’t the only reason it has so many attendees. A lot of this is owed to the community, culture, and reconnecting with your roots, all while partying in some of the most beautiful coastal locations in the world.

The experience is what you make it. Budget or not, the vibe remains undefeated.

Also read: How to apply for a digital nomad visa in Portugal

How to score affordable tickets to Afro Nation

The first rule of Afro Nation is to buy your ticket early.

  • Early bird tickets are always the cheapest. Waiting till the line-up drops might feel smart… until you see the price jump.
  • Don’t feel pressured by VIP hype. General Admission gets you into the same party, same performances, and same memories.
  • Keep an eye on official giveaways or community forums; you’d be surprised by how often people resell tickets.

Finding budget-friendly flights

Flights are often the most expensive part of this trip, but they don’t have to be.

  • Use comparison tools like Google Flights, Skyscanner, or Hopper to spot the cheapest options.
  • Be flexible. Flying midweek instead of weekends can save hundreds.
  • Book as early as you can. Last-minute deals are rare for festival season.

Also read: How to receive and convert foreign currencies to USDC in Portugal

Where to stay without going broke

Accommodation during Afro Nation sells out fast.

  • Airbnb with friends is king. Not only does it save money, but it also makes for a more social trip. Split the cost, split the snacks, split the vibes.
  • Consider hostels, modern hostels are clean, safe, and often full of other festival-goers. Instant new friends.
  • Book a spot a bit further from the festival site and commute in. Buses, trains, or group Ubers make it easy and affordable.
  • Lock it in early. Prices skyrocket as the event gets closer.

Eating, drinking, and moving around like a pro

  • Skip tourist traps. Find local markets or restaurants for authentic meals at half the price.
  • Grocery stores are lifesavers. Stock up on snacks, water, and easy breakfasts.
  • Use public transport where possible. It’s cheap and reliable.
  • Split rides with other festival-goers through group chats or apps.

Tips to enjoy Afro Nation on a budget

It’s easy to go from “I’m being responsible” to “How did I just spend €200 on drinks?”

  • Set a daily budget before you arrive.
  • Grey is your secret weapon here. Open a free EUR account, load your funds, and spend directly. There are no hidden conversion fees and no nasty surprises.
  • Watch out for overpriced festival merch. If you really want it, budget for it upfront.
  • Bring essentials: a reusable water bottle, snacks, and a portable charger so you won’t spend money on unnecessary items.
  • Book everything early. Seriously, everything.
  • Travel with friends to split costs.
  • Stick to your spending plan (but leave room for some fun).
  • Prioritise the moments. The music. The people. The memories.

Also read: How Grey differs from a US bank

How Grey helps you stay on budget

Currency fees can eat into your wallet when you’re hopping between currencies.

Here’s how Grey saves the day:

  • Open a EUR, USD or GBP account from home.
  • Pay for tickets, flights, and accommodation without expensive bank fees.
  • Convert between currencies at great rates, not your bank’s shady rates.
  • Withdraw or convert back to your home currency when you’re done, quickly and easily.

With some planning (and a little help from Grey), you can dance, vibe, and live your best life at Afro Nation without the stress of blowing your budget.

Create your Grey account today or download the app to plan your global adventures smartly.

‍

Arrow (up)

Back to top

