


Cost of living in Manila

Priscila Marotti

TABLE OF CONTENT

SHARE THIS POST

Manila is a city that never sits still: part chaos, part charm, and entirely alive. One moment you’re sipping coffee in a sky-high café in BGC, the next you’re weaving through jeepneys and street vendors selling taho and pandesal.

For expats, freelancers, and remote workers, Manila offers the best of both worlds: the energy of a big city and the warmth of a tight-knit community. The cost of living depends on how you want to experience it. You can choose a budget-friendly apartment in Quezon City, a sleek condo in Makati, or a luxury flat overlooking the Manila Bay sunset.

Read also: The best digital nomad jobs in the Philippines

Rent in Manila

Finding a place to live in Manila means balancing convenience, comfort, and chaos — in the best way. The city is a mix of buzzing business districts, laid-back residential areas, and emerging suburbs that suit every lifestyle and budget.

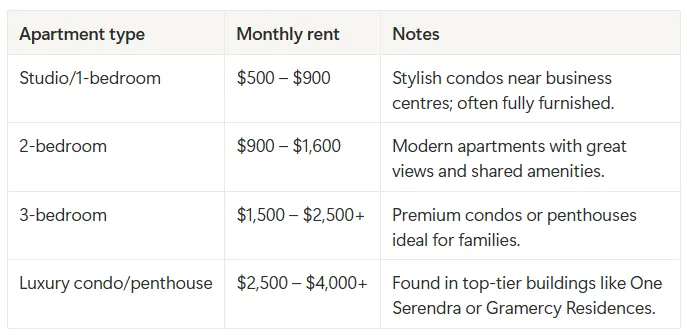
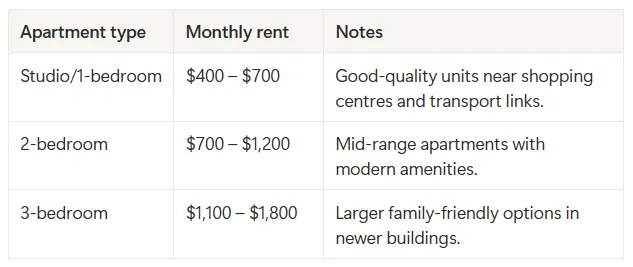
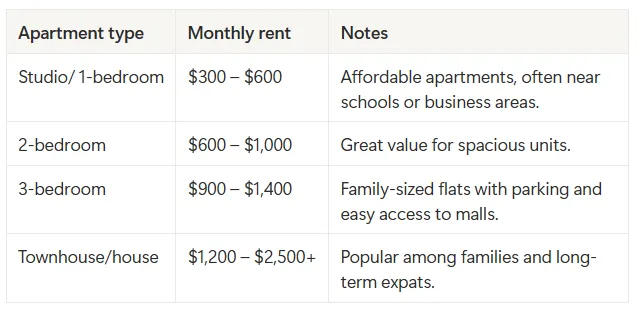
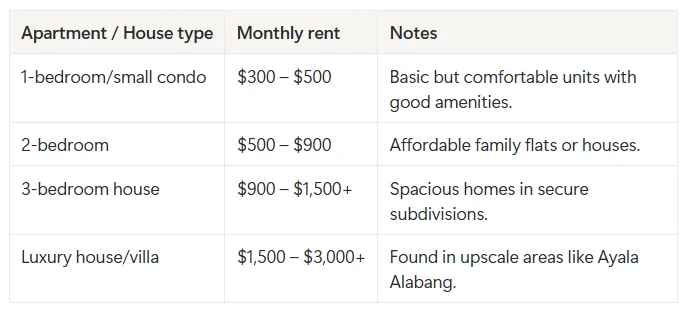
Rents vary depending on the neighbourhood, proximity to business hubs like Makati or BGC, and whether your apartment is furnished or includes utilities. Modern condos tend to cost more, but they come with great amenities like pools, gyms, and 24-hour security.

Makati and Bonifacio Global City (BGC)

The beating heart of Manila’s expat life. Makati and BGC are sleek, walkable, and filled with cafés, coworking spaces, and high-end malls. They’re the go-to choice for professionals and freelancers who want convenience, safety, and a social scene right outside their door.

__wf_reserved_inherit

Ortigas and Mandaluyong

Centrally located and more budget-friendly than Makati or BGC, these areas offer excellent value and easy access to the rest of Metro Manila. Perfect for professionals who want city living without the top-tier price tag.

__wf_reserved_inherit

Quezon City

One of Manila’s largest and most diverse districts, Quezon City combines residential charm with a lively food and entertainment scene. It’s home to universities, media companies, and a thriving student community.

__wf_reserved_inherit

Pasig, Alabang, and other suburban areas

These areas are ideal for families or anyone seeking more space and a quieter environment. You’ll find modern gated communities, good schools, and lower rents than in the city centre — but expect longer commutes.

__wf_reserved_inherit

Transport in Manila

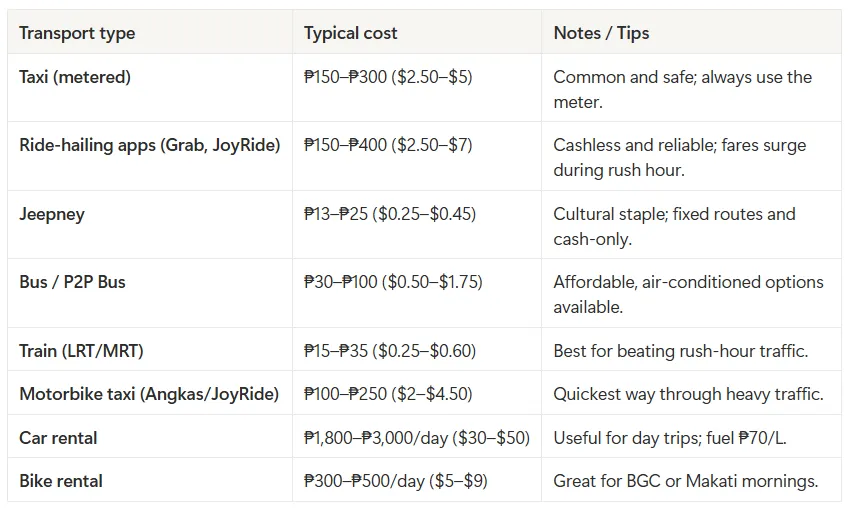
Manila moves fast (and sometimes not at all). Between its endless traffic jams and new transport options, getting around the city can be an adventure in itself. Expats and locals alike mix and match taxis, ride-hailing apps, jeepneys, and trains to balance comfort, time, and cost.

Taxis

Taxis are everywhere in Manila and remain one of the easiest ways to get around. They’re metered and affordable, though rush-hour traffic can make short trips take forever. Always opt for reputable companies or use an app to book.

  • Cost: Starts around ₱45 ($0.75), with most rides costing ₱150–₱300 ($2.50–$5).
  • Tip: Always ask the driver to turn on the meter. Avoid “fixed rate” offers from unbooked street taxis.

Ride-hailing apps (Grab, JoyRide)

Ride-hailing apps dominate Manila’s transport scene, especially for expats and professionals. Grab is the most popular and reliable, offering both cars and motorbike rides. It’s safer, air-conditioned, and cashless.

  • Cost: ₱150–₱400 ($2.50–$7), depending on traffic and distance.
  • Tip: During rush hour, prices surge quickly — try booking before 7 a.m. or after 8 p.m. to avoid long waits.

Jeepneys

A true icon of Filipino culture. Jeepneys are colourful, shared minibuses that follow fixed routes across the city. They’re cheap and everywhere, but not ideal for those unfamiliar with routes or the language.

  • Cost: ₱13–₱25 ($0.25–$0.45) per ride.
  • Tip: Pay in cash, pass your fare forward, and tell the driver where to stop (“Para po!”). Best for short distances or exploring local life.

Buses

City buses run along major roads like EDSA and offer an affordable way to travel between business districts. Modern point-to-point (P2P) buses are air-conditioned and comfortable — a good choice for longer commutes.

  • Cost: ₱30–₱100 ($0.50–$1.75), depending on distance.
  • Tip: P2P buses are great for intercity travel between BGC, Makati, Ortigas, and Alabang.

Metro and trains (LRT, MRT, PNR)

Manila’s train network is limited but handy for avoiding traffic during rush hour. It covers key parts of the city, though carriages can get crowded.

  • Cost: ₱15–₱35 ($0.25–$0.60) per ride.
  • Tip: Travel outside peak hours (7–9 a.m. and 5–7 p.m.) for a less hectic experience.

Motorbikes and scooters

Motorbike taxis are gaining popularity, especially with apps like Angkas and JoyRide. They’re fast, convenient, and can weave through traffic — a lifesaver for short trips.

  • Cost: ₱100–₱250 ($2–$4.50) for most city rides.
  • Tip: Helmets are provided, but double-check for safety straps and clean visors.

Car rentals / driving

Driving in Manila gives freedom but comes with challenges — traffic, parking, and local driving habits. It’s best suited for longer stays or weekend trips.

  • Cost: ₱1,800–₱3,000/day ($30–$50) for compact cars. Petrol costs around ₱70/L (~$1.20).
  • Tip: Expect tolls on major expressways. Apps like Waze are essential for navigation.

Walking and cycling

Walking is common within gated communities or business districts like BGC and Makati, but less practical citywide due to heat and traffic. Cycling is slowly growing in popularity thanks to new bike lanes.

  • Cost: Free to walk; bike rentals from ₱300–₱500/day ($5–$9).
  • Tip: Early mornings are best for walking or cycling — before traffic and humidity peak.
__wf_reserved_inherit

Food prices in Manila

Manila is a food lover’s playground, from street eats to hip cafés and international dining spots. The city’s food scene blends Filipino comfort dishes with flavours from all over Asia and the West, making it easy (and tempting) to eat out often.

Restaurants

Eating out in Manila can fit any budget. You can grab a hearty local meal for the price of a coffee abroad, or splurge on fine dining in Makati or Bonifacio Global City (BGC).

  • Street food / local cafés: Expect to spend ₱120–₱250 ($2–$4) for classics like silog meals (rice, egg, and meat), adobo, or noodle soups. Drinks like iced tea or buko (coconut) juice add ₱40–₱80 ($0.70–$1.50).
  • Mid-range restaurants: In BGC, Ortigas, or Quezon City, a sit-down meal costs ₱400–₱900 ($7–$16) per person, including grilled meats, rice bowls, and drinks.
  • Fine dining / rooftop spots: Dinner for two at upscale restaurants in Makati or BGC ranges from ₱3,000–₱6,000 ($50–$100), not including wine.

Cafés are everywhere — perfect for remote work or lazy brunches. A latte and pastry typically cost ₱250–₱400 ($4–$7).

Supermarkets and markets

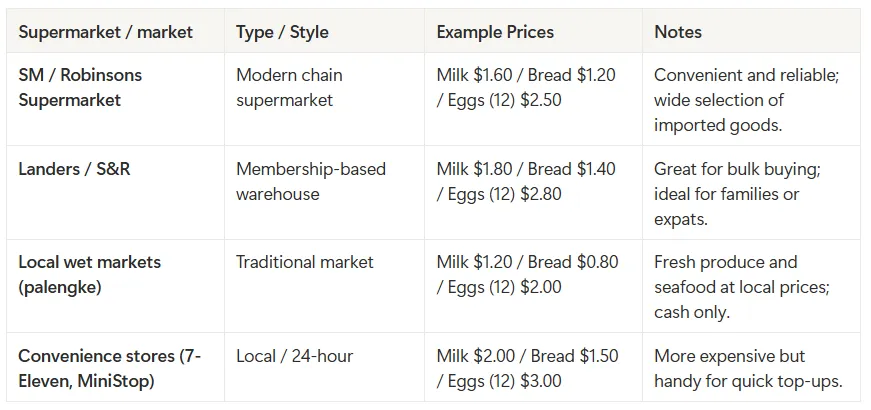
Grocery prices in Manila vary depending on where you shop. Local palengkes (wet markets) are the cheapest for fresh produce, while supermarkets like SM or Robinsons offer convenience and imported goods at higher prices.

__wf_reserved_inherit

Many expats buy local fruits, vegetables, and meat at wet markets, then stock up on snacks and international items at big supermarkets or membership stores. Imported food, dairy, and wine tend to be pricier than local options.

Here’s a realistic monthly breakdown in USD:

For one person

  • Groceries (mix of markets and supermarkets): $60–90 per week (~$240–360 per month)
  • Eating out (casual meals, occasional cafés or dinners): $40–70 per week (~$160–280 per month)

Total monthly food budget: $400–640

Enough to cook most meals at home, eat out a few times a week, and still enjoy Manila’s endless dining options.

For a couple or small family

  • Groceries: $120–180 per week (~$480–720 per month)
  • Eating out: $80–120 per week (~$320–480 per month)

Total monthly food budget: $800–1,200

That’s enough for a comfortable mix of home cooking, restaurant dining, and weekend brunches around Makati, BGC, or Ortigas.

Utilities costs in Manila

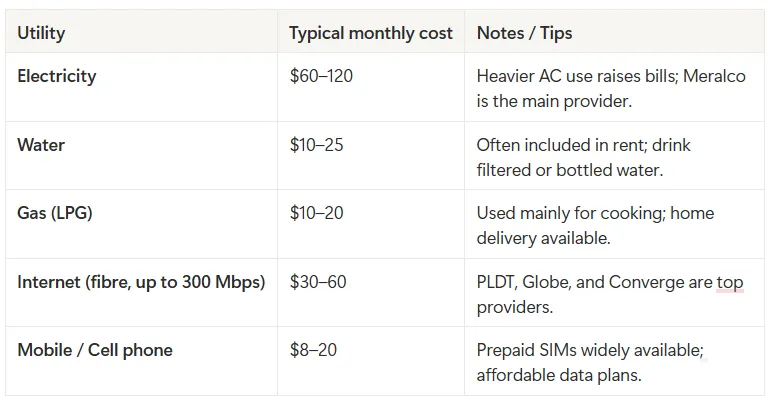
Manila’s utility costs are moderate by Southeast Asian standards but can fluctuate depending on your location, lifestyle, and building type. Air conditioning, in particular, can raise your bills significantly during the hot and humid months.

Electricity

Electricity is one of the biggest household expenses in Manila. Air conditioning, refrigerators, and water heaters drive up costs, especially during the dry season (March–May).

  • Average monthly cost for a 1–2 bedroom apartment: $60–120
  • Tip: Limit AC use and choose energy-efficient appliances. Meralco is the main electricity provider, and bills are paid monthly — most apartments allow online payment.

Water

Water is relatively affordable in Manila and supplied mainly by Manila Water or Maynilad, depending on your area. Many condos include water in the rent, but houses or older buildings may bill it separately.

  • Average monthly cost: $10–25
  • Tip: Check if your water bill is separate from your condo dues. Water is safe for washing and cooking, but most people prefer bottled or filtered water for drinking.

Gas

Most homes use LPG (liquefied petroleum gas) for cooking. Gas tanks are easy to order and delivered directly to your home.

  • Cost: Around $10–20 per month (depending on cooking frequency)
  • Tip: Keep a spare tank — delivery is fast but not 24/7.

Internet

Manila has wide internet coverage, though connection speeds can vary. Fibre is now common in most urban areas and is the best choice for remote workers or streaming-heavy households.

  • Average monthly cost: $30–60 for fibre (up to 300 Mbps)
  • Tip: Top providers include PLDT, Converge, and Globe. Installation can take a few days to a week depending on location.

Mobile / Cell phone

Mobile plans are affordable and widely available. Most expats use prepaid SIM cards, which can be topped up online or at convenience stores.

  • Average monthly cost: $8–20 for 10–20 GB data
  • Tip: Globe and Smart have the best coverage; you can buy SIM cards at airports or malls.
__wf_reserved_inherit

Healthcare in Manila

Manila has a well-developed healthcare system that combines affordable public services with excellent private hospitals that cater to both locals and expats. While the public system offers accessible care, most foreigners and professionals rely on private facilities for faster service, modern equipment, and English-speaking staff.

Public healthcare

The Philippines’ public healthcare system is overseen by the Department of Health (DOH) and supported by PhilHealth, a national insurance programme that helps subsidise hospital and medical expenses. Public hospitals can be very affordable but are often crowded and have longer waiting times.

  • Cost: Low or free for residents; small co-payments for procedures or medication
  • Pros: Inexpensive and widely available
  • Cons: Long queues, limited equipment, and varying service quality

Public healthcare is useful for emergencies or basic treatments, but expats typically prefer private hospitals, which offer more comfort, shorter waits, and international standards of care.

Private healthcare and insurance

Private healthcare in Manila is modern, efficient, and relatively affordable compared to Western countries. Leading private hospitals such as St. Luke’s Medical Center (BGC and Quezon City), Makati Medical Center, and Asian Hospital are well known for their world-class facilities, international accreditation, and English-speaking doctors.

  • Basic consultation (without insurance): $25–$50
  • Specialist visit: $50–$100
  • Hospital stay (per night, private room): $120–$250

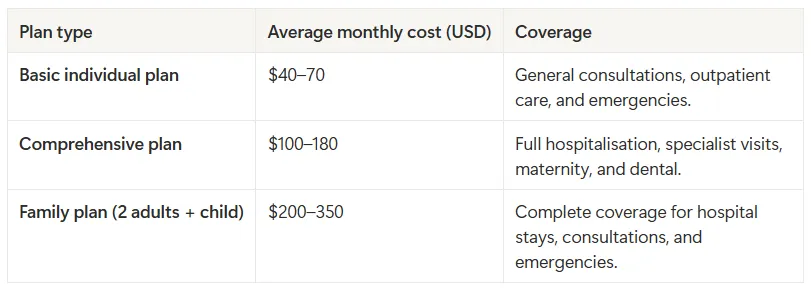
Health insurance is highly recommended for expats and long-term residents. Both local and international providers offer a range of plans suitable for different budgets and coverage levels. Popular insurers include AXA Philippines, Allianz PNB Life, Cigna Global, and Pacific Cross.

__wf_reserved_inherit

Tip: Many expats choose to pay out of pocket for minor visits since private consultations are affordable. Pharmacies are easy to find across the city and well stocked — most common medications are available without a prescription.

Average living costs in Manila

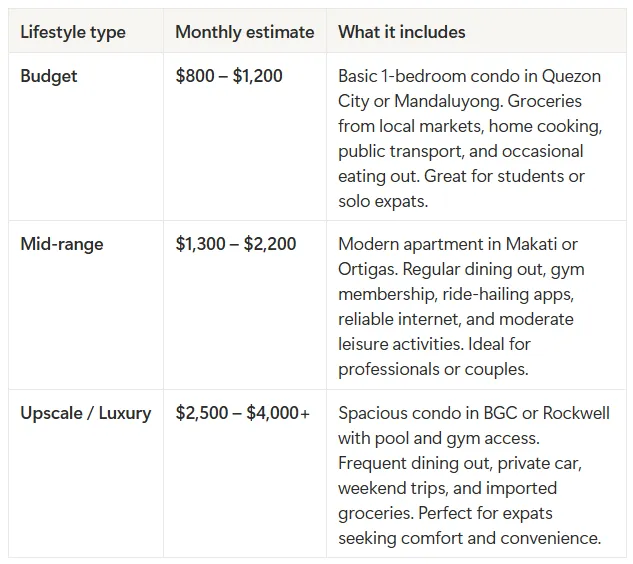
Manila offers a mix of modern city living and laid-back tropical charm, with a cost of living that’s lower than most Western or Gulf cities. From bustling business districts to leafy neighbourhoods and beach getaways just a drive away, the city suits a wide range of lifestyles and budgets.

__wf_reserved_inherit

You can live comfortably in Manila for around $1,200–1,800 per month, depending on your area and lifestyle. Costs rise if you prefer imported goods or high-end accommodation, but local options make it easy to live well on a reasonable budget.

Seamless money management with Grey

Manila is one of those cities that never misses a beat, lively, unpredictable, and full of opportunities at every corner. Between rent, food, and daily adventures, managing your finances wisely can make all the difference.

With Grey, you can receive international payments in USD, GBP, or EUR, convert when rates are best, and withdraw PHP directly to a Philippine bank account. It’s fast, secure, and built for global citizens who call multiple places home.

Open a free Grey account to make life in Manila smoother and stress-free.

‍

Last updated:

June 15, 2026

Open a free Grey account to get startedJoin 1 million digital nomads
IF YOU ENJOYED THIS, CHECK THESE OUT

How to get paid by Amazon in South Africa with Grey

•

•

2 min read

Selling products or earning through Amazon’s affiliate and freelance platforms is a great way to tap into global income streams. But for many South Africans, there’s one persistent challenge — how do you get paid?

That’s where Grey comes in. Grey gives South Africans access to virtual foreign accounts, so you can get paid in Amazon’s preferred currencies and easily convert or withdraw your money.

In this guide, I’ll show you exactly how to get paid by Amazon in South Africa with Grey.

How Amazon pays sellers, affiliates, and freelancers

Amazon uses a standardised system to distribute earnings. You will receive your payouts directly to the bank details you provide.

Here’s how it works:

  • Earnings calculation: Amazon deducts fees and refunds from your sales or commissions.
  • Payment cycles: Most payouts are made every 14 days (biweekly), but this may vary depending on account type and region.
  • Currency: Amazon disburses funds in the local currency of the marketplace (e.g., USD for Amazon.com, GBP for Amazon UK), so a multi-currency account is essential.
  • Bank account requirements: You must add a compatible bank account that matches the payout currency — this is where Grey becomes your best option.

Also read: How to get paid by Amazon in Nigeria, Kenya, and Tanzania with Grey

Why Grey is the best way to get paid by Amazon in South Africa

Grey is a cross-border financial platform that makes international payments easy for freelancers, digital entrepreneurs, and remote workers. With a Grey account, you can:

  • Create virtual USD, GBP, and EUR accounts — perfect for receiving Amazon payouts.
  • Receive payments directly into your foreign account without delays or rejections.
  • Convert funds to South African rand (ZAR) at competitive exchange rates.
  • Withdraw funds locally to your bank account or mobile wallet.

Also read: How freelancers in South Africa can receive payments from the US, UK & EU clients

Step-by-step: How to get paid by Amazon using Grey

Here’s how to set up and receive your Amazon payments through Grey:

1. Open a Grey account

Visit the Grey website or download the Grey app and sign up for free. Fill in your name, email, and phone number to get started.

2. Verify your identity

Upload a valid ID, proof of address, and a selfie. This is required to activate your virtual foreign bank accounts.

3. Generate your bank account details

Once verified, you can create foreign accounts (USD, GBP, or EUR) from your Grey dashboard. These include:

  • IBAN
  • SWIFT/BIC
  • Account number
  • Bank name and address

4. Add Grey account to Amazon Seller Central or Affiliate dashboard

  • Go to Amazon Seller Central or your Amazon Affiliate dashboard.
  • Navigate to Settings > Payment Information.
  • Select “Add new bank account”.
  • Enter your Grey-provided virtual bank account details in the correct currency (e.g., USD for Amazon.com).
  • Save changes.

5. Get paid and withdraw

Once Amazon releases your funds, they’ll arrive in your Grey account. You can:

  • Hold in foreign currency until the exchange rate favours you.
  • Convert to ZAR at competitive rates.
  • Withdraw directly to your local South African bank account.

Also read: How to open a US and UK bank account in South Africa

Tips to make the most of your Amazon payouts with Grey

Here are a few ways you can maximize your Amazon payouts with Grey.

  • Avoid instant conversions if the exchange rate is low — Grey lets you hold multiple currencies.
  • Track your payments in real time using the Grey app or website.
  • Split payouts if you have multiple Amazon accounts or freelance gigs.
  • Stay compliant by keeping a record of your foreign payments for tax purposes.

Get paid by Amazon in South Africa

With Grey, getting paid by Amazon in South Africa is fast, affordable, and stress-free. No more rejected payments, currency conversion issues, or high international transfer fees.

If you’re ready to simplify your finances and get paid like a pro, create your Grey account today or download the app to receive Amazon payouts in USD, GBP, or EUR and convert them to rand with ease.

‍

The best international bank accounts for freelancers and remote workers

•

•

2 min read

Getting paid shouldn’t feel like a puzzle. But for many freelancers and remote workers juggling clients across continents, managing income in multiple currencies can get messy pretty quickly.

I learned this the hard way after chasing down delayed transfers, losing money to currency conversion, and constantly explaining IBAN numbers. That’s when I realised I didn’t just need a better payment method, I needed the right international bank account for freelancers.

Luckily, there are smarter solutions out there. Let’s explore what actually works and why Grey is the top choice if you’re looking for freedom, flexibility, and control over your international income.

How global accounts simplify life for freelancers

When you’re working with clients in the US, UK, Germany, or beyond, your local bank probably isn’t cutting it. High fees, long waits, and limited currency support can affect your earnings and peace of mind.

That’s where international bank accounts for freelancers shine. They give you:

  • Multi-currency access (USD, GBP, EUR, and more)
  • Faster global payments
  • Better exchange rates
  • Access to local account details (so your clients can pay you easily)
  • Freedom to work and earn from anywhere

Why freelancers and remote workers love Grey

Unlike traditional banks or generic apps, Grey is built for people who work across borders. The interface is clean, the setup is easy, and everything — from invoicing to withdrawals — just works.

💡 Also read: How to open virtual bank accounts for freelancers outside the USA

Whether you’re working with clients in the U.S., Europe, the UK, or around the world, Grey makes it easy to:

  • Instantly open virtual USD, GBP, and EUR bank accounts
  • Receive international payments from platforms or clients abroad
  • Convert money at competitive exchange rates with no hidden fees
  • Withdraw funds to your local bank account in minutes
  • Connect with a growing freelancer community for tips, resources, and peer support

Grey simplifies international banking for freelancers in Africa and beyond. It’s secure, fast, and designed to make remote work more rewarding.

Other options worth considering

Not every freelancer has the same needs, so here are a couple of other platforms to explore if you’re shopping around.

Wise

Wise is known for transparency and low transfer fees. You can hold multiple currencies and get local bank details in key countries.

Pros: Great rates, user-friendly app

Cons: Not freelancer-focused, fewer local withdrawal options in some regions

Payoneer

Popular among freelancers using platforms like Fiverr or Upwork, Payoneer offers multi-currency accounts and global payments.

Pros: Good for platform-based freelancers

Cons: Complicated fee structure, longer payout times

Revolut

Revolut is a digital banking app that supports multi-currency accounts, global spending, and even cryptocurrency. It’s great for freelancers who travel or spend in different currencies.

Pros: Hold and exchange over 25 currencies

Cons: Some key features are only available in paid plans

N26

Based in Germany, N26 is a full-fledged digital bank with international capabilities. It’s ideal if you live in Europe or hold EU residency, offering IBAN accounts and seamless card usage abroad.

Pros: Smooth user experience and banking features

Cons: Not available globally; mostly for EU residents

What to look for in a freelancer-friendly international bank account?

Choosing the right platform can impact how quickly and easily you get paid. Here are the key features every freelancer should consider:

  • Can I receive payments in my client’s currency?
  • How fast can I access my money?
  • Are the exchange rates and fees transparent?
  • Can I withdraw to my local account easily?
  • Does it support my country or region?

If you’re a freelancer in Africa, Southeast Asia, or Latin America, Grey checks all the boxes — and adds powerful tools to help you work and earn globally.

You may also like: Earning in USD? Here’s how to receive your salary as a remote worker

Take the stress out of getting paid

Managing international income doesn’t have to be complicated. With the right tools, it can feel seamless — even empowering.

Grey gives you more than just an account. With Grey, you get a gateway to globally impactful work with local-level convenience. Whether you’re invoicing in euros, getting paid in dollars, or converting to naira, Grey ensures nothing gets lost in translation.

Open your international bank account today

If you’re ready to stop worrying about payments and focus on your work, it’s time to make the switch.

Join Grey today and get your own international bank account built for freelancers — no paperwork, no stress, just smarter banking.

‍

How to open an offshore private bank account as a US citizen

•

•

2 min read

There’s a US-based consultant somewhere who just signed a contract with a client in a European country. The client has insisted they’ll pay in EUR and wants to send via SEPA, as their finance team is avoiding international wire transfers. Unfortunately, this consultant’s US bank account isn’t set up to receive SEPA transfers, and every time he converts EUR to USD through his local bank, he loses 3-4% of the payment before it even hits his balance.

If that scenario sounds a bit too distant, you’ll perhaps be able to relate better with Sharon, who works in New York but plans to retire in Portugal in three years and wants to build a local financial presence before she gets there.

In each of these situations, the solution is the same. They both need a bank account outside the United States. And the first question most people ask when they start looking into it is whether it’s even legal.

Easy answer, it is. Millions of US citizens hold foreign bank accounts for ordinary reasons. The process is more straightforward than most people expect, and the complications that do exist are mostly on the reporting side, not the opening side. Here, I’ll be walking through both.

What is an offshore bank account?

The phrase “offshore bank account” carries a bit of baggage that it doesn’t deserve. Most people picture secretive numbered accounts in tax havens, shell companies, or the kind of thing that ends with a congressional hearing. No thanks to Hollywood.

The reality is a lot simpler. An offshore bank account is a bank account held in a country other than where you live or where you’re a tax resident.

For example, a US citizen living in Chicago who opens a current account at a bank in Germany has an offshore bank account. So does a freelancer in New York who opens a multi-currency account to receive GBP from a London client.

People generally open offshore accounts for three main legitimate reasons.

  1. To manage foreign income.
    If you earn in a foreign currency and convert everything back to USD through your US bank every time a payment arrives, you’ll be paying a conversion spread on every single transaction, typically 3 to 5% at traditional banks. Holding the money in the currency you earned it in and converting only what you need reduces that cost significantly.
  2. When preparing for relocation or extended travel
    Building a financial presence in another country before you move there is practical. It means you arrive with a functioning local account rather than spending your first weeks abroad trying to open one as a non-resident.
  3. Currency diversification
    Some US citizens want to hold a portion of their savings in a non-dollar currency, whether as a hedge, for travel convenience, or in anticipation of spending abroad. This is a straightforward financial decision with no legal complications, provided the reporting obligations are met.

An offshore account is not a way to hide money from the IRS. The US government has extensive mechanisms for tracking foreign accounts held by its citizens, and there are penalties for failing to report them. The reporting requirements deserve a lot of attention, so that’s where we’ll start.

The legal and reporting framework every US citizen must understand

There are two primary reporting obligations for US citizens with foreign accounts.

FBAR: FinCEN Form 114

The Foreign Bank Account Report, filed through FinCEN (the Financial Crimes Enforcement Network), is required if the combined balance of all your foreign financial accounts exceeds $10,000 at any point during the calendar year, not just at year-end.

The annual deadline is April 15th of the following year, with an automatic extension to October 15th. Filing is done electronically through the BSA E-Filing System. There is no filing fee.

The penalties for non-compliance are where this gets serious. For non-wilful failure to file, the penalty can reach $10,000 per violation per year. For wilful failure, the penalty can exceed $100,000 or 50% of the account balance per violation. Courts have interpreted “wilful” broadly, and “I didn’t know I had to file” has not consistently held up as a defence.

The FBAR is not filed with your tax return. It’s a separate filing with a separate agency.

FATCA: Form 8938

The Foreign Account Tax Compliance Act introduced a second reporting layer. Form 8938 is filed with your regular federal tax return and covers foreign financial assets above certain thresholds.

For single filers living in the US, the threshold is $50,000 at year-end or $75,000 at any point during the year. For married filers living in the US, it’s $100,000 at year-end or $150,000 at any point. The thresholds are higher for US citizens living abroad.

FATCA and FBAR cover overlapping but not identical territory, and you may be required to file both. Filing one does not satisfy the obligation to file the other.

Foreign income remains taxable

Holding money in a foreign bank account does not change your US tax liability on that money. Income earned abroad, whether from a foreign employer, a freelance client, or investments, is still subject to US income tax. The account is just where the money sits. The IRS taxes the income, not the location of the account.

The rules around FBAR, FATCA, and foreign income taxation are genuinely complex, and the consequences of getting them wrong are expensive. If your situation involves significant foreign balances or income, consult a certified tax professional before opening an account.

Do you actually need a traditional offshore account?

Before walking through the opening process, it’s worth being honest about whether you need this account or not.

A traditional offshore bank account, the kind at a private bank in Switzerland or a retail bank in Germany, involves real minimum balances, documentation requirements, and in many cases a physical visit or notarised paperwork. For some, that’s exactly the right solution. For others, it’s much more than they need.

You’ll need a traditional banking account if:

  • You’re relocating permanently or for an extended period and need genuine local banking infrastructure.
  • You’re holding significant assets (typically $50,000 or more) in a foreign currency for investment or diversification purposes.
  • You need access to banking services in another country, such as local loans, investment accounts, or trade finance.

You’ll need a multi-currency account, not a traditional offshore account, if:

  • You’re receiving foreign income from clients or employers and want to avoid conversion fees.
  • You want local banking details (a SEPA IBAN, a UK sort code, a US routing number) to give to international clients without routing everything through international wires.
  • You want to hold multiple currency balances and convert at your own timing rather than being forced to convert on receipt.

The distinction matters because the processes, costs, and realistic accessibility of these two options are very different. Most people asking “how do I open an offshore bank account” actually need the second option.

Traditional foreign banks have significantly reduced their US client onboarding since FATCA was introduced in 2010, because FATCA compliance costs are substantial for foreign financial institutions. Many simply don’t take new US clients anymore.

Multi-currency fintech accounts have filled a large part of that gap. They’re more accessible, open faster, and better suited to the foreign income management use case most US citizens actually have.

How to open an offshore bank account

Whether you’re opening a traditional account or a multi-currency account, the process follows a similar sequence.

Step one: Choose your jurisdiction

For traditional offshore accounts, the most accessible jurisdictions for US citizens in 2026 are Canada, the UK, Germany, the Netherlands, and some Caribbean banking centres. Historically popular jurisdictions, such as Switzerland and the Cayman Islands, have significantly reduced their intake of US clients due to FATCA compliance costs.

For multi-currency accounts, jurisdiction is less relevant because the account is digital-first and the provider usually holds licences across multiple regulatory environments.

Step two: Decide on the type of account

Current account or savings account at a traditional foreign bank, or a multi-currency account at a regulated fintech platform. The right answer depends on what you identified in the previous section.

Step three: Gather your documentation

For traditional foreign banks, you’ll typically need:

  • A valid US passport
  • Proof of US address (utility bill or bank statement dated within 90 days)
  • Your Social Security Number (SSN) or Individual Taxpayer Identification Number (ITIN)
  • A completed W-9 form (most foreign banks require this under FATCA to confirm your US taxpayer status)
  • Source of funds documentation for accounts above a certain balance threshold
  • Some banks require in-person verification or notarised copies of documents, which adds time and cost if you’re opening remotely

For multi-currency fintech accounts, the documentation requirements are lighter. A valid passport, proof of address, and identity verification through the platform’s KYC process are typically sufficient. You typically won’t need a W-9, notarisation, or a branch visit.

Step four: Apply and complete verification

Traditional foreign banks can take weeks to process applications, particularly for US citizens, where FATCA review adds a compliance layer. Some require an introduction from a relationship manager before an application is even accepted.

Most fintech platforms complete digital KYC verification within one to three business days in most cases.

Step five: Fund the account and understand the ongoing cost structure

The first funding transaction is where fees matter most. Understand the conversion spread on your initial deposit, the ongoing maintenance fee structure (if any), and what it costs to move money in and out. This is covered in the comparison section below.

Also read: Offshore bank accounts: What’s realistic in 2026

Grey: multi-currency banking for US citizens managing foreign income

If what you need is foreign banking details, multi-currency balance management, and a cost structure that doesn’t eat into your income, Grey will work perfectly.

With a Grey account, you get actual local banking details across multiple currencies. A US routing number and account number for USD. A SEPA IBAN for EUR. A UK sort code and account number for GBP. This way, your employers can pay you through their local payment network, the same way they pay any local vendor.

Setting up a Grey account is digital and takes only minutes to get started. KYC verification typically completes within a few business days. Once verified, your account details are available immediately. Fund it via ACH, SEPA, or Faster Payments, hold balances in the currencies you earn, and convert only when you need to, at a rate that’s shown to you before you confirm.

The fee structure is straightforward. Deposits via ACH, SEPA, or Faster Payments are charged at 0.8%, with a minimum of $2/€2/£2 and a maximum of $10/€10/£10. Currency conversion is charged at 1%, capped at $6.

You can also create a virtual USD card to pay for foreign subscriptions like AWS, Figma, or Google Ads. The card costs $5 to create with no monthly fee, but cross-border card transactions (non-USD purchases on a USD card) incur a 2% fee plus $0.50.

Grey is regulated by FINTRAC and FinCEN. Customer funds are held in segregated accounts at licensed partner banks, separate from Grey's operational capital.

Grey is not a replacement for the FBAR or FATCA reporting obligations described earlier in this article. Your Grey account, like any foreign financial account, counts toward your FBAR threshold calculation. The account provides infrastructure, not tax relief. If your combined foreign account balances exceed $10,000 at any point during the year, the filing obligation applies.

Also read: What “offshore account” really means for freelancers

LDMAG1

Making banking work for you

Opening an offshore bank account as a US citizen is legal, accessible, and practical for anyone earning in foreign currencies, planning to move abroad, or managing multi-currency expenses. The complications are mostly on the reporting side: FBAR and FATCA, which apply regardless of which type of account you open or which provider you use.

The type of account you need depends entirely on your situation. If you’re relocating permanently or holding significant assets abroad, a traditional foreign banking relationship may be the right fit. If you’re managing foreign income, paying international clients, or simply want local banking details in multiple currencies, a multi-currency account gives you what you need at a fraction of the cost and complexity.

Open your Grey account today and experience a smarter way to bank beyond borders.

Frequently asked questions

Is it legal for a US citizen to open an offshore bank account?
‍
Yes, it is, but you have to report correctly to the US government. If your combined foreign account balances exceed $10,000 at any point during the year, you must file an FBAR (FinCEN Form 114) by April 15th of the following year, with an automatic extension to October 15th.

Do I have to pay US taxes on money held in an offshore account?
‍
Yes. The location of your bank account does not affect your US tax liability. All income earned by US citizens, regardless of where it is held, is subject to US federal income tax.

What is the difference between FBAR and FATCA reporting?
‍
The FBAR (FinCEN Form 114) is filed with FinCEN if your combined foreign account balances exceed $10,000 at any point during the year. FATCA (Form 8938) is filed with the IRS as part of your regular tax return if your foreign financial assets exceed $50,000 for single filers at year-end ($75,000 at any point during the year). You may be required to file both. Filing one does not replace the other.

Can I open an offshore bank account without visiting the country in person?
‍
For multi-currency fintech accounts, yes. KYC verification is completed digitally, typically within one to three business days, with no physical visit required. For traditional foreign banks, the answer depends on the institution and jurisdiction. Many European retail banks require in-person verification or notarised copies of documents for non-resident applicants.

What documents do I need to open an offshore bank account as a US citizen?
‍
For digital multi-currency accounts, you typically need a valid US passport and proof of address. For traditional foreign banks, you’ll need a passport, proof of address, a Social Security Number, a completed W-9 form (required under FATCA), and source-of-funds documentation for accounts above certain balance thresholds. Some banks also require a reference from an existing client or relationship manager before accepting a US citizen application.

Grey charges fees on deposits, conversions, and withdrawals. Deposits via ACH, SEPA, or FPS incur a 0.8% fee (minimum $2/€2/£2, maximum $10/€10/£10). Currency conversions are charged at 1%, capped at $6. Withdrawal fees vary by currency: ₦35 for NGN, 0.5% for EUR/GBP (minimum €2/£2, maximum €10/£10), and $0.50 to $0.65 for KES/UGX/TZS. Cross-border card transactions (non-USD purchases on a USD card) incur a 2% fee plus $0.50. Exchange rates are variable and include a margin over the mid-market rate. Always review fees and the rate before confirming a transaction. Visit our pricing page for current rates.

‍

Best multi-currency accounts for freelancers and remote workers in Africa

•

•

2 min read

In a world where borders are digital and talent has no postcode, freelancers and remote workers in Africa are making their mark on the global stage. One thing remains non-negotiable: getting paid quickly and easily.

Multi-currency accounts allow you to hold, receive, and send money in different currencies, helping you avoid costly exchange fees and delays.

So, which multi-currency platforms are worth considering? Let’s explore the top contenders — and why Grey stands out as the best option.

Also read: Top international money transfer options for African remote workers

Grey: The ultimate solution for African freelancers

Grey is a digital banking platform designed specifically with global professionals in mind — and it’s changing the game for African freelancers and remote workers.

Here’s why Grey is leading the pack:

1. Instant access to global accounts

With just a few taps, Grey gives you virtual USD, GBP, and EUR accounts — complete with local bank details — making it easy to receive international payments as if you were based in the UK, Europe, or the US.

2. Competitive exchange rates

Tired of losing money to poor conversion rates? Grey offers the most competitive exchange rates in the market, helping you keep more of what you earn. Try out our free currency converter.

3. Fast and secure transfers

Grey enables you to send money globally with speed and transparency. Whether you're paying a supplier or moving funds to your local bank, transferring money with Grey is quick and secure.

4. Seamless user experience

The Grey app is clean, intuitive, and built for mobile — giving you control over your finances from anywhere in the world.

5. No hidden fees

Grey prides itself on transparency. You’ll always know exactly what you’re being charged, and there are no surprise deductions or hidden costs.

You may also like: Top PayPal and Payoneer alternatives for African freelancers

How freelancers and remote workers in Africa can receive payments with Grey

1. Create your Grey account

Register on the Grey website or download the mobile app to get started.

2. Complete identity verification

This involves submitting a valid ID, proof of address, and a selfie for security purposes. The process is quick and ensures smooth transactions.

3. Request your foreign bank accounts

Once verified, navigate to the ‘Accounts’ section to generate your UK, US, or EU bank account to receive global payments. Your account will be generated instantly, and you’ll receive your bank account details.

4. Link your account to freelancing platforms or share your details with clients

Once you’ve created your foreign account, you can easily share it with clients or add it to freelance platforms to receive payments directly.

Other alternatives to consider

While Grey is the standout option, here are a few other platforms freelancers may consider:

  • Payoneer: Popular among freelancers, but often comes with higher fees and slower transfers.
  • Wise: Known for low fees and real exchange rates, but doesn’t always offer local receiving accounts in key African countries.
  • Revolut: Offers multi-currency features but has limited availability and functionality in parts of Africa.

You may also like: 5 top sites to get remote foreign jobs for Africans

The verdict — Why choose Grey's multi-currency accounts?

If you’re a freelancer or remote worker in Africa, choosing the right multi-currency account is key to managing your global income effectively. While there are several platforms, Grey combines ease, affordability, and speed like no other.

Ready to simplify your global banking experience? Open your free Grey account now and take control of your international finances today.

‍

How to send and receive USDC payments in Nigeria

•

•

2 min read

As global digital payments continue to evolve, receiving USDC in Nigeria has become an essential option for freelancers, remote workers, and businesses dealing with international transactions. However, traditional banking systems often complicate the process with high fees, delays, and unnecessary restrictions. Fortunately, Grey provides a seamless solution, allowing users to send and receive USDC payments in Nigeria effortlessly.

Why send and receive USDC payments in Nigeria?

USDC is a stablecoin pegged 1:1 to the U.S. dollar, making it a reliable option for freelancers looking to avoid the volatility of other cryptocurrencies. Receiving and sending USDC provides several advantages:

Why use Grey for receiving USDC payments in Nigeria

Grey provides a hassle-free way to receive USDC payments in Nigeria, eliminating the common challenges associated with international transactions. With Grey, you get:

  • Instant USDC deposits – Receive USDC payments directly in your Grey account without delays.
  • Send USDC anywhere at competitive exchange rates.
  • Low fees – Save money with Grey’s cost-effective transaction fees.
  • Secure transactions – Grey ensures all transfers comply with financial regulations for secure payments.
  • User-friendly experience – A simple, intuitive platform for managing your funds efficiently.

Also read: Receive USDC instantly in your US account with Grey!

How to receive USDC in Nigeria with Grey

Getting started with receiving USDC payments in Nigeria using Grey is quick and straightforward. Follow these steps:

  1. Create a Grey account – Sign up on Grey’s website or mobile app and complete the verification process.
  2. Access your USDC wallet – Once verified, navigate to your Grey wallet and locate your unique USDC wallet address.
  3. Share your wallet details – Provide your USDC address to international clients, employers, or business partners.
  4. Receive your payment – Once the sender transfers USDC, the funds will instantly reflect in your Grey wallet.

You may also like: How to send and receive USDC directly in your USD account

Start sending and receiving USDC payments with Grey today

Managing international payments no longer has to be a challenge. With Grey, you can send and receive USDC payments in Nigeria without stress and convert them to Naira instantly at the best rates.

Sign up on Grey today and experience fast, secure, and cost-effective international transactions.

‍

Secure ways to receive international payments in Mexico

•

•

2 min read

With the rise of remote work, freelancing, and global trade, receiving international payments securely in Mexico is more important than ever. Many traditional payment methods have high fees, slow processing times, and security risks. Choosing the right international payment solution ensures you receive funds quickly, affordably, and without unnecessary complications.

In 2023, international remittances to Mexico reached $63 billion, reflecting the increasing reliance on cross-border transactions. As global transactions grow, so does the need for secure and efficient payment solutions.

In this article, I’ll explore why secure payment methods matter, the best options available in Mexico, and why Grey is the ideal choice for hassle-free international transactions.

Why you need a secure way to receive international payments

Avoid scams:  International transactions can be vulnerable to fraud. Using secure platforms ensures your payments are protected from unauthorized access and scams.

Fast and reliable transactions: Delayed payments can disrupt cash flow, especially for freelancers and businesses relying on timely income. A secure payment system ensures quick and consistent transactions.

Lower transaction costs:  Some payment methods have hidden fees and unfavourable exchange rates. Choosing a secure and cost-effective option helps maximize your earnings.

Regulatory compliance: Mexico has strict financial regulations. Secure international payment platforms comply with legal requirements, ensuring smooth transactions without legal issues.

Also read: How to get an instant USD debit card in Mexico

Ways to receive international payments in Mexico

Regular bank transfers: Major banks like BBVA, Santander, and Banorte allow international wire transfers, but they often come with high fees and slow processing times.

PayPal:  This is a popular option for freelancers and e-commerce businesses, but currency conversion rates can reduce your earnings.

Western Union & MoneyGram: These services are useful for receiving cash quickly, but fees and in-person pickups may not be ideal for regular transactions.

Grey: It provides multi-currency accounts in USD, GBP, and EUR, making it easy to receive international payments and convert funds at competitive exchange rates. With Grey, you can withdraw directly to your local bank account hassle-free.

Why Grey is the best way to receive international payments in Mexico

Multi-currency accounts: Receive payments in USD, GBP, and EUR without worrying about high conversion fees.

Fast processing: Payments are credited quickly, ensuring steady cash flow.

Competitive exchange rates: Convert and withdraw your funds without losing money on poor exchange rates.

User-friendly platform: The app and web platform make it easy to manage your transactions.

Also read: Best virtual Mastercards for online payments in Egypt

Steps to set up your Grey account

1. Sign up

Register on the Grey website or download the mobile app. Click “Sign Up” and enter your details to create an account.

2. Verify your identity

Upload the required documents, such as your passport, national ID, or driver’s license, for verification. Grey may also request proof of address to enhance security.

3. Create a foreign account

Once verified, you can request a USD, GBP, or EUR account, allowing you to receive international payments directly from clients and businesses. Grey provides official account details, including IBAN, SWIFT code, and account number.

4. Share your payment details

Provide your Grey account details to international clients, employers, or payment platforms like Upwork, Fiverr, Payoneer, or Stripe.

5. Withdraw your funds

Log in to your Grey dashboard to check your balance. Convert your USD, GBP, or EUR to Mexican Pesos (MXN) at competitive exchange rates. Once converted, withdraw your funds directly to your local bank account.

Also read: How to pay for online courses from Mexico with Grey

Secure international payments with Grey

As global transactions continue to grow, having a secure, fast, and cost-effective way to receive international payments in Mexico is essential. Grey offers a seamless solution with multi-currency accounts, competitive exchange rates, and instant withdrawals, ensuring you get paid without hassle.

Create your Grey account today or download the app to enjoy inclusive global banking, designed to carry your dreams across borders.

‍

Arrow (up)

Back to top

