<script type="application/ld+json" data-schema-version="grey-blog-v4"> [{"@context":"https://schema.org","@type":"BlogPosting","@id":"https://grey.co/blog/how-to-pay-for-udemy-courses-in-nigeria#article","headline":"How to pay for Udemy courses in Nigeria","description":"Struggling to pay for Udemy courses in Nigeria? Our guide shows you how to use a Grey virtual card for easy transactions. Enroll in top courses and upskill today!","inLanguage":"en","url":"https://grey.co/blog/how-to-pay-for-udemy-courses-in-nigeria","mainEntityOfPage":{"@id":"https://grey.co/blog/how-to-pay-for-udemy-courses-in-nigeria#webpage"},"datePublished":"2024-03-15T14:51:08.976Z","dateModified":"2026-05-30T23:18:56.972Z","author":{"@type":"Person","@id":"https://grey.co/authors/toluwani-omotesho#person","name":"Toluwani Omotesho","url":"https://grey.co/authors/toluwani-omotesho"},"publisher":{"@type":"Organization","@id":"https://grey.co/#organization","name":"Grey","url":"https://grey.co","logo":{"@type":"ImageObject","url":"https://cdn.prod.website-files.com/6360022338a81bd6fdbb1145/6564ae1077a67e39d3c491a6_Grey%20Logo%20Lockup%20Black.svg"}},"image":{"@type":"ImageObject","@id":"https://grey.co/blog/how-to-pay-for-udemy-courses-in-nigeria#primaryimage","url":"https://cdn.prod.website-files.com/636a85d290ee58e70c17e1c0/65f45fb96467d8a616ce9c33_Paying%20for%20Udemy.webp","contentUrl":"https://cdn.prod.website-files.com/636a85d290ee58e70c17e1c0/65f45fb96467d8a616ce9c33_Paying%20for%20Udemy.webp","width":1200,"height":675}},{"@context":"https://schema.org","@type":"WebPage","@id":"https://grey.co/blog/how-to-pay-for-udemy-courses-in-nigeria#webpage","url":"https://grey.co/blog/how-to-pay-for-udemy-courses-in-nigeria","name":"How to pay for Udemy courses in Nigeria","description":"Struggling to pay for Udemy courses in Nigeria? Our guide shows you how to use a Grey virtual card for easy transactions. Enroll in top courses and upskill today!","inLanguage":"en","primaryImageOfPage":{"@id":"https://grey.co/blog/how-to-pay-for-udemy-courses-in-nigeria#primaryimage"},"breadcrumb":{"@id":"https://grey.co/blog/how-to-pay-for-udemy-courses-in-nigeria#breadcrumb"}},{"@context":"https://schema.org","@type":"BreadcrumbList","@id":"https://grey.co/blog/how-to-pay-for-udemy-courses-in-nigeria#breadcrumb","itemListElement":[{"@type":"ListItem","position":1,"name":"Home","item":"https://grey.co/"},{"@type":"ListItem","position":2,"name":"Blog","item":"https://grey.co/blog"},{"@type":"ListItem","position":3,"name":"How to pay for Udemy courses in Nigeria","item":"https://grey.co/blog/how-to-pay-for-udemy-courses-in-nigeria"}]}] </script>

How to pay for Udemy courses in Nigeria

Toluwani Omotesho

TABLE OF CONTENT

SHARE THIS POST

People constantly look for ways to up-skill so as to take advantage of local and global opportunities. One of the platforms that helps with this is Udemy, an online learning and teaching platform that offers over 200,000 paid courses across various industries, including project management, marketing, and data analysis.

However, many Nigerians currently experience issues processing payments for Udemy courses due to the restrictions on traditional naira cards. But, with a Grey USD card, there’s an easy fix. In this article, we’ll guide you through using your Grey virtual card to pay for Udemy courses seamlessly.

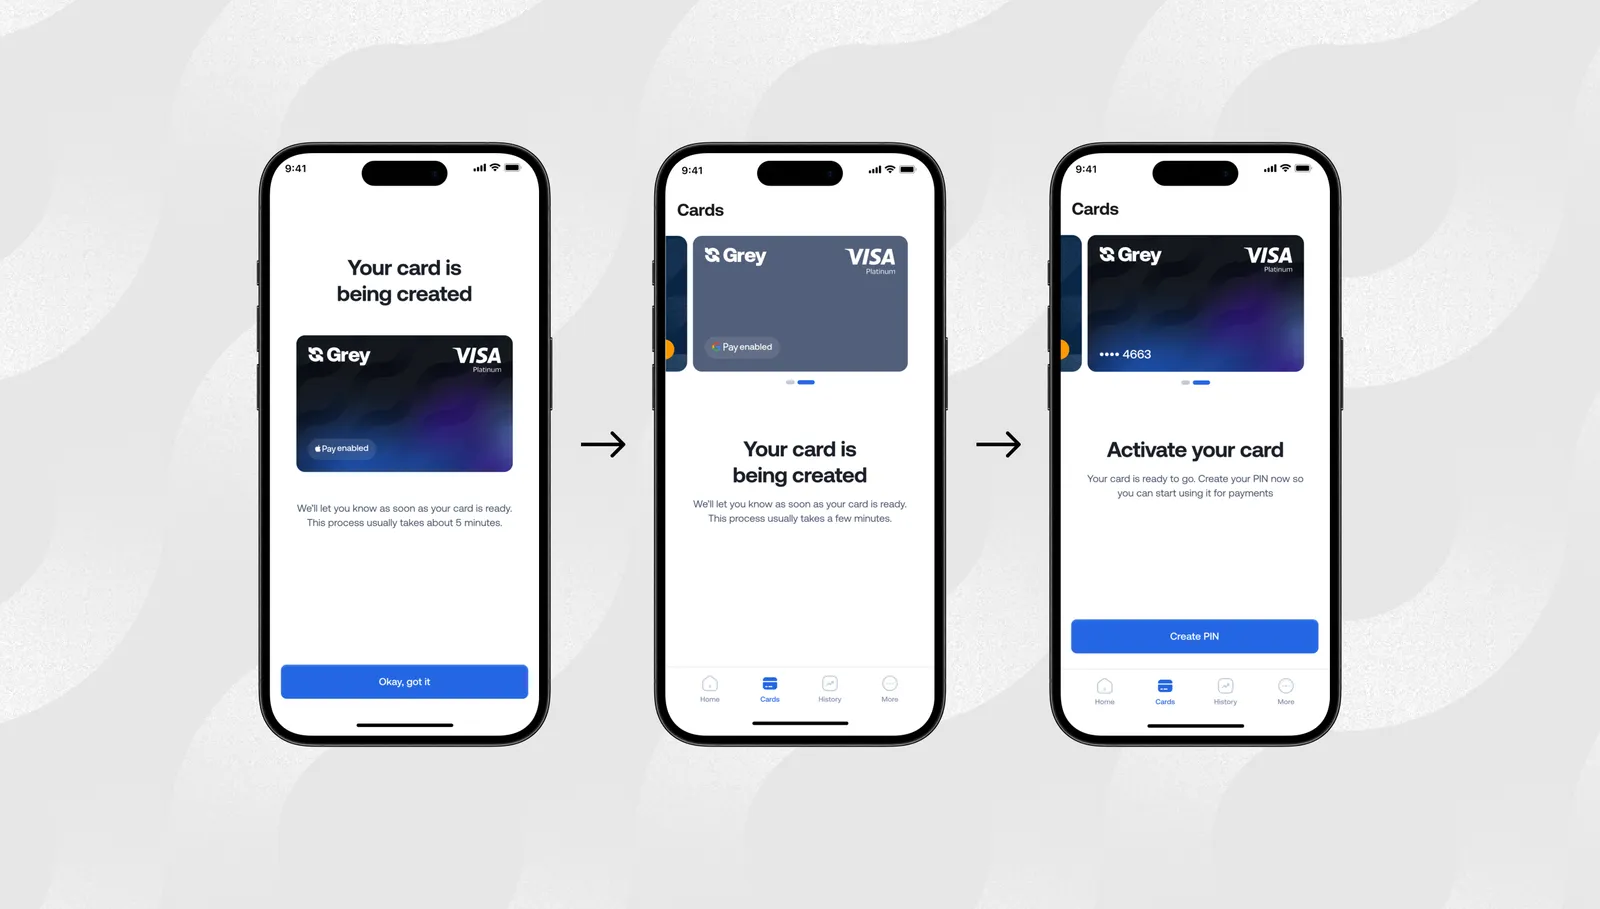
But first, here’s how to create your Grey virtual card:

On the Grey website:

- Log in to your account.

- Once logged in, navigate to ‘Virtual Cards’ in the sidebar menu.

- Click the “Get Started” button. You’ll then be guided through a series of prompts to complete the creation of your virtual card.

On the Grey mobile app:

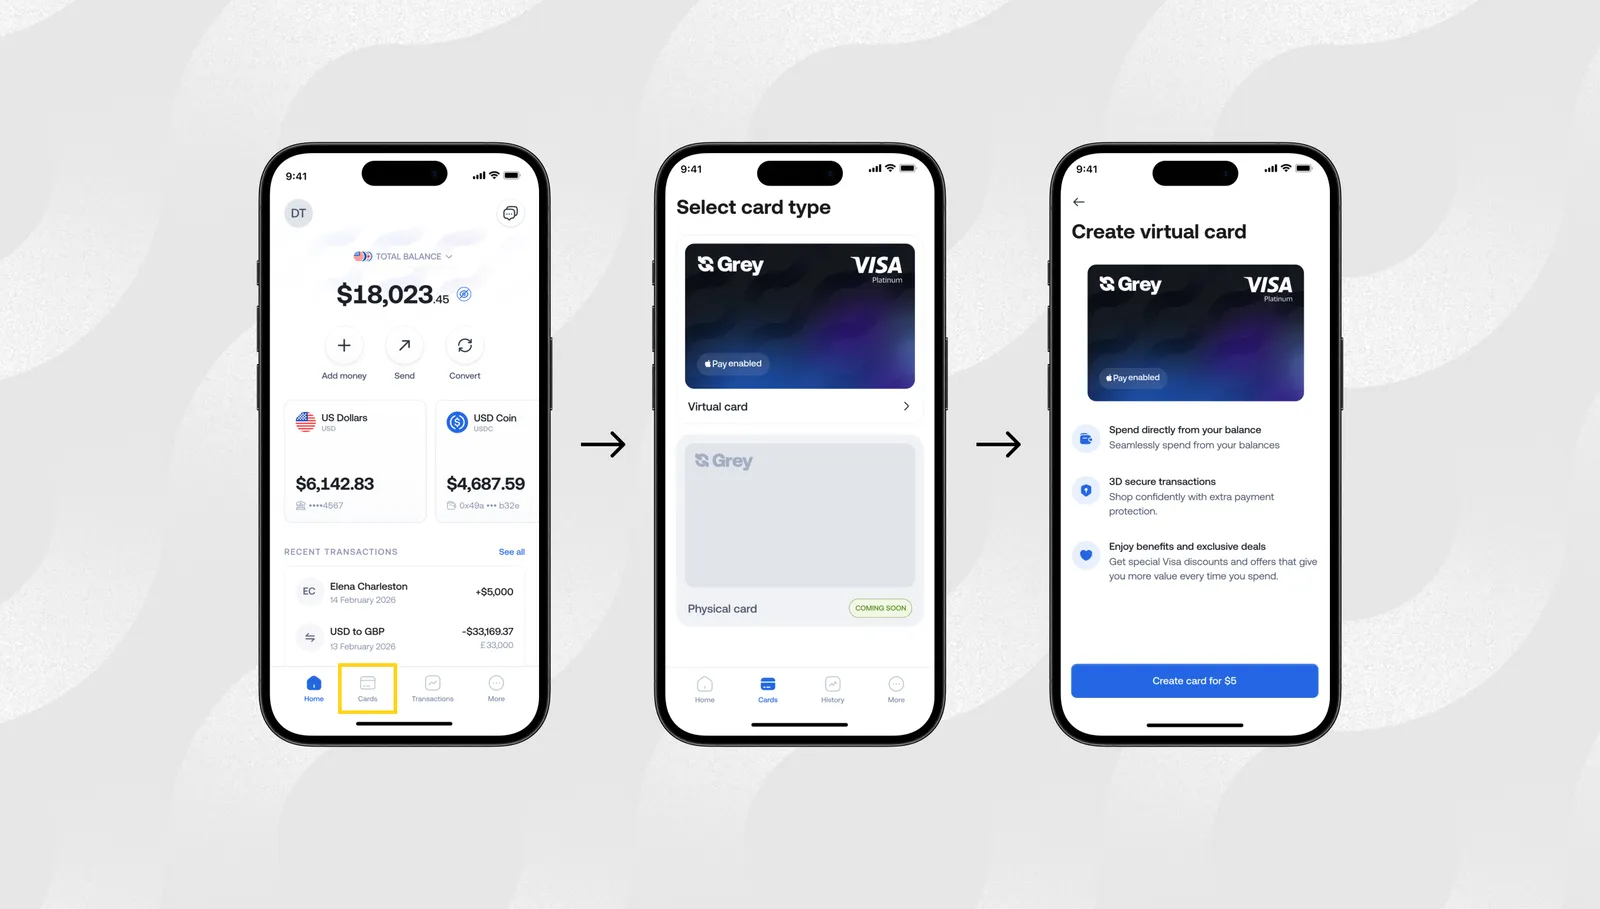
- Log into your account and tap “Cards” in the menu.

- Select “Get Started”.

- Tap “Create Virtual Card” and follow the prompts to finalize your card’s setup.

You must have at least $5 in your USD balance to create a card, as there’s a one-time creation fee of $4, and an additional $1 is required to fund your account.

Once your virtual card is created, the next step is to ensure it’s sufficiently funded before paying for your Udemy course.

Also read: Your comprehensive guide to Grey's virtual card: Answers to common questions

How to fund your Grey virtual card

- Check your balance: Ensure you have sufficient funds in your Grey account. You can deposit money into your account using Naira, GBP, EUR, or other supported currency. Afterwards, you can easily convert this into USD within the platform.

- Add funds to your card: Go to your virtual card’s page and select the “Add Money” option. This lets you transfer money from your USD balance to your virtual card.

- Specify the amount: You can add anything ranging from $2 to $2,500 to your card. Enter your preferred amount and then click “Continue” to proceed. Grey does not charge additional fees to fund your card.

You can pay for your courses without trouble once you’ve successfully created and funded your USD virtual card. Here’s a step-by-step guide to help you out.

Paying for Udemy courses with your Grey USD virtual card

- Select your course: Udemy has an extensive catalogue of courses. Once you’ve found a course you’re interested in, click on the “Buy now” button on the course’s page.

- Proceed to checkout: You’ll be redirected to the checkout page to select your preferred payment method.

- Choose payment method: to use your Grey USD virtual card, select the “Credit/Debit Card” option as your payment method.

- Enter card details: carefully input your virtual card information, which includes the cardholder’s name, card number, expiry date, and CVV code.

- Complete purchase: Click on “Complete Checkout” to finalise your transaction.

Once your payment is successfully processed, you’ll receive a confirmation email from Udemy and you’ll gain immediate access to your newly purchased course.

Also read: How to pay for online courses and certifications with Grey

Wrapping up

Beyond Udemy, you can also use your Grey USD virtual card to pay for your Apple subscription, AliExpress, Facebook Ads, X (formerly Twitter), MailChimp, and even for your application fees if you’re an international student. With Grey, you can say goodbye to failed transactions when making international payments and truly experience what borderless banking is. Create your account now to get started.

Last updated:

October 2, 2026

Open a free Grey account to get startedJoin 1 million digital nomads
IF YOU ENJOYED THIS, CHECK THESE OUT

How to send money from Italy to Egypt (without visiting a bank)

•

•

2 min read

Italy has one of the largest Egyptian diaspora communities in Europe. Whether you are sending money to family in Cairo, supporting someone through a large expense, or making a regular remittance, the number of ways to move EUR to EGP has grown considerably. The gap between the cheapest and the most expensive options is also considerable. Traditional banks worldwide still struggle to manage international payments, and banks in Italy and Egypt are no exception. Besides the cost and delay, the stress of visiting a physical banking hall is quite unnecessary.

Various options help people send money from Italy to Egypt without setting foot in a bank. This article covers the main ways to send money from Italy to Egypt entirely online, how each one works, and the cost.

Wise

Wise applies the mid-market rate on currency conversions and charges a clearly displayed fee before you confirm the transfer. For EUR to EGP, the fee typically ranges from 0.4% to 0.8% of the transfer amount, depending on the payment method used. . Wise offers EUR accounts and transactions don’t go through the full SWIFT route that incurs more fees. This reduces payment delay and avoids losing money to intermediary bank fees.

Key things to know about Wise for this transfer:

  • The exact EGP amount the recipient will receive is shown before you confirm. No surprises after the fact.
  • Payment can be made via bank transfer from an Italian bank account or via card.
  • Processing is typically within one business day, and in many cases, the same day for transfers initiated in the morning.
  • Wise is available via its website and iOS and Android apps.
  • The account is free to open and requires standard identity verification.

Revolut

Revolut has been consistently among the cheapest options for bank account transfers on this corridor in recent comparisons. On weekdays, Revolut charges no additional currency conversion fees on conversions within the account's fair usage limit, meaning the conversion cost on a standard plan is absorbed by the platform up to a monthly threshold. Above that threshold, or on weekends, a conversion fee applies.

How it works:

  • You add EUR to your Revolut account via bank transfer, card, or other payment methods.
  • You select Egypt as the destination and enter the recipient's bank account details.
  • Revolut converts EUR to EGP at its exchange rate and initiates the transfer.
  • Bank transfers to Egypt typically arrive within one business day.

You should note that there is a  fair usage limit on weekday conversions with no fees:

  • Standard: £1,000/month (1% fee thereafter).
  • Plus: £3,000/month (0.5% fee thereafter).
  • Premium/Metal/Ultra: Unlimited.

Revolut is available to Italian residents via its website and app. Account opening requires identity verification and takes a few minutes.

Also read: What Egypt’s currency controls mean for international payments

Remitly

Remitly supports transfers from Italy to Egypt and offers two delivery speed options with different pricing structures.

  • Economy transfers: lower fees, and transactions are usually completed within three to five business days.
  • Express transfers: more expensive but faster, typically within minutes to a few hours.

Remitly generally offers low fees, and new users get a discount rate on their first transfer

Payment methods available for Italian senders include bank transfer, debit card, and credit card. The app is user-friendly with layers of security to protect your transactions. There is a recipient tracking feature that lets both the sender and the recipient monitor when funds have arrived.

Also read: How to send money from China to Egypt online

Profee

Profee offers free card-to-card transfers from Italy to Egypt. Users can send money with a Visa or Mastercard card in Italy to a Visa or Mastercard card in Egypt. Hence, it requires the recipient to have a bank-issued card rather than just an account number. The first transfer is free for new users.

To send money with Profee

  • Sign up on Profee by providing your mobile number and personal details.
  • Choose "Italy" as the sending country and "Egypt" as the destination.
  • Enter the amount: Once you type in an amount in EUR to see the current exchange rate and any applicable fees.
  • Enter the recipient's full name and their payout information.
  • Pay for your transfer using one of the following methods:
    • Visa or Mastercard
    • Apple Pay or Google Pay
    • SEPA Bank Transfer
    • Klarna or Sofort
  • Confirm: Review the details and enter your bank's confirmation code to authorise the payment.

Recipients in Egypt can receive the payment through:

  • Bank accounts: Direct transfer to most Egyptian banks.
  • Mobile wallets: Including Vodafone Cash, Orange Cash, Etisalat Cash, and WE.
  • Meeza cards: Direct transfer to Meeza-branded cards

Grey

Grey provides virtual EUR accounts alongside USD and GBP for recipients in Egypt, allowing you to receive from European clients via SEPA, hold the balance in EUR, and convert at a mid-market rate with 1% conversion fee (capped at $6). It cost 0.5% (minimum of €2 and maximum of €10).

Grey is a secure payment platform regulated by FinCEN (US) and FINTRAC (Canada) to protect your funds and data.

To send money from Italy to Egypt without visiting the bank:

  • Open the Grey app and verify your account.
  • Add EUR funds or use your existing balance.
  • Go to “Send money” and select your EUR balance
  • Choose “Send via bank transfer” to Egypt.
  • Enter the recipient’s full name and Egyptian bank details (bank name, branch code, account number).
  • Confirm transaction

Transactions are typically completed within hours to a day.

Also read: How to get an instant USD debit card in Egypt

WorldRemit

WorldRemit supports EUR-to-EGP transfers from Italy to Egyptian bank accounts, mobile wallets, and cash pickup locations. It offers 3 free transfers for new users; thereafter, the fees and exchange rate margins are better than those of traditional banks. On average, it takes about one to two business days for transactions to be completed.

How the options compare

Lets say you are sending €1,000 to a family member in Egypt. This is what the experience will look like with  these platforms
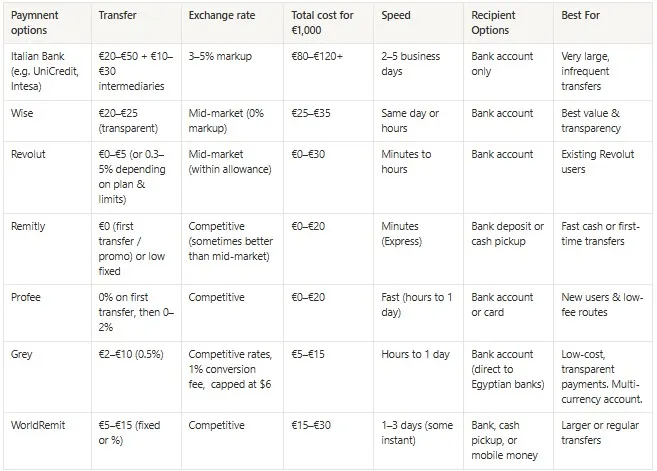
Compare payment options for sending money from Italy to Egypt,

Managing international transactions with Grey

Whether you are settling bills in Egypt from Italy, sending money home, or paying someone, a wire transfer using traditional banks might not be the best plan. International wire transfer fees are high, the exchange rates are unfavourable, and the delays can be unbearable.

With Grey‘s multicurrency accounts, you can manage EUR, GBP, and USD in one place and at affordable rates. Conversions are at competitive rates, and transactions are swift. Grey cards offer you more financial freedom to spend across countries and currencies. With Visa cards that take directly from your multicurrency balance, you can easily settle online subscriptions and purchases by linking with your Google Pay and Apple Pay.

Grey is tailors to simplify your Italy-to-Egypt payments and a low costs. Sign up on Grey and download the app to get started.
‍

FIRC and e-FIRA for Indian freelancers explained

•

•

2 min read

If you’re an Indian freelancer dealing with overseas clients, keeping track of foreign payments can be tricky. That’s where FIRC and e-FIRA come in—they certify that you’ve received payments in foreign currency, helping you prove income, stay compliant with tax authorities, and manage your finances with confidence. Without the right paperwork, you risk delays, penalties, or unnecessary stress.

This guide breaks down FIRC and e-FIRA for freelancers, showing you how to obtain them, use them correctly, and make receiving international payments smooth and hassle-free.

What is FIRC and how does it work?

A Foreign Inward Remittance Certificate (FIRC) is an official document your bank issues to confirm that you’ve received money from a client or company outside India. When a client abroad sends you funds, your bank processes the transfer and converts the foreign currency into Indian Rupees if needed. Once the transaction is complete, the bank issues a FIRC, either in physical or digital form, as proof that the payment has been received.

The certificate contains important details like the sender’s name, the amount, currency type, date of receipt, and purpose of the payment. As a freelancer, you may need it for income tax purposes, regulatory compliance, or to maintain clear records of international payments. Essentially, the FIRC serves as an official acknowledgement of your foreign earnings, helping you remain transparent and compliant while documenting your legitimate international income.

Also read: How to avoid FX losses as a freelancer in India

Understanding how e-FIRA works for Indian freelancers

An Electronic Foreign Inward Remittance Advice (e-FIRA) is the electronic, digitally signed version of a Foreign Inward Remittance Certificate, issued by Authorised Dealer (AD) Category I banks. It provides a secure, detailed record of foreign payments received, including information about the sender, amount, currency, date, and purpose of the remittance. Unlike the traditional FIRC, the e-FIRC is generated digitally, making it easier to store, share, and use for official purposes.

  • The client or company abroad sends a payment, which the bank processes and converts to Indian Rupees if needed.
  • The AD Category I bank generates the e-FIRC as a digitally signed certificate confirming receipt.
  • The certificate contains all key details: sender information, amount, currency, date, and purpose of the payment.
  • Freelancers can use the e-FIRC for tax filings, regulatory compliance, or to maintain official records of international income.

Also read: How freelancers in India can receive payments from the US ...

When do Indian freelancers need FIRC or e-FIRA?

As an Indian freelancer, you need FIRCs or e-FIRAs to prove foreign income, comply with tax rules, maintain records, and support export or service documentation.

1. Income tax filing:

You need FIRCs/e-FIRCs to show the Indian Income Tax Department that payments received from abroad are legitimate. The certificate serves as proof of inward remittance, helping you declare foreign earnings accurately, avoid disputes, and claim deductions under applicable laws, especially when filing ITRs or reporting export income from freelance services.

2. Regulatory compliance:

Banks and regulators may request FIRCs or e-FIRCs to verify that foreign payments follow Reserve Bank of India (RBI) rules. Having these certificates ensures compliance with FEMA regulations and helps freelancers avoid penalties while maintaining transparency in all cross-border financial transactions.

3. Record-keeping

Maintaining FIRCs/e-FIRCs provides a clear, auditable record of international payments. During audits or financial reviews, these certificates act as official proof of funds received, helping freelancers reconcile accounts, validate income streams, and maintain professional financial documentation for business or personal use.

4. Claiming benefits

Freelancers providing services to foreign clients can use FIRCs/e-FIRCs to support claims for government schemes, incentives, or export-related benefits. They act as proof that income was earned from legitimate overseas sources, which may be required when applying for export credits, subsidies, or other official benefits tied to foreign remittances.

Step-by-step guide: how to get FIRC or e-FIRA

Receiving and documenting foreign payments is simple if you follow the right steps. Here’s how Indian freelancers can get their FIRC e-FIRA after receiving international payments.

1. Payment

Receive your funds via SWIFT transfer or through international payment gateways such as Grey. Ensure the payment is credited to your Indian bank account with all remittance details intact. This is the first step before your bank can issue a certificate confirming inward remittance.

2. Request from your bank

Contact your Authorised Dealer (AD) Category I bank to request the FIRC or e-FIRA. Many banks allow requests via email, online forms, or in-person submission. Make sure to specify the type of certificate required and provide relevant payment details to help the bank process your request efficiently.

3. Provide details

Submit all necessary documents, including the UTR (Unique Transaction Reference) number, the invoice related to the payment, and the purpose code for the remittance, such as P0101 for software consultancy or other services. Complete documentation ensures faster verification and certificate issuance by the bank.

4. Bank verification:

The bank verifies your payment details and records the transaction on the RBI’s EDPMS (Electronic Data Processing & Monitoring System) portal. Once verification is complete, the bank issues the digitally signed e-FIRC/e-FIRA or physical FIRC as proof of inward remittance, which you can use for taxes, audits, or compliance purposes.

Can you use FIRC and e-FIRA independently?

As an Indian freelancer, you can rely on FIRC or e-FIRA individually, based on your situation. Each certificate independently confirms that foreign payments have been received into your bank account. While FIRC is the traditional paper-based proof, e-FIRC and e-FIRA are digitally signed and easier to store, share, or submit online.

The e-FIRA provides more detailed remittance information, including sender details and purpose of payment, which can be helpful for compliance or reporting. You don’t need to collect multiple certificates for the same transaction; choosing the one that fits your record-keeping or tax requirements is sufficient. This flexibility makes it easier and more convenient for freelancers to manage international earnings.

How FIRC and e-FIRA simplify international payments for freelancers

Receiving payments from international clients can be complex, but FIRC, e-FIRC, and e-FIRA simplify the process for freelancers. These certificates serve as official proof that foreign funds have been successfully transferred to your bank account, reducing any confusion about whether payments have cleared. This makes it easier to reconcile accounts and ensures that you always have a verified record of income.

For freelancers working with clients abroad, having a FIRC or its digital equivalents allows faster processing of tax filings and compliance requirements. You don’t need to wait for manual confirmations or risk disputes with clients over payment receipts. Digital versions like e-FIRC and e-FIRA are especially convenient because they can be stored, shared, and submitted online, saving time and paperwork.

These certificates also support regulatory and banking processes. Banks can quickly verify payments, and freelancers can access government schemes, export benefits, or audits with confidence. Overall, FIRCs and e-FIRCs streamline cross-border payments, giving freelancers clarity, security, and smoother financial management.

LDMAG1

Managing freelance payments with Grey

For Indian freelancers, managing payments from clients abroad can be challenging, but FIRCs, e-FIRCs, and e-FIRAs simplify the process by providing official proof of inward remittances. These certificates make tax filing, regulatory compliance, and record-keeping straightforward, giving you peace of mind while working with international clients.

Grey takes this a step further by offering a reliable, fast, and secure platform for sending and receiving cross-border payments. With an easy account setup, transparent fees, and seamless transfers, Grey ensures freelancers get paid on time. Sign up or download the app today and experience hassle-free international payments designed specifically for freelancers.

‍

How to receive payments from Teachable as an international course creator

•

•

2 min read

Creating courses for sale on an Edtech platform is one way professionals can earn passive income. A programmer can create a JavaScript course with videos, text, and tasks, upload it to a platform, and have beginners buy it to learn. It is a great passive income source because the platform handles payments, manages students, and delivers content.

On the flip side, you are expected to provide a payout option to receive your earnings. Your choice determines how quickly you can access your earnings and how much you get to keep. Managing Teachable payments is considerably more difficult for international course creators because payouts are usually denominated in USD.  Without a USD account, you face high transaction fees, forced conversions at unfavourable rates, and delayed payouts.

This article explains exactly how Teachable payouts work for international creators, what each gateway costs, and how to set up a receiving system that protects as much of your course revenue as possible.

Also read: How to pay for online courses and certifications with Grey

How does Teachable's payment system work?

Teachable processes student payments through its own built-in payment infrastructure, called teachable:pay, which runs on Stripe. When a student buys your course, Teachable collects the payment, deducts its platform fee and processing costs, and then routes the remainder to your payout account according to the schedule you selected.

The gateway and payout method available to you depend on the country your school is registered in. Teachable divides its creator base into two groups:

  • Creators in teachable:pay-supported countries can connect directly to a bank account and choose daily, weekly, or monthly payouts.
  • Creators in unsupported countries are automatically enrolled in the Monthly Payment Gateway, which pays out to PayPal only on the first business day of each month.

A creator using teachable:pay receives their earnings directly to a bank account on a date they stipulate. A creator on the Monthly Payment Gateway receives earnings to PayPal once a month, and then faces PayPal's conversion fees and withdrawal restrictions, depending on their country.

Understanding Teachable's fee structure

Teachable’s current plan offers:

  • Starter plan ($39/month): 7.5% transaction fee on every sale, plus payment processing fees.
  • Builder plan ($99/month): 0% base transaction fee, plus payment processing fees.
  • Growth plan ($189/month): 0% base transaction fee, plus payment processing fees.
  • Advanced plan ($399/month): 0% base transaction fee, plus payment processing fees.

For payment processing, Stripe charges approximately 2.9% plus $0.30 per card transaction on standard processing. Let's say you make a course sale of  $97 on the Starter plan, Teachable deducts 7.5% ($7.28), Stripe deducts 2.9% + $0.30 ($3.11), and you are left with approximately $86.61 before the payout. The same sale on the Builder plan skips the 7.5% transaction fee, leaving you with approximately $93.89.

However, you should not be quick to upgrade to a Builder plan unless your monthly sales are at least $800. This is when you’d really be saving up on transaction fees.

Managing Teachable payouts with teachable:pay

If your course is registered in a country where teachable:pay is available, this is the most direct and cost-effective payout route. Your earnings are paid to your bank account via Stripe's Connect Express infrastructure, on the payout schedule you select: daily, weekly, or monthly.

Here is how this works:

  • A student purchases your course and pays via credit card, Apple Pay, Google Pay, or PayPal.
  • Teachable processes payments through Stripe and holds them in a rolling reserve.
  • On your chosen payout schedule, Stripe releases the funds and initiates a transfer to your connected bank account.
  • For creators in the US, this is a direct ACH transfer. For creators in other supported countries, Stripe handles cross-border transfers to a local bank account in their local currency.

For the first payout, it can take four to six weeks for Stripe to complete their risk assessment. After that, subsequent payouts follow the schedule more consistently.

To use teachable:pay:

  • Enter your phone number and complete Stripe’s quick verification (ID + basic details — usually takes minutes).
  • Connect your bank account:
  • For the best rates and speed, use a virtual USD (or local currency) account from Grey, Wise, Raenest, or Cleva instead of a traditional local bank.
  • Provide the routing and account number (or IBAN/sort code) of your USD account. These work perfectly with Stripe payouts in most supported countries.
  • Choose your payout schedule: daily (earnings paid ~2 business days after sale), weekly (every Thursday), or monthly.

It is important to note that your earnings will be withheld if you have earned over $500 and have not submitted a tax form. Submitting the W-8BEN (for non-US individuals) or W-8BEN-E (for non-US entities) is required before your first significant payout.

Also read: Managing multiple income streams as a freelance creative

Receiving Teachable payouts via the Monthly Payment Gateway

For creators in countries not eligible for teachable:pay, this is the only native payout option Teachable offers. It pays out to your PayPal account on the first business day of each month. This leaves you with no control over when or how you receive your money.

Once you provide your details, the payout goes to your PayPal account, and you are left to figure out how to access it. Your next steps largely depend on whether PayPal is supported in your country. What happens from that point depends on where you are and how PayPal functions in your market.

This poses a lot of problems for international creators outside the areas teachable:pay

  • PayPal's conversion rate is typically 3% to 5% below mid-market.
  • High transaction fees
  • Frequent account freezes

Receiving payments from Teachable as an international course creator

Whether your money arrives via Stripe to a bank account or via PayPal to a balance, the conversion to your local currency is where a significant amount of cost can be added or avoided, depending on your setup.

For creators on teachable:pay receiving USD, EUR, or GBP payouts via Stripe, directing those funds to a virtual foreign currency account gives you control over the conversion timing. The payout arrives in the original currency; you hold it, and you convert at a disclosed rate when it works for you, rather than accepting whatever the receiving bank applies on that day.

When you receive a USD payout from Stripe into a Grey USD account, the money moves through the US banking network via ACH. There are no intermediary bank charges as you find with an international wire transfer.

Using Custom Payment Gateway for receiving Teachable payouts

One of the perks of the Growth or Advanced plan is that you get more control you want full control, connect your own Stripe or PayPal account directly. Payouts and fees are then handled by Stripe/PayPal instead of Teachable.

These are the fees that may apply:

  • Teachable transaction fee: 0% on Builder+ plans (7.5% on Starter).
  • Processing fees (charged to the sale, not deducted from your payout):
    • US cards: 2.9% + $0.30
    • International cards: 3.9% + $0.30
    • PayPal fees are higher (up to 4.99% + $0.49 for international).
  • Your net payout: Teachable sends you the full sales amount minus processing fees (and any Teachable transaction fee). Reserves may apply (10–100% held temporarily for refunds).
  • Timing:
    • teachable:pay: 1–2 business days (daily) or weekly/monthly.
    • Monthly Payment Gateway: 1st of the following month.

Tips when receiving payouts from Teahcable.

Here are some things to put in place as you prepare for your payout:

  • Submit your tax form before you start selling: Teachable will withhold your payouts if your earnings exceed $500, and you’ve not submitted a tax form. The W-8BEN for individuals is straightforward, but waiting until your balance is frozen to sort it out is avoidable.
  • Check your gateway eligibility before launching: If your country is eligible for teachable:pay, setting it up correctly before your first sale means you benefit from direct bank payouts from the start, rather than defaulting to the Monthly Payment Gateway by inaction.
  • Don’t use the same PayPal account for Teachable as for other income sources if PayPal is restricted in your market: Account restrictions that affect one income stream can affect all of them. Keeping them separate reduces the impact of any single platform issue.
  • Set your course pricing in USD unless most of your audience is in a specific non-USD market: USD is the most widely recognised pricing currency for online courses and offers the most predictable payout in the currency most fintech platforms handle best.

Receive your Teachable payouts with Grey

Grey gives international course creators virtual USD, GBP, and EUR accounts with real foreign banking details. For creators on teachable:pay, directing your Stripe payout to a Grey USD account means the funds arrive via ACH with no intermediary bank fees. You get to keep your earnings in USD, convert at competitive rates, and withdraw to your local bank account at a flat fee.

Grey offers virtual Visa cards that charge directly from your multi-currency balance, so you don’t need regular top-ups. You also get to integrate your card with Google Pay and Apple Pay to use contactless and pay without issues.

Sign up on Grey and download the app to get virtual foreign currency accounts for receiving Teachable payouts.

‍

Changing money in Morocco: digital vs bureau de change

•

•

2 min read

Changing money in Morocco can seem straightforward at first, withdraw cash, pay for meals, or shop in the souks. But the method you choose can make a big difference. Digital solutions promise speed and convenience, while traditional bureaux de change offer a familiar, face-to-face experience.

Each comes with its own trade-offs. Digital platforms make transfers and currency conversion instant at competitive exchange rates. Bureaux de change give you certainty and personal interaction, yet long lines, limited hours, and slower processing can cost you time and flexibility. Choosing the wrong method can turn a simple transaction into a frustrating experience.

In this guide, we explore the pros and cons of digital vs bureau de change in Morocco, helping travellers and residents alike make informed choices

Also read: Morocco's growing appeal for European remote workers

How digital exchange works in Morocco

Digital exchange in Morocco allows individuals and businesses to convert, send, and receive foreign currencies using online platforms instead of traditional banks. These platforms link users directly to the currency market or licensed intermediaries, offering real-time exchange rates and faster transactions than conventional methods. Users can access digital exchange services via websites or mobile apps, making it convenient to manage funds from anywhere.

To use a digital exchange, you first create an account and complete the required KYC verification, providing identification and sometimes proof of residence. Once verified, you can deposit local currency (MAD) into the platform and convert it to a foreign currency, such as USD, EUR, or GBP. Many platforms allow instant transfers to international bank accounts or digital wallets, often at lower fees than traditional banks.

Digital exchanges also monitor transactions for compliance with Morocco’s foreign exchange regulations, ensuring that all transfers meet legal requirements. This protects both users and the platform while enabling secure, traceable, and efficient movement of money across borders.

Also read: How Moroccan freelancers save on FX fees with Grey

Understanding bureaux de change operations across Morocco

Bureaux de change in Morocco are licensed currency exchange offices where individuals and businesses can buy and sell foreign currencies like USD, EUR, or GBP. These offices operate in cities, airports, and tourist areas, providing a convenient alternative to banks for exchanging cash. Exchange rates are set daily and may vary slightly between bureaux, depending on demand and market conditions. Customers present their identification, such as a passport or national ID, and the bureau converts the funds instantly, often charging a small commission or including a margin in the rate.

Many bureaux also offer additional services, including cash withdrawals, remittances, and travel money solutions. While transactions are quick and physical, customers should compare rates between locations to get the best value. Compliance with Morocco’s foreign exchange regulations ensures that all transactions are legal, secure, and traceable, protecting both the client and the operator.

Also read: How to exchange currency safely when visiting Morocco

Complexities of using bureaux de change in Morocco

In Morocco, Bureaux de Change handle foreign currency exchanges, but complexities can impact how residents and businesses receive payments or manage earnings.

1. Fluctuating exchange rates

Exchange rates in Moroccan bureaux change daily, influenced by market demand and central bank policies. For freelancers, exporters, or businesses receiving foreign payments, this volatility can reduce earnings unexpectedly, meaning timely exchanges are critical to protect income and ensure predictable cash flow.

2. Fees and commissions

Bureaux often embed fees or margins into exchange rates. For individuals and small businesses in Morocco, repeated conversions or large transfers can erode profits, reducing the net amount received and affecting budgeting for payments, salaries, or operational costs.

3. Regulatory compliance

Moroccan bureaux must follow strict currency laws. Large payments or business receipts require identification and documentation, which can delay access to funds. Freelancers, exporters, and employees may face slower processing times, impacting their ability to pay bills or reinvest earnings promptly.

4. Limited services

Not every bureau in Morocco supports all currencies, bulk transfers, or remittances. Businesses and residents may struggle to access the right service at convenient times, potentially delaying payments, increasing costs, or forcing multiple trips to complete necessary transactions.

Advantages of choosing digital exchange in Morocco

Digital exchange in Morocco offers faster, more convenient currency transfers, helping residents and businesses manage earnings, pay contractors, and send money internationally efficiently.

1. Speed

Digital exchange platforms allow users in Morocco to convert and send currencies instantly or within hours. Freelancers, exporters, and remote workers can access funds quickly without visiting physical offices, ensuring timely payments and reducing delays in receiving earnings from abroad.

2. Better rates

Unlike traditional bureaux, digital exchanges often offer mid-market rates with lower margins. For Moroccans receiving international payments, this means more of their earnings are preserved, increasing net income and making it cost-effective for repeated transactions or large sums.

3. Transparency

Digital platforms provide clear breakdowns of fees, conversion rates, and transaction statuses. Users in Morocco can monitor every transfer in real-time, reducing uncertainty and giving businesses and freelancers confidence that payments are accurate and traceable.

4. Multi-currency support

Digital exchanges let Moroccan users hold, send, and receive multiple currencies from one platform. This flexibility benefits freelancers, small businesses, and remote workers who deal with USD, EUR, or GBP, eliminating the need for multiple accounts or trips to physical bureaux.

Top digital exchange solutions in Morocco

  • Grey: Offers virtual accounts in GBP, EUR, and USD, letting freelancers receive international payments, convert currencies instantly, and benefit from competitive rates with transparent, low-cost fees.
  • Wise: Provides multi-currency accounts for sending and receiving money, offering low-fee conversions at competitive mid-market rates, making international payments simple, fast, and cost-effective for individuals and businesses.
  • CashPlus & Wafacash: Popular in Morocco for remittances, currency exchange, and mobile wallet management, enabling users to send, receive, and access funds conveniently across local and international networks.

LDMAG1

Managing currency exchange with Grey

In Morocco, digital exchange is the most efficient way to convert and send money, offering speed, convenience, and security. Among options, Grey stands out with competitive exchange rates, multi-currency support, and transparent fees.

Whether you’re a freelancer, remote worker, or sending funds abroad, Grey ensures your money moves quickly, safely, and with minimal loss. Sign up or download the Grey app to exchange funds without stress.

‍

How non-US residents can get a virtual dollar card in 2026

•

•

2 min read

I haven’t been to the US in more than ten years, but if you looked at my finances today, you might think I live there. I get paid in dollars, keep a dollar account, save in dollars, and use platforms that charge (you guessed it) in dollars.

At some point it becomes obvious: having a dollar card will make everything easier.

This is the reality for millions of freelancers, remote workers, online entrepreneurs, and global teams today. They may live in Brazil, India, Nigeria, Kenya, or the Philippines, but their financial lives often revolve around the US dollar.

In this guide, I’ll explain what a virtual USD card is, how non-US residents can get one, how much they cost, and why they have become one of the most practical financial tools for people working globally.

What is a virtual dollar card?

A virtual dollar card is a digital card that lets you spend in US dollars online.

Instead of receiving a plastic debit or credit card in the mail, you receive digital card details that include the card number, expiration date, and CVV security code. These details can be used immediately to shop online and pay bills.

The key difference between a virtual dollar card and a regular bank card is the currency. A virtual USD card is denominated in US dollars, which means payments are processed directly in USD.

This matters because many online services globally priced in dollars. When you try to pay with a local currency card, your bank usually converts the transaction to USD and adds a foreign transaction fee at varying rates. These fees typically range from 2% to 5% per payment, depending on the bank and country.

A virtual dollar card removes that extra conversion step and its added costs. If you already hold funds in USD, you can simply pay directly in dollars.

For people who work online or run global businesses, using a virtual dollar card often becomes the easiest way to manage international expenses.

Also read: How to pay online and in stores worldwide with your phone

Can non-US residents get a virtual dollar card?

Yes. Non-US residents can now get a virtual dollar card even if they do not live in the United States and do not have a US bank account.

In the past, getting a USD debit card usually required opening a bank account with a US bank. This typically involved providing a US residential address, a Social Security Number, and completing identity verification in person. For most people living abroad, this made the process complicated or impossible.

Modern fintech platforms have changed that.

Today, many digital financial services allow users to open multi-currency accounts online, hold balances in USD, EUR, or GBP, and generate virtual cards linked to those balances.

The entire process can usually be completed remotely in a few minutes. These platforms use secure identity verification processes, relying on internationally accepted documents like passports or national ID cards to confirm users before granting access.

As a result, freelancers, remote workers, startups, and global entrepreneurs now have access to USD payment tools that were previously limited to US residents.

Do I need a US bank account to get a virtual dollar card?

One of the biggest misconceptions about USD payment cards is that you need to open a bank account in the United States to get one.

That used to be true. Most US banks require:

  • a Social Security Number (SSN)
  • a US residential address
  • and often, in-person identity verification

If you’re living outside the US, such requirements makes getting a USD debit card incredibly difficult.

Modern fintech platforms have changed that model. Instead of requiring US residency, many providers now offer multi-currency digital accounts that include USD balances and virtual cards. These accounts are regulated financial services that allow users to hold and spend dollars without opening a traditional US bank account.

Getting started is much simpler, but still secure. Verification is completed online through standard KYC checks, using trusted identity documents such as:

  • a passport
  • or a national ID

These checks help ensure your account is properly verified and protected. Once you’re set up, you can generate a virtual card within minutes and start making payments online.

Can I get a virtual USD card without a Social Security Number?

Yes. Non-US residents generally do not need a Social Security Number to obtain a virtual dollar card.

Instead of using US tax identifiers, most digital payment providers verify identity through international documentation. This usually involves submitting a government-issued ID and completing biometric verification during the account creation process.

The absence of credit checks is another advantage. Because most virtual dollar cards function as prepaid or debit cards, users spend their own balance rather than borrowing money. This means there is no credit history requirement and no risk of accumulating interest or debt.

For freelancers and remote workers who earn internationally, this model makes it much easier to access USD payment tools regardless of where they live.

Types of virtual dollar cards

Not all virtual dollar cards work the same way. Depending on the platform, they can be linked to different types of accounts or balances.

Understanding the difference can help you choose the option that works best for your needs.

Prepaid virtual dollar cards

Prepaid virtual cards are loaded with a specific amount of money before you use them.

You first add funds to the card, and then spend from that balance until it runs out. Many platforms use this model because it’s simple and easy to control.

Since you can only spend the amount you load, prepaid cards are often seen as a good option for budgeting and security.

Debit virtual dollar cards

Debit virtual cards are connected directly to a balance in your account, usually a USD wallet or multi-currency account.

Instead of loading money onto the card itself, payments are deducted directly from your available balance.

Many fintech platforms, including Grey, issue debit-style virtual cards linked to a USD balance.

Disposable virtual cards

Some platforms also offer disposable virtual cards designed for single-use or temporary payments.

These cards are useful when:

  • trying a new online service
  • making a payment on an unfamiliar website
  • protecting your main card details

Once the payment is completed, the card number is no longer valid.

Which type of dollar card is best?

For most freelancers, remote workers, and global businesses, a debit virtual dollar card linked to a USD balance tends to be the most practical option. It allows you to manage your funds easily while paying for global services, subscriptions, and tools that charge in USD.

Are virtual dollar cards safe to use?

Security is one of the main advantages of virtual cards.

Unlike physical cards, virtual cards cannot be lost or stolen. Because they exist only digitally, card details are stored within the user’s account and can be regenerated instantly if necessary.

Most providers also include additional security measures such as two-factor authentication, real-time transaction alerts, and the ability to freeze or unfreeze cards instantly.

Another common feature is 3D Secure authentication, which requires the user to approve certain transactions before they are completed. This helps prevent unauthorised payments even if card details are exposed.

For users who regularly make online purchases, these security features make virtual cards one of the safest payment options available.

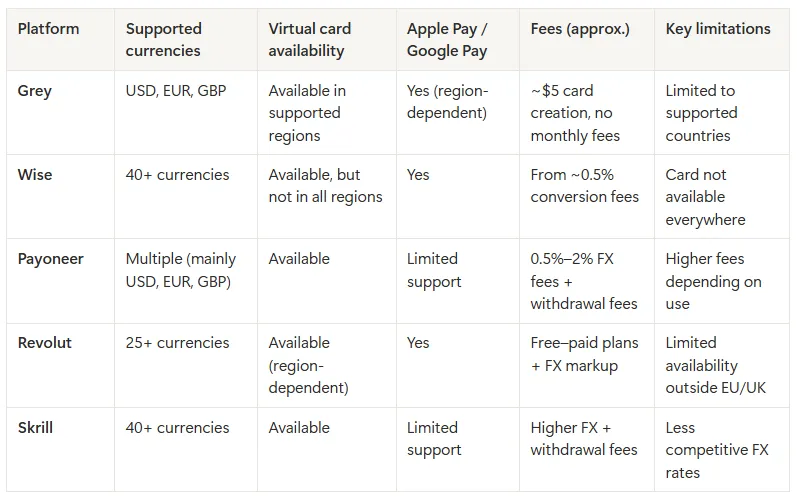
How virtual US dollar cards compare

Several platforms now offer virtual cards for international users. While the basic functionality is similar, there are important differences in pricing, supported currencies, and card availability.

Wise, Payoneer, and Grey are three of the most widely used platforms among freelancers and remote professionals.

  • Wise offers multi-currency accounts with local bank details in several countries. Their virtual cards are widely accepted and can be used globally, though card issuance is not available in every region. Wise typically charges conversion fees starting around 0.5%, depending on the currency pair.
  • Payoneer focuses primarily on freelancers and marketplace sellers who receive payments from international platforms. Their cards are often used by sellers on Amazon, Upwork, or Fiverr. Payoneer fees vary depending on the withdrawal method, and currency conversion can range from around 0.5% to 2% above mid-market rates.
  • Grey focuses on simplifying cross-border payments for freelancers and global professionals. Users can open USD, EUR, and GBP balances and generate virtual cards linked directly to their account. Card creation costs ****$5, and there are no recurring maintenance fees.
  • Revolut offers virtual cards as part of its digital banking app, with support for multiple currencies and budgeting tools. However, availability depends heavily on your country, and some features are limited outside Europe and the UK.
  • Skrill provides virtual prepaid cards and supports international payments, especially for online transactions. While widely available, fees can be higher, particularly for currency conversion and withdrawals.

Each platform serves a different purpose. Wise focuses on global banking, Payoneer is built for marketplace payouts, and platforms like Revolut and Skrill lean more towards digital banking and prepaid payments. Grey is built specifically for freelancers and remote workers who want direct access to multi-currency accounts and fewer barriers when managing international payments.

Virtual card comparison for international users

Table comparing virtual cards options

The best option depends on how you earn, where you live, and which currencies you use most frequently.

How to get a virtual dollar card as a non-US resident

If you’re ready to get a virtual dollar card, the process is usually quite straightforward.

With Grey, for example, it only takes a few steps:

Opening an account is done entirely online. After signing up on the Grey website or through the mobile app, users complete a short identity verification process. Once this is complete, you can generate your virtual card directly from the Cards section of the dashboard.

__wf_reserved_inherit

The card is issued instantly, and the card details including the card number, expiration date, and CVV become available immediately for online payments. This allows users to start paying for subscriptions, digital services, and international platforms without waiting for a physical card to arrive.

Grey currently charges $5 to create a virtual dollar card, which includes a $4 one-time issuance fee and a $1 minimum funding requirement. Unlike some providers, there are no monthly maintenance fees, so users are not charged simply for keeping the card active.

__wf_reserved_inherit

The card is connected to Grey’s multi-currency account, where users can hold balances in USD, EUR, GBP and NGN. If a USD balance is already available, payments are deducted directly from there. If not, funds can be added by converting another supported currency. The exchange rate is shown before confirming the conversion, so users can see the exact amount they will receive.

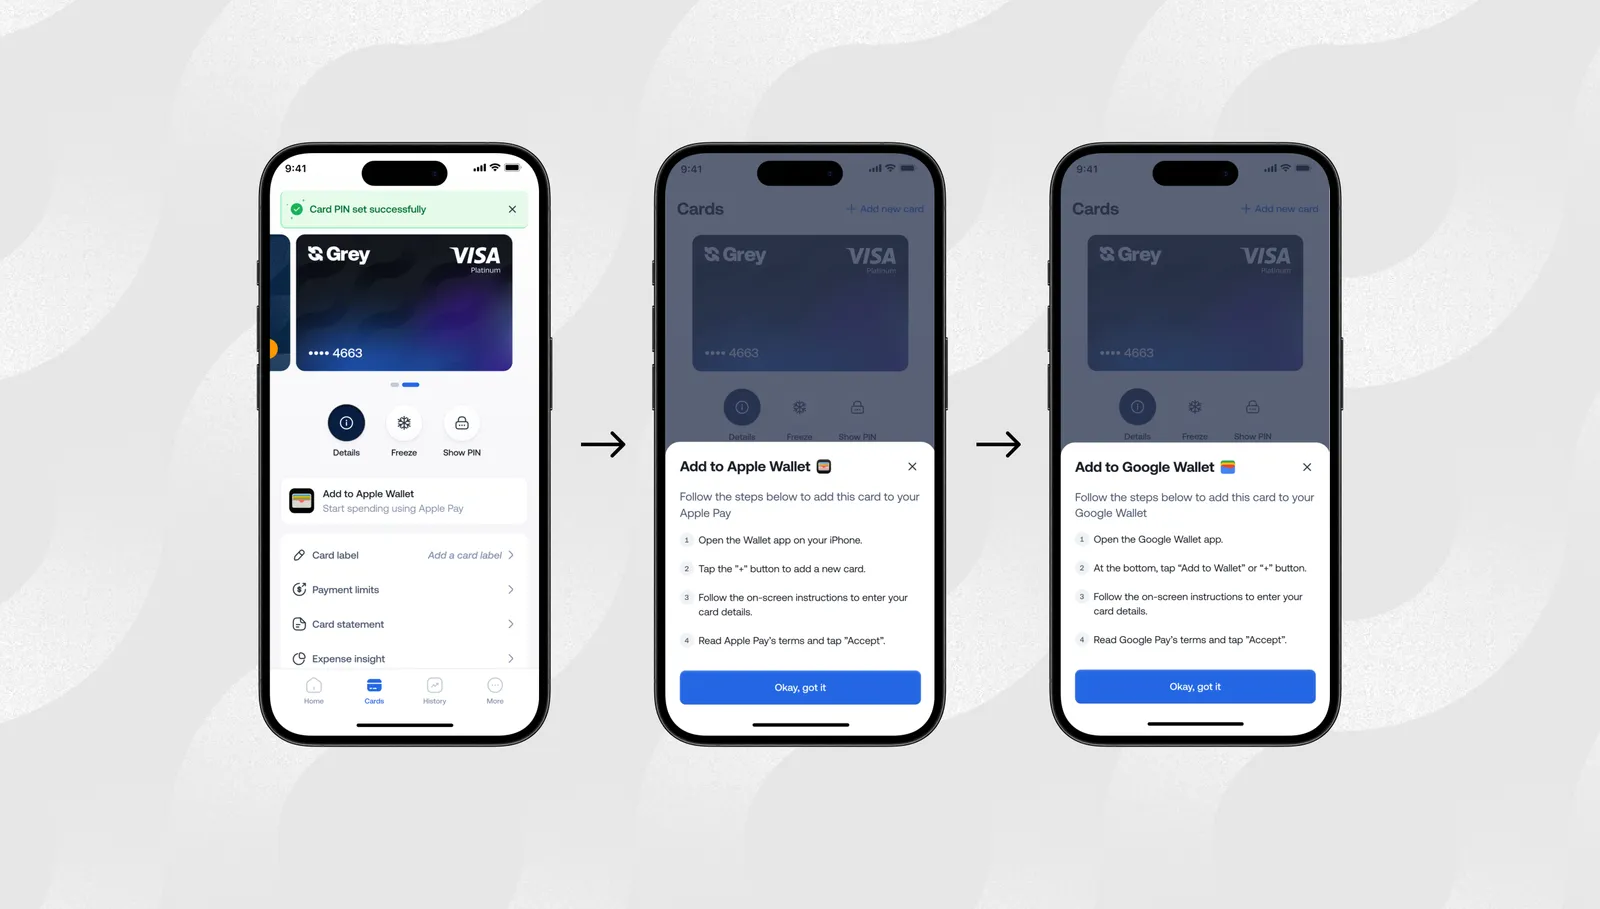
Although the card is virtual, it is not limited to online payments. In supported regions, the Grey virtual card can be added to Apple Pay or Google Pay, allowing users to make contactless payments in physical stores using their phone. This makes it possible to pay for everyday purchases from the same USD balance used for online services.

Also read: How to add your Grey card to Apple Pay or Google Pay

__wf_reserved_inherit

Security is another key feature of virtual cards. Payments are protected by 3D Secure authentication, which requires confirmation before certain transactions are completed. Users can also freeze or unfreeze their card instantly from the app if they suspect suspicious activity.

And that’s it. Once the card is created, you can use it to pay for online services, subscriptions, international platforms and contactless payments.

In most cases, the entire card creation process can be completed online in minutes.

Also read: Grey card vs other virtual cards: what you should know

Start using a virtual dollar card today

Open your Grey account, fund your USD balance, and create your Grey virtual card to start paying for global services in minutes.

Frequently asked questions about virtual dollar cards

Can non-US residents get a virtual dollar card?

Yes. Many fintech platforms now offer multi-currency accounts that allow non-US residents to generate virtual dollar cards without needing a US bank account or US residency.

How long does it take to get a virtual dollar card?

Most platforms issue virtual cards instantly once identity verification is completed. The entire process usually takes less than 10 minutes.

What documents are required to get a virtual USD card?

Users typically need a government-issued ID such as a passport or national identification card. Some providers may also require proof of address.

Can virtual USD cards be used for subscriptions?

Yes. Virtual cards can be used for most recurring payments, including streaming services, SaaS subscriptions, cloud hosting platforms, and digital tools.

Are there spending limits on virtual dollar cards?

Spending limits vary by provider and account level. Many cards allow daily transactions between $500 and $5,000, while higher limits may be available after additional verification.

Can I add a virtual dollar card to Apple Pay or Google Pay?

Some providers, like Grey, support mobile wallets, allowing users to make contactless payments with their phones even without a physical card.

‍

Western Union vs Grey: Which is cheaper for sending money to India?

•

•

2 min read

Western Union has been moving money across borders since 1871. More than 150 years of operations, agent locations in over 200 countries, and a brand that most people associate with international transfers. Grey launched in 2019 and operates digitally, serving 3+ million users across 80+ countries. These are fundamentally different products built for different eras of money transfer, and the comparison reflects that.

Western Union's core advantage is physical reach. If your recipient in India needs cash in hand at an agent location, particularly in a smaller city or town without reliable digital banking, WU can deliver that. Grey's core advantage is cost and features. If your recipient has a bank account or uses UPI, Grey will typically deliver significantly more INR for the same dollar amount. How much more? For a $1,000 transfer, the difference can be $20- $55, depending on the WU payout method and the exchange rate on the day. That is $240-$660 per year for monthly senders.

This guide breaks down how each platform prices transfers, what the real cost gap looks like at common amounts, and when each option makes more sense.

The dual-layer pricing problem

Understanding how Western Union earns money is essential to comparing it honestly. WU uses what the industry calls dual-layer pricing: a visible transfer fee plus a margin built into the exchange rate. Both layers extract revenue from the same transfer, but only the fee is shown as a clear cost.

Layer 1: The visible fee

Western Union charges a transfer fee that varies by amount, funding method, and payout method. Sending $500 from a US bank account to an Indian bank account costs roughly $3-$17. Sending the same amount for cash pickup incurs about $3 extra charge. Funding with a credit card or Google pay costs an additional $15. The fee is visible in the transaction summary.

Western Union frequently offers a $0 upfront transfer fee for sending over $1,000 USD to INR, provided you fund the transaction via a bank transfer or debit card and send it directly to the recipient's bank account. You will likely see $0.00 on your receipt when using the Western Union Currency Converter for large online bank-to-bank transfers to India

Layer 2: The exchange rate margin

The less visible cost is the exchange rate. If the mid-market rate on a given day is 95.00 INR per USD, Western Union might offer 92.50-94.50, depending on the payout method. That 0.5-3.0% spread on a $1,000 transfer costs the sender INR 1,500-2,550, equivalent to $17.65-$30.00. This margin does not appear as a line item. It is simply the gap between the rate WU offers and the rate available on the open market and can be as high as 6%.

Adding both layers together: on a $1,000 transfer, the visible fee might be $0, and the undisclosed rate margin might be $25. Grey's total cost for the same transfer (fee + rate difference from mid-market) is typically $5-$15. The gap widens further on cash pickup transfers, where WU's margin is wider and additional agent fees may apply.

Cost comparison at common amounts

Amount WU fee (bank) WU rate margin (est.) WU total cost Grey fee (conversion + withdrawal fee) Grey total cost Savings with Grey
$500 $2 0.5% to 6% $4.5-$32 $5  + $1.50 $6.50 Up to $25
$1,000 $0 0.5% to 6% $5-$60 $10 + $1.50 $11.50 Up to $38
$2,500 $0 0.5% to 6% $12.5-150 $25 +$1.50 $25.5 Up to $124

WU rate margins are estimated based on the gap between WU's offered rate and the mid-market rate. Figures are approximate and vary by day.

The annual impact

For a sender who transfers $1,000 per month to India, the cost difference between WU and Grey compounds significantly:

Metric Western Union (est.) Grey (est.)
Per-transfer cost $25-$40 $5-$15
Annual cost (12 transfers) $300-$480 $60-$180
5-year cost (60 transfers) $1,500-$2,400 $300-$900
INR retained by recipient (annual) INR 20,400-34,000 less Baseline

The difference is not theoretical. It is money that either stays in the recipient's account or goes to the transfer provider. Over 5 years of monthly transfers, a sender using WU instead of Grey loses $1,200-$1,500 to fees and rate margins. That is a round-trip flight from the US to India in transfer costs.

Also read: What is the best app to send money to India from the US?

Speed and payout methods

Feature Western Union Grey
Bank account 1-2 business days Minutes
UPI Yes Yes
Cash pickup Yes (minutes, agent network) No
In-person sending Yes (WU agent locations) No (app only)
Funding: bank account Yes Yes (ACH)
Funding: debit card Yes No
Funding: credit card Yes ($15) No
Funding: in-person cash Yes (WU agent) No

‍Western Union's cash network

India has approximately 500,000+ bank branches and over 200,000 ATMs. But financial access is unevenly distributed. While urban areas have dense banking infrastructure, rural and semi-urban India still has significant gaps. The Jan Dhan Yojana program has brought banking to hundreds of millions of previously unbanked Indians, but account usage patterns vary. Many Jan Dhan accounts have low balances and infrequent transactions.

Western Union's agent network reaches towns and villages that app-only providers cannot serve. If your recipient does not have a bank account, does not use UPI, or is in a location where digital banking is unreliable, WU's agent network is not just a convenience. It is the only option. This is the product. Western Union's pricing is higher because maintaining a physical agent network in 200+ countries costs more than running an app.

For everyone else, meaning the vast majority of Indian recipients who have a bank account or smartphone, the agent network is an expensive delivery method for something that can be done digitally for a fraction of the cost.

Grey's digital advantage

Grey transfers to Indian bank accounts arrive within minutes. UPI transfers are similarly fast. The entire transaction happens in the app: enter the amount, see the fee and rate, confirm, done. No driving to an agent location, no filling out paper forms, no carrying cash.

For the India corridor specifically, Grey's UPI support is a practical differentiator. UPI adoption has crossed 300 million active users in India. For most recipients under 50, UPI is the preferred way to receive money. Sending to a UPI ID with Grey is equivalent to WU's cash-in-minutes proposition, but digital and cheaper.

Also read: Grey vs Wise: Which delivers more INR to India?

Account features

Feature Western Union Grey
Multi-currency balance No Yes (USD, GBP, EUR)
Virtual card No Yes (Visa)
GreyTag (free P2P) No Yes
Invoicing No Yes
Account type Transfer service Financial account
Physical presence 500,000+ agent locations worldwide App only
Business features WU Business Solutions Grey Business

Western Union is a transfer service. You send money. That is the product. There are no balances, cards, or financial features beyond the transfer itself. WU Business Solutions exists for enterprise clients, but the consumer product is purely a remittance tool.

Grey is a financial account that includes transfers. You hold balances in three currencies, pay for things with a virtual card, receive payments via invoicing, and send money to other Grey users for free via GreyTag. For someone whose financial life spans two countries, Grey replaces multiple products: a transfer service, a foreign currency account, and an international payment card.

Also read: How to compare money transfer rates to India

When to use Western Union vs Grey

Use Western Union if:

  • Your recipient needs physical cash at an agent location.
  • Your recipient does not have a bank account or smartphone.
  • You need to send in person (some senders prefer walking into a WU location).
  • You need to fund with a credit card (WU allows it; Grey does not).
  • You are sending to a location with unreliable digital banking infrastructure.

Use Grey if:

  • Your recipient has a bank account or uses UPI (which covers the vast majority of urban and semi-urban India).
  • You send money monthly or more often and want the lowest total cost.
  • You want to see the fee and exchange rate separately before confirming.
  • You need a multi-currency balance for holding USD, GBP, or EUR.
  • You want a virtual Visa card for international payments.
  • You invoice clients or receive payments in foreign currencies.

Common mistakes when comparing Western Union and Grey

  • Looking only at the WU fee. A $7 WU fee looks comparable to Grey. But the exchange rate margin adds $15-$30 on a $1,000 transfer. The fee is the smaller cost. The rate margin is the larger one. Always check the total INR the recipient receives, not just the fee.
  • Assuming WU is safer because it is bigger. Size does not equal safety in regulated financial services. Both WU and Grey are regulated. WU is publicly traded and licensed worldwide. Grey is backed by Y Combinator and holds appropriate US licenses. Both use bank-level encryption and identity verification. The relevant safety question is whether the provider is regulated, not how large it is.
  • Using WU for bank transfers out of habit. If your recipient has a bank account, WU's bank deposit option is significantly more expensive than Grey or Wise and often slower (1-2 days vs minutes). WU's value proposition is the agent network. For bank transfers, digital-first platforms are cheaper and faster.
  • Not accounting for the recipient's experience. WU cash pickup requires the recipient to travel to an agent location, present ID, and wait in line. Grey UPI delivery puts the money in their phone instantly. For regular transfers to someone with a smartphone, the recipient's experience with Grey is meaningfully better.

Frequently Asked Questions

1. Is Western Union more expensive than Grey for India transfers?

Yes, for bank account and UPI transfers. WU uses dual-layer pricing (a visible fee plus a margin in the exchange rate), which typically costs $25-$40 for a $1,000 transfer. Grey's total cost is usually $5-$15 for the same amount. The gap is widest for bank deposits and narrower for cash pickup, where WU's agent network provides value that Grey does not offer.

2. Does Grey offer cash pickup in India?

No. Grey delivers to Indian bank accounts and UPI IDs only. If your recipient needs physical cash at an agent location, Western Union, Remitly, or Xoom are the options. If your recipient has a bank account or uses UPI, Grey is typically faster and cheaper.

3. How much can I save by switching from Western Union to Grey?

On monthly $1,000 transfers, the savings are approximately $15-$30 per transfer, or $180-$360 per year. Over 5 years, that is $900-$1,800. The exact savings depend on the WU exchange rate margin on the day you compare. Run a side-by-side comparison on both platforms for your specific amount.

4. Is Western Union safe for sending money to India?

Yes. Western Union has been operating for over 150 years and is licensed as a money transmitter in every US state. It is publicly traded (NYSE: WU) and regulated globally. Grey is similarly regulated with FinCEN registration and state licenses. Both are safe for transfers.

5. Can I send from a WU agent to a Grey account?

Not directly. Western Union and Grey are separate services. You cannot initiate a WU transfer and have it land in a Grey account. To use Grey, you send from the Grey app funded by your US bank account. To use WU, you send from the WU app or an agent location. They are independent transfer paths.

6. Does Western Union support UPI in India?

No. Western Union delivers to Indian bank accounts and offers cash pickup at agent locations. It does not support UPI. Grey supports UPI delivery, allowing you to send directly to a recipient's UPI ID. This is faster and more convenient for recipients who use UPI as their primary payment method.

Grey shows the exchange rate and fee before every transfer. Compare for yourself at grey.co/blog/fees-and-charges-on-grey.

Arrow (up)

Back to top