How to convert and send US dollars (USD) with Grey

Priscila Marotti

TABLE OF CONTENT

SHARE THIS POST

As a digital nomad your finances should work as flexibly as you do. With Grey, converting and sending USD becomes effortless, no matter where you are. From managing payments with US clients to handling multiple income streams, Grey makes accessing and transferring your funds quick, affordable, and hassle-free.

In this guide, we’ll walk you through effortlessly converting and sending US dollars with Grey, revealing how to maximise savings, cut through complexity, and make global financial management a breeze.

Why Grey is perfect for sending and converting US dollars

Managing your finances can be challenging, especially when working with clients or employers in different currencies. Whether you’re based in Asia, Europe, or anywhere else, having a platform that supports multi-currency accounts and provides transparent exchange rates is essential.

Grey offers several advantages for digital nomads and remote workers:

  • Multi-currency accounts: Grey lets you hold and manage funds in multiple currencies, including USD, EUR, GBP, and more, making it easy to convert and send money.
  • Low fees and competitive rates: Grey provides low conversion fees and competitive exchange rates, ensuring that more of your earnings stay with you.
  • Global accessibility: Whether in Bali, Mexico, or Spain, Grey’s mobile app allows you to manage your finances anywhere with an internet connection.
  • Seamless transfers: Sending USD or any other currency is fast and simple. Grey allows instant transfers to various bank accounts and wallets globally.
  • Easy account integration: You can link your Grey account to platforms like Amazon, freelance job sites, and other payment systems, simplifying the process of receiving and sending payments.

Exchange rates often fluctuate for several reasons, so we’ve created a special currency converter for you.

The benefits of converting and sending USD with Grey

Before diving into the conversion and sending process, let’s take a moment to explore why Grey is a great option for converting USD into local currencies or sending it to other accounts.

  1. Competitive exchange rates

Grey offers competitive exchange rates compared to traditional banks and other payment platforms. While rates vary based on market conditions, Grey provides real-time rates with a transparent view of conversion fees.

  1. Low conversion fees

Grey’s conversion fees are designed to be transparent and affordable.

  1. Efficient cross-border transfers

Fast and secure transfers are key when working internationally. Grey enables you to send USD to international accounts almost instantly. This feature is particularly useful for remote workers who must pay international invoices or send money to family members in other countries.

Grey also allows for quick transfers between different currency accounts, so if you need to convert USD into GBP, EUR, or any other supported currency, you can do so easily.

  1. Global accessibility

Since Grey is a fully digital platform, you can access it from anywhere in the world. This is particularly advantageous for digital nomads who frequently travel or live abroad, as it provides a consistent and reliable way to manage your finances regardless of location.

Step-by-step guide: How to convert and send USD with Grey

Now that you understand the benefits of using Grey, let’s walk through the detailed process of converting USD to another currency and sending it to a recipient, whether for personal or business reasons.

Step 1: Sign up for a Grey account

If you haven’t already, the first step is to create an account with Grey. Visit Grey’s website or download the app from the App Store or Google Play. The sign-up process is straightforward and typically takes just a few minutes.

To start, you’ll need to provide personal details, verify your identity, and set up your account.

Step 2: Deposit USD into your Grey account

Once you’ve created your account, you can deposit USD into your Grey account. You can do this through several methods:

  • Bank transfer: Link your bank account to Grey and deposit funds directly into your USD account.
  • Payment platforms: If you receive payments from platforms like PayPal, Stripe, or other freelance networks, you can transfer your earnings directly to your Grey account.
  • Wire transfer: If you’re working with clients or employers who prefer wire transfers, you can provide them with your Grey account details so they can receive USD payments.

You can begin the conversion process after depositing USD into your Grey account.

Step 3: Convert USD to another currency

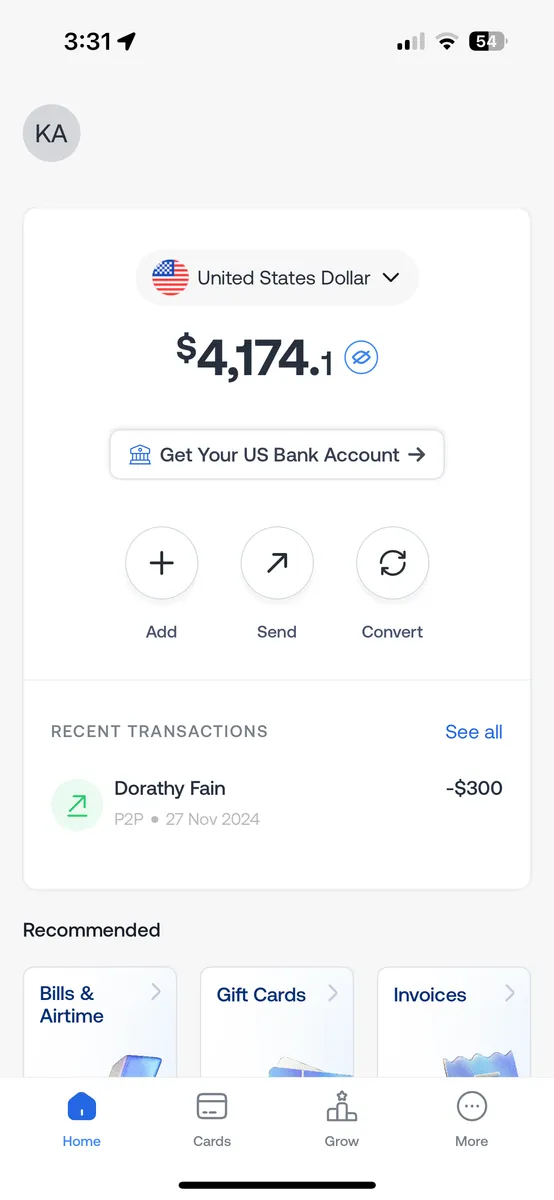
To convert USD into another currency, follow these steps:

  1. Open the Grey app: Log into your Grey account and navigate to the currency conversion section.
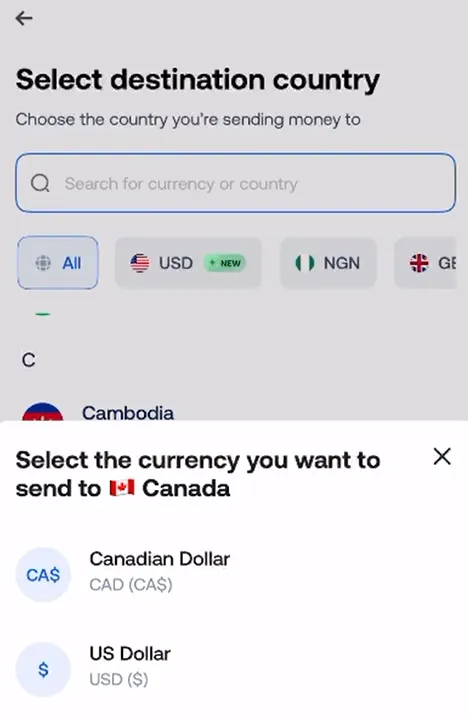
  2. Select the currencies: Choose USD as the source currency and select the destination currency (e.g., EUR, GBP, ZAR).
  3. Check the exchange rate: Grey will display the current exchange rate for the conversion, along with the conversion fees.
  4. Confirm the conversion: Once you’re satisfied with the rate and fees, confirm the transaction. Your funds will be converted and reflected in your Grey account in the new currency.

Step 4: Send USD or converted funds to a recipient

To send funds to another individual or account, you’ll need to:

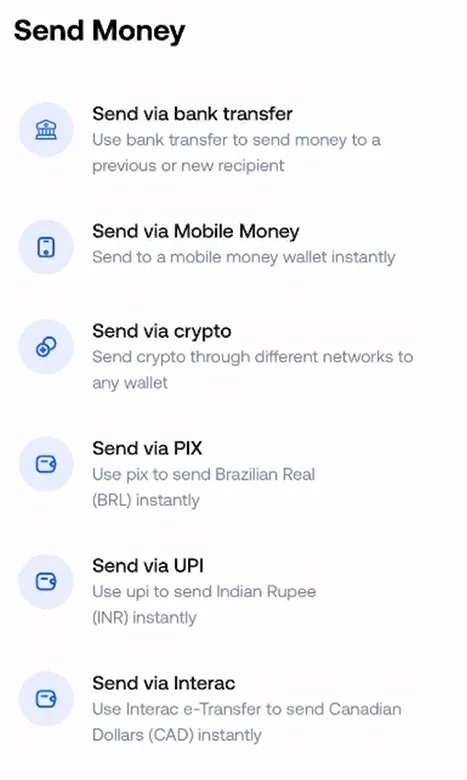
1. Navigate to the Send Money section: Choose the “Send” option in the Grey app.

__wf_reserved_inherit

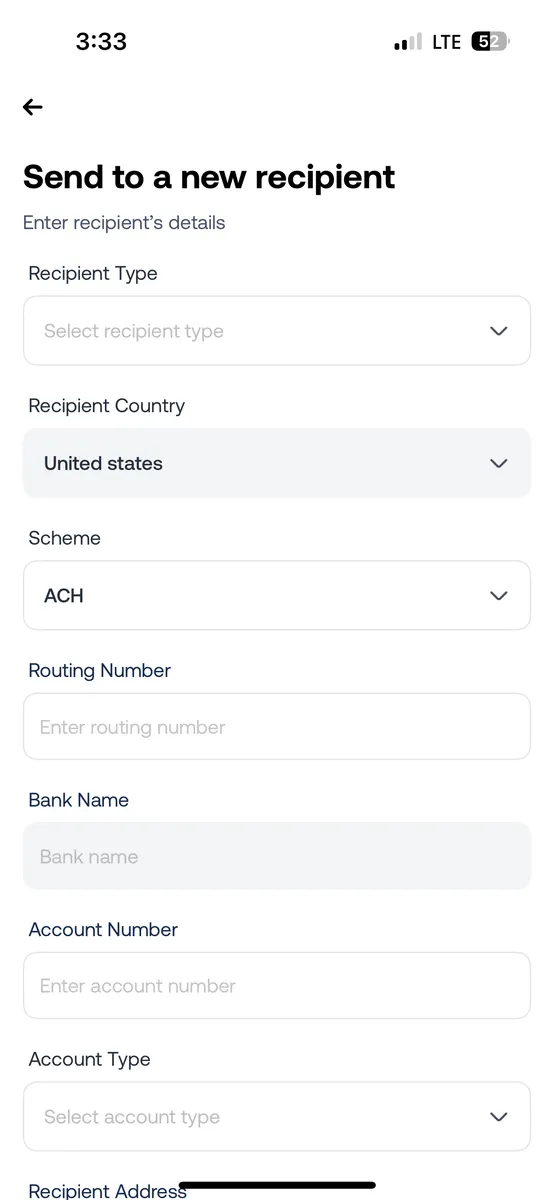
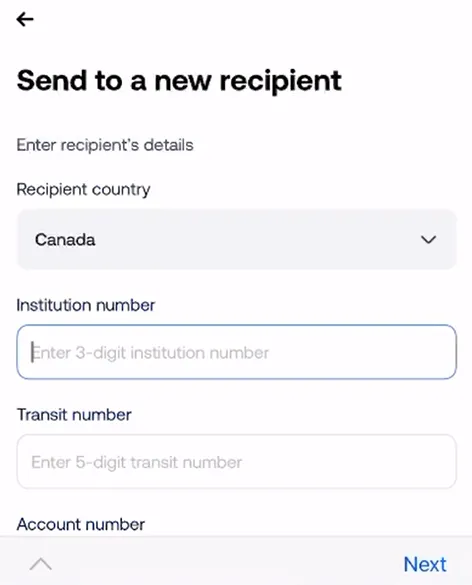
2. Enter the recipient’s details: Add the recipient’s bank account or wallet information. You can also send funds to another Grey user.

__wf_reserved_inherit

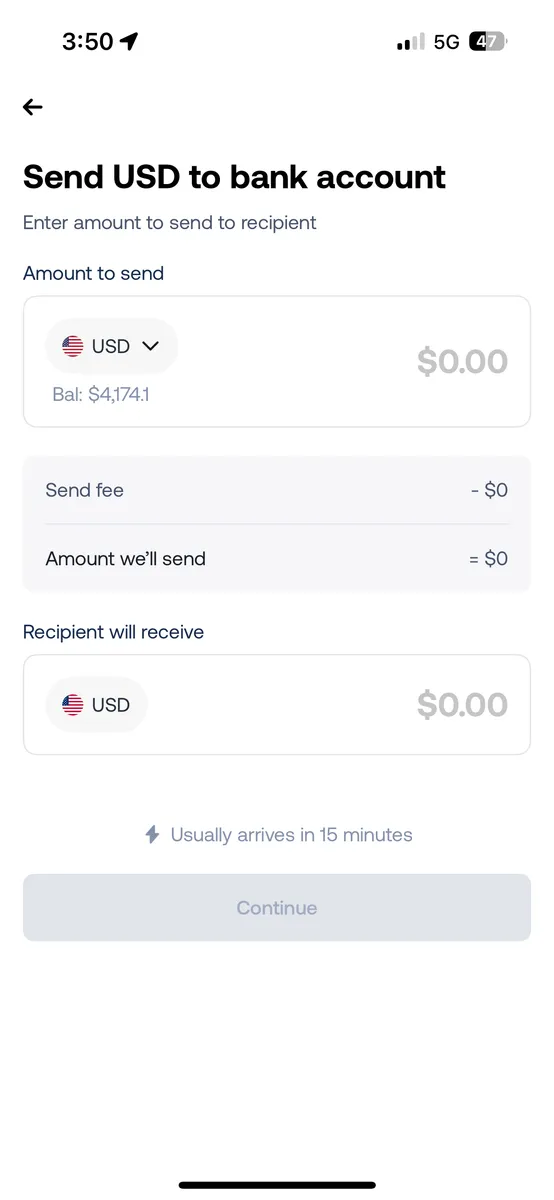
3. Choose the amount to send: Enter the amount in USD or your currency (e.g., EUR).

__wf_reserved_inherit

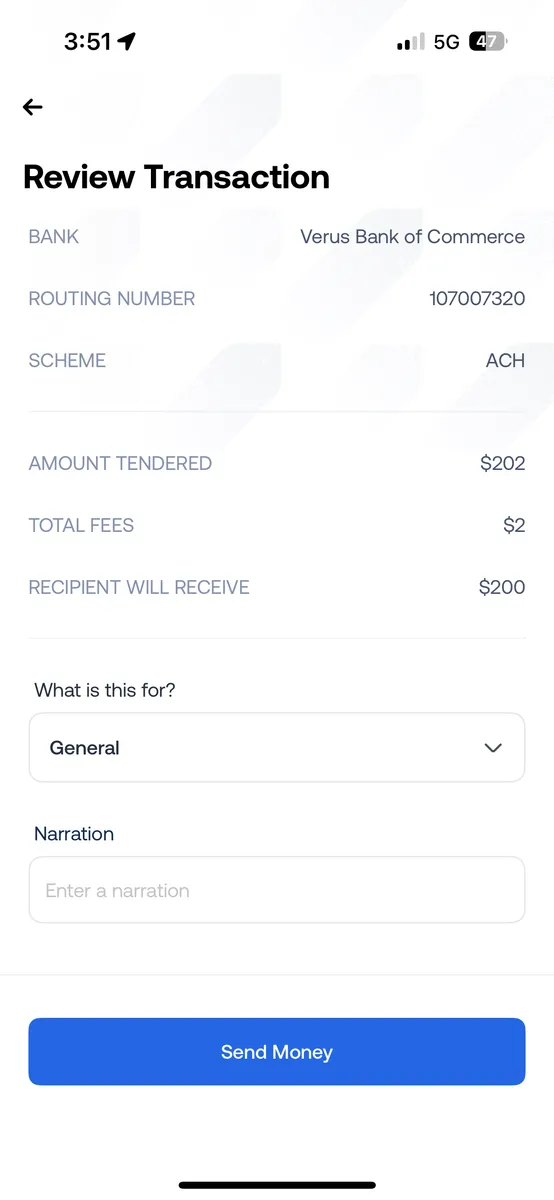
4. Review fees and exchange rates: Grey will estimate the fees and exchange rates so you know exactly how much the recipient will receive.

__wf_reserved_inherit

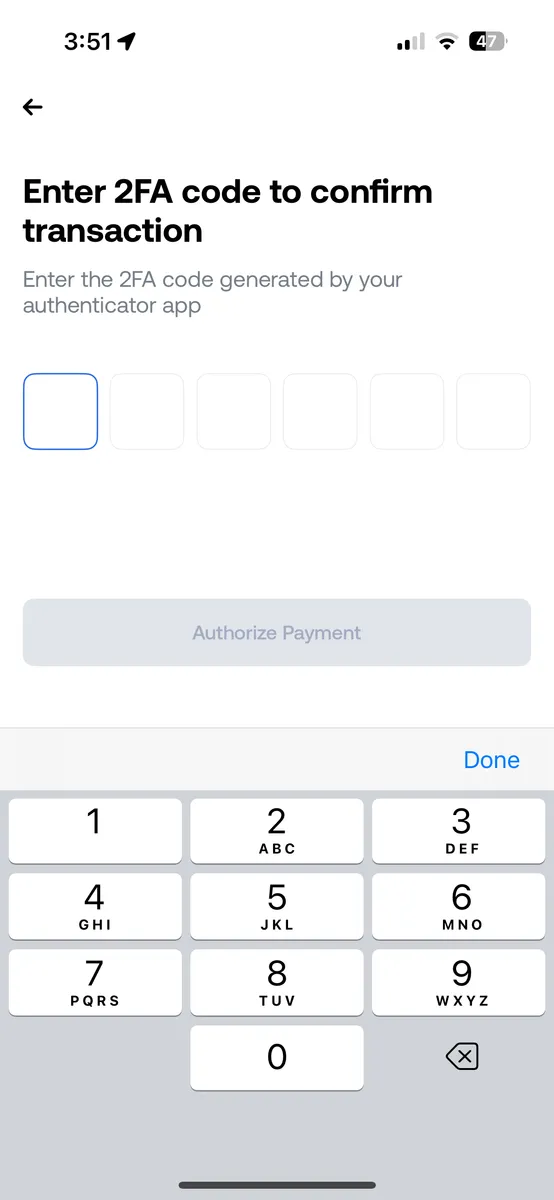
5. Complete the transaction: Confirm the details and authorise the payment. The recipient typically receives the funds in minutes to a few hours, depending on the payment method.

__wf_reserved_inherit

Convert and send USD: Key tips for remote workers

  1. Minimise fees: Always review Grey’s exchange rates and conversion fees before confirming any transaction. While Grey offers competitive rates, you may still want to plan your conversions to avoid unnecessary fees, especially if you’re sending large sums.
  2. Use local currency accounts: If you’re working in a country with a stable currency, consider holding a local currency account to avoid frequent conversions and fees.
  3. Monitor exchange rates: Grey updates its exchange rates in real time. If you’re converting large sums, it may be worth monitoring rates for a few days to ensure you get the best deal.
  4. Use Grey’s app for convenience: Grey’s mobile app allows you to convert and send USD or other currencies from anywhere in the world, which is a huge advantage for digital nomads who need to manage their finances on the go. Download Grey now and get started.

Simplify converting and sending USD with Grey

Converting and sending USD with Grey is an efficient and cost-effective way for remote workers and digital nomads to manage their finances. With competitive exchange rates, low fees, and the convenience of a fully digital platform, Grey provides a seamless solution for handling cross-border transactions.

Ready to start using Grey? Sign up today and take control of your global finances.

Last updated:

June 15, 2026

Open a free Grey account to get startedJoin 1 million digital nomads
IF YOU ENJOYED THIS, CHECK THESE OUT

Remitly review 2026: Fees, speed, and reliability

2 min read

Remitly processes billions of dollars in transfers across 170+ countries every year. It's one of the most downloaded money transfer apps in the world. But popularity doesn't tell you whether you're getting a good deal. Most Remitly reviews list features. This one focuses on the number that actually matters: how much of your money arrives at the other end.

Remitly is a money transfer service that lets you send cash to 170+ countries. Transfer fees start from $0 for economy transfers, with a small exchange rate margin built in. Express transfers arrive within minutes but cost more. Remitly is best for sending to bank accounts or mobile wallets in emerging markets.

This review walks you through Remitly's fees across five major corridors. It compares economy versus express on real transfers, explains where Remitly's reliability holds up and where it doesn't, and shows you how it stacks up against alternatives, including Grey, Wise, and WorldRemit.

How does Remitly work?

Remitly is a digital-first money transfer platform. You don't visit a branch or fill out paper forms. Everything happens in the app or on the website.

Here's the process: create an account (email, phone number, and a government ID for verification). Enter your recipient's details (name, bank account or mobile wallet number, country). Choose between Economy (slower, cheaper) or Express (faster, pricier). Pay by bank transfer, debit card, or credit card. Remitly handles the conversion and delivers to your recipient's bank account, mobile wallet, or a cash pickup location.

First-time transfers require identity verification, which can take a few minutes to a few hours, depending on the documents you submit. Subsequent transfers skip this step. The app supports 18 languages and runs on iOS and Android.

One thing worth knowing: Remitly's fee structure isn't fixed. The fee you pay depends on the corridor, the amount, the payment method, and whether you pick Economy or Express. Two people sending the same amount to the same country can pay very different fees depending on these choices. That variability makes comparing Remitly tricky without looking at specific corridors.

Remitly fees: Full breakdown

Remitly's advertised fees look low. Economy transfers are often listed as "$0 fee." But the real cost of any transfer is the fee plus the exchange rate margin. Remitly builds a margin into the rate it offers, so you're paying even when the stated fee is zero. The margin is wider on Economy transfers and tighter on Express.

Here's what a $500 transfer looks like across Remitly's five most popular US corridors:

Corridor Economy fee Express fee Rate margin (est.) True cost on $500
US to India $0 $1.99 to $3.99 0.5 to 2% $2.50 to $13.99
US to Mexico $0 $3.99 1 to 2.5% $5 to $16.49
US to the Philippines $0 $1.99 to $3.99 0.5 to 2% $2.50 to $13.99
US to Nigeria $0 to $2.99 $3.99 to $5.99 1 to 3% $5 to $20.99
US to Ghana $0 to $2.99 $3.99 1 to 2.5% $5 to $16.49

Focus on the "true cost" column. A $0-fee Economy transfer to Nigeria might look free, but if the rate margin is 2.5%, you're quietly losing $12.50 on a $500 send. Add a $2.99 stated fee on some corridors, and the real cost is over $15.

Remitly also charges a 3% surcharge on some credit card payments, depending on the card provider. Debit card and bank transfer payments don't carry this surcharge. If you're funding with a credit card, factor that in.

New customers often get a promotional rate and a fee-free first transfer. Don't base your long-term cost assessment on the first transfer.

All numbers here are estimates based on publicly available information from mid-2026. Fees and rates shift frequently, so double-check the total cost right before you send.

Remitly transfer times: Economy vs express

Speed is where Remitly genuinely delivers. According to Remitly, 90% of Express transfers arrive within an hour. Economy transfers take longer but cost less. Here's what to expect by corridor and delivery method. For context on how transfer speeds compare across the industry, see how long international wire transfers take.

Corridor Express (bank) Economy (bank) Cash pickup
US to India Minutes 3 to 5 business days Not widely available
US to Mexico Minutes to hours 3 to 5 business days Within hours
US to Philippines Minutes 3 to 5 business days Within hours
US to Nigeria Minutes to hours 3 to 5 business days Within hours
US to Ghana Minutes to hours 3 to 5 business days Within hours

Three things affect delivery speed beyond the Economy/Express choice: your recipient's bank processing time (some Nigerian banks take longer to credit accounts, especially on weekends), first-time KYC verification on your end (can delay the initial transfer by hours or even a day), and public holidays in the recipient country.

Express to India and the Philippines is genuinely fast. Minutes, not hours. Nigeria and Ghana can be slightly slower on the receiving end due to local bank processing, even on Express.

Remitly reliability: What real users say

Remitly holds a 4.6 out of 5 rating on Trustpilot from over 117,000 reviews. More than 80% of reviewers gave it five stars. On the Apple App Store, it holds a similar rating. That's strong for a fintech in the remittance space.

The positive reviews consistently mention speed ("money arrived in minutes"), ease of use ("simple app, took two minutes"), and good coverage of developing-market corridors that other providers don't serve well.

The negative reviews cluster around three issues: transfers delayed without clear explanation (particularly on first transfers where KYC checks are triggered), exchange rates that look worse than competitors on the same corridor at the same time, and customer service that's responsive but sometimes slow to resolve account-level issues like holds or verification blocks.

One pattern worth flagging: several negative reviews describe situations in which a transfer was held for "additional verification" after the funds had already been debited from the sender's account. The sender couldn't cancel, and the money was stuck for days. This appears to be an anti-fraud measure, and it's not unique to Remitly, but it's more frequently reported than with competitors like Wise.

Trustpilot rating and review count verified as of mid-2026. Ratings change over time.

Remitly alternatives worth considering

Remitly isn't the only option, and it's not always the cheapest. Here's how it compares to four alternatives across the dimensions that matter most:

Feature Remitly Grey Wise WorldRemit Western Union
Transfer fee
$0 to $5.99 Flat fee per transfer Low flat fee (varies) $0 to $4.99 $0 to $10+
Rate transparency Margin built into rate Visible rate and fee Mid-market rate shown Margin built into rate Margin built into rate
Express speed
Minutes Minutes Hours to 1 day Minutes to hours Minutes (cash pickup)
Corridors
170+ countries 80+ markets 80+ countries 150+ countries 200+ countries
Recipient holds USD? No (converted to local) Yes (USD, GBP, EUR) Yes (multi-currency) No (converted) No (converted)
Best for Fast transfers to emerging markets Recipients who want to hold USD/GBP Rate-conscious senders Wide corridor coverage Cash pickup globally

Grey's specific advantage is on the receiving side. With Remitly, your recipient gets local currency (naira, pesos, rupees) at whatever rate applies at the moment of conversion. With Grey, the recipient can open a Grey account to receive transfers in USD, hold the dollars, and convert to local currency when the rate is right. For Nigerian recipients in particular, this matters because the naira rate can move significantly within a single week.

If your recipient just needs naira in their account as fast as possible, Remitly Express is hard to beat. If your recipient wants to hold USD and choose when to convert, Grey is the better option. If you're sending to a corridor where every fraction of a per cent matters and you don't need instant delivery, Wise typically offers the tightest rate. For more on sending from the US, see send money from the US.

If your recipient wants to hold USD rather than convert immediately, open a Grey account so they can receive transfers directly, with no forced conversion and no bank delays.

Frequently asked questions about Remitly

Is Remitly safe to use?

Yes. Remitly is licensed and regulated in every country where it operates. In the US, it's registered with FinCEN as a money services business and holds state-level money transmitter licences. In the UK, it's authorised by the FCA. Customer funds are held in trust accounts, separate from Remitly's operating funds. The Trustpilot score (4.6/5 from 117,000+ reviews) suggests the majority of users have positive experiences.

How long does Remitly take to transfer money?

Express transfers to most corridors arrive within minutes to a few hours. Economy transfers take 3 to 5 business days. Cash pickup is typically available within hours of sending. First-time transfers may take longer due to identity verification. Remitly claims 90% of transfers arrive within one hour on Express.

Does Remitly charge fees?

Yes, though the fee structure varies by corridor, amount, and delivery speed. Economy transfers are sometimes listed as $0 fee, but Remitly builds a wider exchange rate margin into Economy transfers, which is effectively a hidden cost. Express transfers charge a stated fee ($1.99 to $5.99 on common corridors) with a tighter rate margin. Credit card payments may incur an additional 3% surcharge. Always check the total cost (fee plus rate) before confirming.

What is the Remitly exchange rate margin?

Remitly doesn't publish a fixed margin. The margin varies by corridor, delivery speed, and market conditions. Based on public comparisons, the margin typically ranges from 0.5% on Express transfers to popular corridors (India, Philippines) to 2-3% on Economy transfers to less-liquid corridors (Nigeria, Ghana). The margin is the difference between Remitly's offered rate and the mid-market rate at the same moment.

Can I cancel a Remitly transfer?

You can cancel a transfer if it hasn't been processed yet. Once processing begins (which can be almost immediately for Express transfers funded by card), cancellation may not be possible. If the transfer is held for verification, you typically can't cancel until the verification is resolved. Refunds for cancelled transfers go back to the original payment method and can take 3 to 10 business days to appear.

Is Remitly better than Western Union?

For digital-first senders who want speed and low fees, Remitly is generally cheaper and faster than Western Union for bank-to-bank and mobile wallet transfers. Western Union's advantage is its physical network: 500,000+ agent locations worldwide for cash pickup and cash-to-cash transfers. If your recipient needs to collect physical cash from a location, Western Union's network is larger. If they have a bank account or mobile wallet, Remitly is usually the better deal. For recipients who want to hold USD, send money internationally with Grey instead.

Open a Grey account and let your recipients receive transfers in USD directly, with no forced conversion and no bank delays.

Disclaimer: This article is for informational purposes only. Fees, exchange rates, transfer speeds, and regulatory status change frequently. All figures cited are estimates based on publicly available data as of mid-2026. Verify current pricing directly with each provider before sending money. Grey is not a bank. Grey is a licensed financial services provider offering multi-currency accounts. This review is not endorsed by or affiliated with Remitly.

How to fill out a money order: Step-by-step guide

2 min read

You've got a blank money order in front of you. Five fields, no instructions, and a nagging suspicion that writing the wrong thing in any of them will mean starting over. You're right about that last part. Money orders can't be edited once they're filled in, so getting them right the first time matters.

To fill out a money order: write the recipient's full name in the "Pay to the Order of" field, your name and address in the purchaser section, and sign the front. Leave the back blank until you cash or deposit it. Fill in the memo line with the payment reference. Don't leave any fields blank.

That's the short version. Below, we'll walk through each field with examples, point out the mistakes that get money orders rejected, and cover where to cash one when you're on the receiving end.

What you need before you fill out a money order

Before you pick up a pen, make sure you have three things ready. Once you start writing on a money order, you can't undo it. A mistake means requesting a refund from the issuer (USPS, Western Union, or MoneyGram) and buying a new one, which costs both time and money.

  1. The recipient's full legal name. This is the name that appears on their government-issued ID or bank account. Not a nickname, not a business abbreviation, not "Mom." If the name on the money order doesn't match the name on the recipient's ID, they won't be able to cash it. If you're paying a company, use the company's full legal name, not the brand name (for example, "Acme Property Management LLC", not "Acme Rentals").
  2. Your address. The purchaser section requires your name and address. This is your current mailing address. If there's ever a problem with the money order (it gets lost, the recipient disputes it), the issuer uses this information to contact you.
  3. A payment reference or memo. This isn't always required, but it's always smart. Write whatever helps the recipient match this payment to what it's for: a rent invoice number, a utility account number, a case reference, or simply "March rent." If the money order gets separated from any accompanying paperwork, the memo is how the recipient knows what it was for.

One more thing: use a pen, never a pencil. A pencil can be erased and altered, which is why some institutions reject money orders filled out in pencil.

How to fill out a money order: Field by field

Every money order looks slightly different depending on the issuer (USPS, Western Union, MoneyGram), but they all have the same five fields. Here's how to write a money order, field by field, with a worked example for each.

Step 1: "Pay to the Order of" (or "Pay to")

This is the most important field. Write the full legal name of the person or company you're paying. Use their name exactly as it appears on their ID or business registration.

Example: If you're paying rent to Acme Property Management LLC, write "Acme Property Management LLC." Don't write "Acme Properties" or "My landlord."

Fill this in immediately after purchasing the money order. If you leave it blank and lose the money order, anyone who finds it can write in their own name and cash it. A blank "Pay to" field turns the money order into cash.

Step 2: "Purchaser" or "From" (your name and address)

Write your full legal name and current mailing address. This identifies you as the sender. Some money orders label this field "Purchaser," others say "From," and some say "Sender." They all mean the same thing.

Example: "Jane Smith, 742 Elm Street, Apt 4B, Chicago, IL 60614."

If you're sending the money order on behalf of someone else, write the name of the person who actually purchased it (the person who paid for it at the counter), not the person who asked you to buy it.

Step 3: "Memo" or "For" (payment reference)

Write a brief description of what this payment is for. This field isn't always required, but leaving it blank means the recipient has to guess why they received money, which can delay processing.

Example: "Invoice #4521" or "March 2026 rent, Unit 4B" or "Account #78901234."

Keep it short. One line. If the reference is a long account number, double-check every digit. A wrong account number on the memo won't cause the money order to bounce, but it can cause the payment to be applied to the wrong account on the recipient's end.

Step 4: Sign the front

Sign on the front of the money order in the "Purchaser's Signature" or "Drawer" line. This is your signature as the buyer and sender of the money order. Don't confuse this with the back.

The back of the money order has an endorsement line. That's for the recipient to sign when they cash or deposit it. If you sign the back, some banks will treat it as if you've already endorsed it and may reject it when the recipient tries to cash it.

Step 5: Keep your receipt

Most money orders come with a detachable receipt or stub. Tear it off and keep it somewhere safe. This receipt contains the money order's serial number and tracking information. If the money order is lost, stolen, or never cashed, you'll need this receipt to request a refund or replacement. Without it, proving you purchased the money order is much harder.

That's it. Five fields, five minutes, done. Don't leave any field blank. A fully completed money order is harder to alter or misuse than one with empty fields.

Common money order mistakes and how to avoid them

Money orders aren't forgiving. Once you've written on one, it's done. Here are the mistakes that get money orders rejected at the counter:

Mistake: Writing a nickname instead of a full legal name.

Why it matters: the recipient's bank or cashing location matches the name on the money order against their government-issued ID. "Mike" won't match "Michael David Johnson." "Bob's Auto Shop" won't match "Robert's Automotive Services LLC."

Fix: Ask the recipient for their full legal name (or business name) before you start writing. If you're not sure, ask to see their ID or check the exact name on their invoice.

Mistake: Leaving the "Pay to the Order of" field blank.

Why it matters: A money order with a blank payee field is a bearer instrument. Anyone who has it can write in their own name and cash it. It's the equivalent of carrying cash with no security.

Fix: Fill in the payee name immediately after purchasing. Don't wait until you get home. Do it at the counter.

Mistake: Trying to alter the amount.

Why it matters: The amount is printed by the issuing machine at the time of purchase. You can't change it. If you bought a money order for $500 but need to send $450, you can't cross out the amount and write a new one. The money order will be rejected.

Fix: know the exact amount before you buy. If you make a mistake, you'll need to request a refund from the issuer and purchase a new money order. USPS charges a fee for refund processing.

Mistake: Signing the back instead of the front.

Why it matters: the back is for the recipient's endorsement. If you, the purchaser, sign the back, some institutions treat it as if the money order has already been endorsed and will reject it when the actual recipient tries to cash it.

Fix: Sign the front only, in the "Purchaser's Signature" field. Leave the back completely blank.

Mistake: Using a pencil.

Why it matters: A pencil can be erased and altered. Some banks and cashing locations reject money orders filled out in pencil as a fraud prevention measure.

Fix: Use a black or blue ballpoint pen. Not a felt-tip, not a gel pen (smudges), not a pencil.

Where to cash or deposit a money order

If you've received a money order, you need to endorse it (sign the back), present a government-issued photo ID, and take it to one of these locations:

Your bank or credit union. If you have a bank account, depositing a money order is usually free. You can deposit it at the teller, through the ATM (if your bank accepts money order deposits), or via mobile deposit (if your bank's app supports it). Funds are typically available within 1 to 2 business days.

US Post Office. USPS money orders can be cashed at any post office. You'll need a valid photo ID. There's no fee for cashing a USPS money order at a post office.

Check-cashing stores. These accept money orders but charge a fee, typically 1 to 3% of the money order's value. On a $1,000 money order, that's $10 to $30. Use this option only if you don't have a bank account and can't get to a post office.

Walmart Money Centre. Walmart cashes money orders up to $5,000 for a fee (typically $4 to $8). Limits and fees vary by location. You'll need a valid photo ID.

Western Union and MoneyGram locations. If the money order was issued by Western Union or MoneyGram, you can cash it at their partner locations. Fees apply.

What if the money order is lost or stolen? Contact the issuer immediately with the serial number from your receipt. USPS charges a $6.45 processing fee for lost money order inquiries. Western Union and MoneyGram have their own processes and fees. Replacement can take 30 to 60 days.

Money order alternatives for sending money without a bank

Money orders exist because not everyone has a bank account, and not every payment can be made electronically. But if you're using money orders regularly because you don't have access to digital payments, there are faster and cheaper options:

Digital wallets like PayPal, Cash App, and Venmo let you send money from your phone. No bank account required for basic features. For international payments, Grey lets you open an account to receive money in USD, GBP, or EUR and use a virtual debit card for spending. No US address, no bank relationship, no queueing at the post office.

If you're sending money to someone abroad, a money order is one of the slowest and most expensive options. International money orders through USPS cost $10.25 each (as of mid-2026) and take days to arrive. Compare that with digital transfer services that deliver in minutes for a fraction of the cost. For the full comparison, see ACH vs wire transfer for bank payments.

Money orders still make sense for specific situations: paying rent to a landlord who only accepts them, making payments to government agencies, or sending money to someone without internet access. For everything else, there's a cheaper and faster option. See Grey for freelancers or send money from the US for digital alternatives.

Frequently asked questions about how to fill out a money order

Do you sign the back of a money order?

Only if you're the recipient cashing or depositing it. The back is for the recipient's endorsement signature. If you're the purchaser (the person sending the money order), you sign the front in the "Purchaser's Signature" field. Signing the back as the purchaser can cause the money order to be rejected when the recipient tries to cash it.

What happens if I make a mistake on a money order?

You can't correct it. Money orders can't be altered after they're filled in. Cross-outs, white-out, and overwriting will cause the money order to be rejected. If you make a mistake, you'll need to request a refund from the issuer (USPS, Western Union, or MoneyGram), which involves a processing fee and a waiting period, and then buy a new one.

Can I fill out a money order in pencil?

Technically, yes, but many banks and cashing locations will reject it. A pencil can be erased and altered, which makes it a fraud risk. Always use a black or blue ballpoint pen.

How do I cancel a money order?

Contact the issuer with the serial number from your receipt. For USPS money orders, fill out PS Form 6401 (available at any post office) and pay a $6.45 processing fee. The refund can take 30 to 60 days. Western Union and MoneyGram have their own cancellation processes. If the money order has already been cashed, it can't be cancelled.

What do I put in the memo line of a money order?

A brief reference that helps the recipient identify the payment: an invoice number, account number, rental unit number, or a description like "March rent" or "Tuition payment." This field isn't always required, but leaving it blank can delay processing if the recipient handles many incoming payments.

How long is a money order valid?

USPS money orders don't expire and can be cashed at any time. However, some states impose abandoned property rules that may affect uncashed money orders after a certain period (often 1 to 5 years). Western Union and MoneyGram money orders may have expiration dates or begin charging inactivity fees after 1 to 3 years. Check the fine print on the money order itself or contact the issuer.

Open a Grey account and send or receive money internationally without queueing for a money order. Faster, cheaper, fully digital.

Disclaimer: This article is for informational purposes only. Money order procedures, fees, and acceptance policies vary by issuer and location. Verify current requirements with the specific issuer (USPS, Western Union, MoneyGram) before purchasing or cashing a money order. Grey is not a bank. Grey is a licensed financial services provider offering multi-currency accounts.

What is a routing number and where do you find it?

2 min read

Did you know that 92% of Americans get their pay through direct deposit? Every one of those paychecks relies on a routing number, a simple nine-digit code that quietly does the work of making sure your money ends up in the right place.

A routing number is a nine-digit code that helps identify your bank during financial transactions. You'll usually see it printed at the bottom left of your cheque, right before your account number. These numbers are used for all sorts of things: direct deposits, ACH transfers, and domestic wires. But here's the catch: your bank might use different routing numbers for different types of transfers, such as ACH versus wire transfers.

If you've ever been asked for your routing number and had no idea where to look, don't worry, you're not alone. In this article, we'll explain exactly what a routing number is, how to find yours in less than a minute, and why some banks have more than one.

What is a routing number?

A routing number, sometimes called an ABA routing transit number, is a unique nine-digit code given to every US bank and credit union by the American Bankers Association (ABA). It's basically your bank's address in the world of finance, telling other banks where to send your money.

The first four numbers show which Federal Reserve district and processing centre your bank belongs to. The next four digits point to your specific bank within that district. The last digit is a sort of checksum: it helps make sure the number is valid.

Here's something that surprises a lot of people: your bank might have more than one routing number. That's because banks often use different numbers for different types of transactions, depending on which Federal Reserve network processes them:

  1. ACH routing number: Used for direct deposits, bill payments, and electronic transfers. Processed through FedACH in batches.
  2. Wire routing number: Used for domestic wire transfers. Processed through Fedwire individually in real time.
  3. Cheque routing number: Printed on the bottom of paper cheques. Processed through the Federal Reserve's cheque clearing system.

Some banks keep it simple and use the same routing number for all transactions. Others, like Wells Fargo, have different numbers by state for ACH transactions, while the wire number stays the same across the country. So, always double-check which one you need before you send or receive money.

Where to find your routing number

Here are the three quickest ways to find your routing number, ranked from fastest to slowest:

1. Your bank's mobile app: Just open your banking app, tap on your account, and look for something like "Account Details" or "Routing Number." This is usually the fastest way. Most people can find it in under 20 seconds.

2. On a cheque: If you have a cheque handy, glance at the bottom left corner. The routing number is the first set of nine digits, tucked between two funny-looking symbols (they're called MICR symbols). The next set is your account number, and the smallest set is the cheque number.

3. Your bank's website: Log in to your online banking, head to your account summary, and look for "Routing Number" in your account details. If you're stuck, just type "routing number" into the site's search or help section.

If those options don't work (maybe you don't have a cheque, the app, or online banking), you can always call your bank's customer service (the number is on the back of your debit card). They'll just need to verify who you are before giving you your routing number.

One tip: double-check whether your bank uses different routing numbers for cheques and electronic transfers. The number on your cheque might not be the right one for direct deposit or ACH payments. When in doubt, use the number from your app or online banking.

Routing number vs account number: What is the difference?

You'll usually need both your routing and account numbers for most transactions, but they do different jobs. The routing number identifies your bank, while your account number identifies your specific account at that bank. Here's a quick breakdown:

Routing Number Account Number
9 digits, always 8 to 17 digits (varies by bank)
Identifies your bank Identifies your specific account
Bottom left of the cheque Next to the routing number on the cheque
Same for all customers at the same bank (in the same state) Unique to you
Shared with employers, billers, and transfer recipients Shared with the same parties, but more sensitive
Public (can be looked up online) Private (only you and your bank know it)

The main thing to remember: your routing number is public; anyone can look it up. But your account number is private. Don't share it with just anyone, since someone with both could try to pull money from your account. You need both numbers for ACH and wire transfers, so keep them together.

When do you need a routing number?

You'll need to share your routing number in the following situations:

  1. Setting up direct deposit. Your employer will ask for your routing and account numbers so they can deposit your paycheck directly into your account. Use your ACH routing number (not the wire one) for this.
  2. Sending or receiving a domestic wire transfer. The person sending you money will need your wire routing number (which may differ from your ACH number) and your account number.
  3. Setting up automatic bill payments. When you sign up for recurring payments, like utilities or subscriptions, they'll use your routing and account numbers to take money out via ACH.
  4. Moving money between banks. If you're transferring funds between your accounts at different banks, you'll need the routing numbers for both.

For international wire transfers, you won't use a routing number at all. Instead, the sender will need your bank's SWIFT or BIC code. Want to know more about the difference? Check out our guides on SWIFT codes vs routing numbers andACH vs wire transfers.

Routing numbers for Major US banks

The table below lists primary ACH routing numbers for major US banks, while highlighting where routing numbers may vary by state or account.

Bank ACH primary routing number
Chase 021000021
Citibank 021000089
Bank of America 026009593
US Bank 091000022
Wells fargo Varies by state (e.g., 121000248 for CA).

Routing numbers identify the bank involved in a payment, but the correct number can vary by state and transaction type, so confirm it before sending money.

Frequently asked questions

Is a routing number the same as a sort code?

They're basically the same thing, but for different countries. Routing numbers are for the US (9 digits); sort codes are for the UK (6 digits). Both help identify a bank and a branch when you're making domestic payments. If you're sending money between a US and UK account, you'll use a routing number on the US side and a sort code.

Can two banks have the same routing number?

Nope, each routing number is unique to one bank (or sometimes a specific branch or region). The American Bankers Association assigns them, so no two operating banks will have the same one. If banks merge, the old routing numbers are either phased out or reassigned.

What happens if I give the wrong routing number?

If you give the wrong routing number, your payment might bounce back or go to the wrong bank. If it bounces, you just have to fix the number and try again. If it lands in the wrong bank, your bank will need to work with the other one to get your money back, which can take a while, so it's best to double-check before hitting send.

Where is the routing number on a Bank of America cheque?

Look at the bottom left corner of your Bank of America cheque. The first nine digits are your routing number, then comes your account number, and finally the cheque number. Just remember, Bank of America uses different routing numbers for each state, so the one on your cheque depends on where you opened your account.

Can I find my routing number without a cheque?

Yes! Check your bank's mobile app under Account Details, log in to your bank's website, give customer service a call, or search online for your bank's name plus "routing number." Most banks make these numbers easy to find on their help pages.

Do I need a routing number for Zelle or Venmo?

Not usually. Zelle and Venmo use your email or phone number to send and receive money. But when you first link your bank account, you might need to provide your routing and account numbers to set things up. After that, you just use your email or phone number for transfers.

Not a US bank customer? You can open a Grey account and get your own USD routing and account details, so you can receive payments from US clients or employers, even if you don't have a US address.

Disclaimer: This article is for informational purposes only. Routing numbers, account details, and bank procedures can change over time. Always double-check with your bank before using any number for a financial transaction. Grey isn't a bank. We're a licensed financial services provider offering multi-currency accounts.

How to receive payments on Etsy as a seller in Tanzania

2 min read

Tanzania is known for the unparalleled creativity among its people. This is evident as more Tanzanian sellers are tapping into Etsy’s global marketplace.

Etsy is a platform for creative entrepreneurs, to sell unique, handcrafted items, vintage goods, and craft supplies. The next hurdle becomes receiving payments from international buyers as Tanzania isn't directly supported for payouts.

In this guide, we’ll show you how to streamline the payment process on Etsy with Grey, so you can focus on what you love most: creating.

Why Tanzanian sellers should use Etsy

Etsy is a favourite among buyers and sellers for several reasons:

  • Global reach: You can reach millions of buyers worldwide who value handmade and vintage products.
  • Diverse product categories: Etsy caters to nearly every creative niche.
  • Supportive community: Etsy fosters a network of sellers and buyers who appreciate craftsmanship and creativity.

Also read: How to receive payments on Etsy as a seller in Ghana

How to receive payments on Etsy using Grey in Tanzania

Grey provides an easy solution for receiving international payments as a Tanzanian Etsy seller. Follow these steps to get started:

1. Open your Grey app

Log in to your Grey account or create one to access international bank accounts in USD, GBP, or EUR.

2. Link your Grey account to Etsy

How to receive payments on Etsy as a seller in Tanzania
  • Select your bank’s country.
How to receive payments on Etsy as a seller in Tanzania
  • Choose whether you’re registering as an individual or a business.
How to receive payments on Etsy as a seller in Tanzania
  • Enter your personal information, i.e. name and address.
How to receive payments on Etsy as a seller in Tanzania
  • Add your Grey US, EU, or UK bank account details, depending on your preference.
How to receive payments on Etsy as a seller in Tanzania
  • Etsy will process payments to your Grey account, making it easy to manage your earnings.

With your Grey account linked, you can receive Etsy payouts directly into your international bank account.It is important to note that you will have to provide a valid ID and depending on the location you pick, may have to fill in a valid address and social security number for your account to be verified.

Also read: How to receive payments on Etsy as a seller in Nigeria

Why Grey is the best payment solution for Etsy sellers in Canada

Grey simplifies the payment process for Tanzanian Etsy sellers. Here’s why it’s the best choice:

  • Access to multiple currencies: Receive payments in USD, GBP, or EUR depending on your buyers’ preferences.
  • Competitive exchange rates: Maximise your earnings when converting to Tanzanian shilling (TZS).
  • Secure transactions: Grey’s robust security features ensure your funds are protected.
  • Hassle-free withdrawals: Transfer your earnings to your local bank account with ease.

Also read: How to withdraw to your local bank account on Grey

Tips for succeeding as a Tanzanian seller on Etsy

  • Optimise your listings: Use high-quality photos and detailed descriptions to make your products stand out.
  • Offer international shipping: Expand your customer base by providing global shipping options.
  • Respond quickly: Engage with buyers by answering queries promptly and addressing concerns professionally.
  • Leverage social media: Promote your products on apps like Instagram and Pinterest to drive traffic to your Etsy shop.

Also read: How to receive payments on Etsy as a seller in South Africa

Simplify Etsy payments with Grey

With Grey, you can stop worrying about receiving Etsy payouts or converting your earnings from Etsy. Manage your finances seamlessly and focus on growing your creative business.

Sign up for a Grey account today and unlock a world of possibilities for your Etsy shop in Tanzania.

How to receive Amazon payments in the Philippines

2 min read

Want to receive Amazon payments in the Philippines? With the right tools in place, it’s simpler than you might imagine. A few smart adjustments can help you maximise your earnings, enjoy competitive exchange rates, and easily manage cross-border transactions. Ready to get started? Let’s explore how!

Grey helps professionals, freelancers, and digital nomads in emerging markets easily receive Amazon payments.

Understanding Amazon seller payments

Amazon follows a structured process when paying its sellers. It’s essential to understand how this works to make the most of your earnings:

  • Earnings calculation: Amazon deducts fees, refunds, and other charges from your sales revenue to determine your net income.
  • Payment schedule: Disbursements typically occur every 14 days, though this may vary based on your account status and marketplace policies.
  • Currency specifics: Amazon transfers funds in the marketplace currency where you sell. If your account uses a different currency, you may incur conversion fees.
  • Bank account requirements: Sellers must provide valid bank account details to receive payouts. Grey helps you get US, UK, and Euro bank accounts to simplify the process of receiving your cash internationally.

Also read: How to receive Amazon payments with Grey

A step-by-step guide to receiving Amazon payments in the Philippines

Follow these steps to get started with Grey and receive payments directly into your account:

  1. Sign up for a Grey account: Visit the Grey website or download the app to open a free account.
  2. Select your preferred currency account: Grey provides multi-currency virtual accounts, including USD, GBP, and EUR, suitable for Amazon marketplace payouts.
  3. Integrate with Amazon Seller Central: Add your Grey account details to Amazon Seller Central to receive payments directly into your virtual account.
  4. Access your funds: Once payments are disbursed, they will be available in your Grey account for use or withdrawal.

Why Grey is ideal for Amazon payments in the Philippines

Grey’s platform is designed to support global sellers, offering benefits tailored to the needs of users in the Philippines:

  • Multi-currency support: Hold and manage funds in currencies such as USD, GBP, and EUR without conversion hassles.
  • Transparent exchange rates: Convert currencies at competitive rates with no hidden fees, maximising your earnings.
  • Quick transfers: Experience faster payment processing than traditional banks, giving you quicker access to your funds.
  • User-friendly app: Manage your finances effortlessly with Grey’s intuitive mobile app.

How to receive Amazon payments in the Philippines with Grey

Connecting your Grey account to Amazon Seller Central is easy. Follow these steps:

  1. Log in to Seller Central: Go to Settings > Account Info > Payment Info > Bank Account Info.
  2. Add your Grey UK, US or Euro bank account details: Select “Add new deposit method” and input your Grey virtual account information.
  3. Verify your account: Upload the required documents (eg:  a bank statement), to confirm your details.
  4. Complete the setup: After verification, your Grey account will be ready to receive Amazon payouts.

Manage Amazon payments in multiple currencies

Grey allows you to streamline international payments and minimise conversion fees. Here’s how:

  • Avoid unnecessary conversion: Retain your funds in the currency of the Amazon marketplace to reduce exchange losses.
  • Flexible currency management: Convert funds only when needed, using Grey’s competitive in-app exchange rates.

Effortless withdrawals and account management

Once your Amazon earnings are deposited, you can manage them efficiently:

  • Withdraw your earnings: Transfer funds to a local bank account or mobile wallet quickly and easily.
  • Monitor transactions: Keep track of payments and access your transaction history through the Grey app.

You may also like: How to receive Amazon payments in Mexico

Why Grey is the top choice for sellers in the Philippines

  1. Maximise earnings: Benefit from low fees and transparent conversion rates.
  2. Global reach: Accept payments from multiple Amazon marketplaces and international clients.
  3. Direct payouts: Receive funds directly into your Grey virtual account without third-party intermediaries.
  4. Convenience on the go: Use the Grey app to manage your funds anytime, anywhere.

Take control of your Amazon payments

Receiving Amazon payments doesn’t need to be complicated. Grey offers a seamless solution to streamline your financial management. Whether you’re a new seller or a seasoned professional, Grey helps you handle your Amazon earnings efficiently and cost-effectively.

Sign up with Grey today to simplify your payment process and enjoy greater control over your finances.

How to receive Amazon payments in Egypt

2 min read

Many Egyptians working with Amazon often discover that receiving payments is more layered than it appears at first glance. It is a bit like finishing a long journey and expecting a straight road home, only to realise there are multiple checkpoints before you actually arrive. After completing a month of sales on Amazon US or Amazon UK, earnings show up in the seller dashboard in US dollars or British pounds, indicating funds that are ready for withdrawal. On the surface, the process seems straightforward, but the real consideration begins when transferring those funds into Egypt.

For many sellers, the first withdrawal highlights the gap between earning and actually receiving money locally. A payout is initiated with the expectation that it will arrive directly in an Egyptian bank account in EGP, but the process may involve intermediary banks, conversion steps, and variations in the final amount received. These factors can affect both timing and total value.

This is why understanding how Amazon payments move through the system is important. From currency conversion methods to approved receiving accounts and withdrawal pathways, each step influences how efficiently earnings are accessed and how much value is retained once funds reach Egypt.

Also read: How freelancers in Egypt can receive payments from US, UK & EU clients

Understanding Amazon seller payment options and eligibility

When selling on Amazon from Egypt, understanding payment options and eligibility is essential for smooth operations. Once your seller account is set up, Amazon typically pays proceeds directly into a local Egyptian bank account through automated bank transfers. These payments follow a predictable cycle, but funds are usually held for around 14 days. This holding period allows Amazon to manage potential refunds and buyer protection claims under its A-to-Z Guarantee policy.

For sellers who may accumulate fees higher than their sales, Amazon provides accepted methods for clearing balances, including credit or debit card payments and international wire transfers, as outlined in Seller Central guidelines.

Before any of this becomes possible, eligibility must be confirmed. Individual sellers are required to provide a valid National Egyptian ID, while business sellers must present a recognised Commercial Registration. Together, these requirements ensure compliance, security, and trust within the Amazon marketplace, allowing sellers in Egypt to operate within a verified financial and legal framework.

Common delays and payment rejection issues with Amazon payments in Egypt

Payment delays and rejections in Egypt often arise within the normal processing cycle of cross-border transactions, where financial systems apply checks to ensure security, accuracy, and compliance.

Mandatory security hold

Whenever bank account details are updated on Amazon Seller Central, a mandatory three-day security hold is automatically applied. This pause is a protective measure designed to prevent fraudulent withdrawals and ensure that the account changes are legitimate. During this period, sellers will not receive disbursements, even if payments are due, which can temporarily affect cash flow planning.

Account reserves

Amazon often places a portion of funds in reserve to cover potential returns, chargebacks, or customer claims. This is a standard risk management practice across marketplaces. While it may feel like a delay in payment, it ensures that sufficient funds are available if disputes arise after a sale has been completed.

Unconfirmed shipments

Payments may also be delayed when orders are not properly marked as shipped or when tracking information is missing. Amazon requires accurate shipment confirmation before releasing funds, as this verifies that the customer has received or is in the process of receiving the product. Without this step, payouts remain on hold.

Incorrect card details

Errors in entering card information, such as the card number, CVV, expiry date, or cardholder name, can lead to failed payment attempts. Even small mistakes can trigger rejection, so details must be entered exactly as they appear on the bank card to avoid disruptions.

Bank security blocks

Egyptian banks may automatically block international or online transactions if they appear unusual or are not pre-approved for cross-border use. This often happens when a card is not activated for online payments or when spending patterns deviate from normal behaviour, resulting in rejected Amazon transactions.

Billing address mismatch

A mismatch between the billing address provided on Amazon and the one registered with the bank can also cause payment issues. Even minor differences, such as postcode or formatting errors, may trigger a rejection. Ensuring that all details match bank records helps prevent unnecessary delays in processing payments.

Also read: How Egyptian remote workers receive foreign income reliably

How  to set up Amazon payment in Egypt

Setting up Amazon payments in Egypt involves a guided process within Seller Central, where each step ensures your account is properly linked and ready.

Open Seller Central

Begin by logging into your Amazon Seller Central account, which serves as the control centre for all selling activities. This is where payments, orders, and account settings are managed, making it the starting point for setting up how and where your funds will be received.

Navigate to settings

Once inside, move to the Settings section and select Account Info. This area contains the financial and operational details tied to your seller profile, and it is where you begin the process of linking your bank account for receiving payments.

Add a deposit method

Under Payment Information, locate the option labelled Bank Account Information. This is where you initiate the process of adding a deposit method, so Amazon knows exactly where to transfer your earnings once they are ready for disbursement.

Enter account details

Select Egypt as your bank location and carefully input your bank account details. Accuracy is important here, as even small errors can lead to delays or failed transfers, so ensure all information matches your official banking records.

Currency converter

If your bank account operates in a currency other than the Amazon marketplace currency, you will need to accept the Amazon Currency Converter terms. This allows funds to be converted seamlessly before reaching your account, simplifying cross-border transactions.

Verification

After adding your bank details, Amazon applies a short verification period. A three-day security hold is placed on payments to confirm the changes, ensuring that your account remains protected while the new information is securely processed.

Also read: Managing USD income as a remote worker in Egypt

Best platforms to receive Amazon payments in Egypt

Choosing the best platform to receive Amazon payments in Egypt often depends on how you sell, where your customers are, and how you prefer to access funds.

Payoneer

For many Egyptian sellers working with international Amazon marketplaces, Payoneer often feels like the default starting point. You sign up, get access to a virtual USD account, and suddenly receiving payments from Amazon US or UK becomes straightforward. The real experience, however, begins when you try to move that money locally. Transfers to Egyptian bank accounts are reliable, but the fees can quietly add up, especially when converting to EGP. It works well for scale and global reach, but requires close attention to cost efficiency over time.

  • 1% receiving fee from Amazon
  • 3% – 4.5% withdrawal fee
  • 5.7% – 8.5% total cost when converting to EGP

Grey

Grey offers a more modern, streamlined experience, especially for sellers who want clarity and lower fees. Once connected to Amazon Seller Central, it feels less like a workaround and more like a clean financial pipeline. You receive funds in foreign currency, then withdraw directly to your Egyptian bank account or even a mobile wallet. The interface is simple, and the transparency around fees makes planning easier. For many, it is a quieter, more efficient alternative to traditional platforms, particularly when margins matter.

  • 1.4% total fees

Amazon Payment Services (APS)

If your focus is local, especially selling on Amazon, the Payment Services feel built for that environment. It supports local payment methods like Meeza cards and digital wallets, making it easier for Egyptian customers to complete purchases. There’s also the added advantage of instalment options through ValU, which can drive higher conversion rates. However, the structure is more formal, with setup and monthly costs that make it better suited to established businesses than to individuals just starting out.

  • Setup fee: approx. 1,200 EGP
  • Monthly fee: approx. 650 EGP
  • Transaction fee: 2.75% + 2.5 EGP per transaction

PayMob & Fawry

For sellers building within Egypt’s local e-commerce space, PayMob and Fawry offer familiarity and reach. These platforms are widely used, making them easy to integrate into existing customer habits. The experience is less about receiving international Amazon payouts and more about enabling smooth local transactions and disbursements. They are particularly useful if your Amazon presence connects with a broader local sales strategy, where convenience and accessibility for Egyptian customers matter most.

Comparing options for receiving Amazon payments in Egypt

__wf_reserved_inherit

What to look out for when choosing an Amazon payment platform in Egypt

Choosing the right Amazon payment platform in Egypt requires careful evaluation of how funds move, how quickly they arrive, and how efficiently they integrate into your operations.

  • Currency support: The currency you receive depends on where you sell. However, selling on international marketplaces like Amazon US or UK introduces foreign currencies, requiring a system that can receive, hold, and convert USD, EUR, or GBP efficiently.
  • Transaction fees: Fees can quietly shape your overall profit, especially when dealing with cross-border payments. Third-party platforms like Payoneer or similar providers often charge layered fees, including receiving, conversion, and withdrawal costs. Comparing these against your local bank’s charges helps you avoid unnecessary erosion of earnings over time.
  • Withdrawal time: Once Amazon releases your funds, the next concern is how quickly they reach your local account. Some providers process withdrawals within a few business days, while others take longer due to intermediary banks. Faster withdrawal times can significantly improve cash flow and operational flexibility.
  • Ease of linking: A smooth setup process matters more than it seems. Providers that integrate easily with the Deposit Methods section in Amazon Seller Central reduce friction, minimise setup errors, and make it easier to manage your account without repeated verification issues or technical delays.
  • Support and stability: When payments are delayed or fail, responsive customer support becomes critical. Choosing a provider known for reliability and quick issue resolution ensures that problems are addressed promptly, reducing downtime and helping you maintain consistent access to your funds.

Frequently Asked Questions

1. Why does Amazon hold my payments for 14 days?

Amazon applies a standard holding period to manage risk across its marketplace. This window allows time to process returns, refunds, or disputes before releasing funds. It protects both buyers and the platform, but requires sellers to plan cash flow carefully.

2. Can I receive Amazon payments in USD while living in Egypt?

Yes, but only through supported third-party providers or foreign currency accounts. Amazon itself does not pay Egyptian sellers in USD locally, so you’ll need a service that can receive international payouts and convert or transfer them into EGP

3. Is it better to receive in USD first or convert directly to EGP?

Receiving in USD gives more control over timing and exchange rates, especially in volatile markets. However, it introduces extra steps and fees. Direct EGP settlement is simpler, but it may lock you into lower conversion rates.

4. Why do some sellers receive less than expected even after accounting for fees?

Beyond visible fees, hidden FX markups and intermediary bank charges often reduce final payouts. Some providers apply unfavourable exchange rates rather than explicit fees, making it harder to track real costs unless you compare mid-market rates consistently.

Managing Amazon payments with Grey

Managing Amazon payments in Egypt is now far simpler with modern digital payment platforms designed for global sellers. Grey provides Amazon sellers with virtual GBP, USD, and EUR accounts that come with real banking details, allowing Amazon marketplaces like the UK or US to send payouts as if they were local transfers. This removes the friction of traditional cross-border banking and makes receiving funds more predictable and structured.

With a Grey, you can manage multiple currencies, convert at competitive exchange rates, and withdraw directly to your Egyptian bank account in a few steps. Grey also offers flexibility for handling international subscriptions and purchases, making it easier to stay operational across markets.  Sign up on Grey and download the app to receive your Amazon payment easily.

Grey charges fees on deposits, conversions, and withdrawals. Deposits via ACH, SEPA, or FPS incur a 0.8% fee (minimum $2/€2/£2, maximum $10/€10/£10). Currency conversions are charged at 1%, capped at $6. Withdrawal fees vary by currency: ₦35 for NGN, 0.5% for EUR/GBP (minimum €2/£2, maximum €10/£10), and $0.50 to $0.65 for KES/UGX/TZS. Cross-border card transactions (non-USD purchases on a USD card) incur a 2% fee plus $0.50. Exchange rates are variable and include a margin over the mid-market rate. Always review fees and the rate before confirming a transaction. Visit our pricing page for current rates.

Arrow (up)

Back to top