<script type="application/ld+json" data-schema-version="grey-blog-v4"> [{"@context":"https://schema.org","@type":"BlogPosting","@id":"https://grey.co/blog/india-visa-requirements-for-us-citizens#article","headline":"India visa requirements for US citizens","description":"A complete guide to India visa requirements for US citizens: types, fees, application steps, and documents you need to enter India without issues.","inLanguage":"en","url":"https://grey.co/blog/india-visa-requirements-for-us-citizens","mainEntityOfPage":{"@id":"https://grey.co/blog/india-visa-requirements-for-us-citizens#webpage"},"datePublished":"2025-03-16T07:44:41.433Z","dateModified":"2026-05-29T23:39:13.601Z","author":{"@type":"Person","@id":"https://grey.co/authors/adeolu-titus-adekunle#person","name":"Adeolu Titus Adekunle","url":"https://grey.co/authors/adeolu-titus-adekunle","jobTitle":"Content Writer","sameAs":["https://www.linkedin.com/in/titusadeoluadekunle/"]},"publisher":{"@type":"Organization","@id":"https://grey.co/#organization","name":"Grey","url":"https://grey.co","logo":{"@type":"ImageObject","url":"https://cdn.prod.website-files.com/6360022338a81bd6fdbb1145/6564ae1077a67e39d3c491a6_Grey%20Logo%20Lockup%20Black.svg"}},"image":{"@type":"ImageObject","@id":"https://grey.co/blog/india-visa-requirements-for-us-citizens#primaryimage","url":"https://cdn.prod.website-files.com/636a85d290ee58e70c17e1c0/67d68152889244dc841e674c_India%20visa%20requirements%20for%20US%20citizens.webp","contentUrl":"https://cdn.prod.website-files.com/636a85d290ee58e70c17e1c0/67d68152889244dc841e674c_India%20visa%20requirements%20for%20US%20citizens.webp","width":1200,"height":675}},{"@context":"https://schema.org","@type":"WebPage","@id":"https://grey.co/blog/india-visa-requirements-for-us-citizens#webpage","url":"https://grey.co/blog/india-visa-requirements-for-us-citizens","name":"India visa requirements for US citizens","description":"A complete guide to India visa requirements for US citizens: types, fees, application steps, and documents you need to enter India without issues.","inLanguage":"en","primaryImageOfPage":{"@id":"https://grey.co/blog/india-visa-requirements-for-us-citizens#primaryimage"},"breadcrumb":{"@id":"https://grey.co/blog/india-visa-requirements-for-us-citizens#breadcrumb"}},{"@context":"https://schema.org","@type":"BreadcrumbList","@id":"https://grey.co/blog/india-visa-requirements-for-us-citizens#breadcrumb","itemListElement":[{"@type":"ListItem","position":1,"name":"Home","item":"https://grey.co/"},{"@type":"ListItem","position":2,"name":"Blog","item":"https://grey.co/blog"},{"@type":"ListItem","position":3,"name":"India visa requirements for US citizens","item":"https://grey.co/blog/india-visa-requirements-for-us-citizens"}]}] </script>

India visa requirements for US citizens

Adeolu Titus Adekunle

TABLE OF CONTENT

SHARE THIS POST

India is a growing destination for business, education and tourism. US citizens account for up to a quarter of visitors to India. The growing technological infrastructure, vast population, affordable cost of living and tourist attractions have made India a dream destination. If you are considering visiting India soon, this article is for you.

Find out all you need to know about India visa requirements for US citizens. Also, it is essential to plan your finances ahead. So, we will show you how to have a hitch-free experience while travelling to India.

Read also: How to open US, UK and Euro bank accounts in India

Do US citizens need a visa for India?

Yes, US citizens require a visa to enter India. India offers an electronic visa (e-Visa) system for short-term stays. For long-term visits, such as work or study, travellers must apply for an appropriate visa through the Indian consulate or embassy.

Entry requirements for US citizens

For tourist visits shorter than 60 days, you can apply for an e-visa. However, if you plan to stay longer or your purpose is other than tourism, you'll need to apply for a visa from an Indian embassy or consulate.

There are different visa categories, each with its own requirements. Your purpose for visiting India will determine the visa type you apply for. Travelling with one or more minors requires adhering to certain guidelines to ensure a smooth entry.

Student visa

Apply for a student visa If you are visiting India to pursue academic studies, research, or specialized courses in India.

  • Duration: It is typically issued for the duration of the academic course or up to five years, whichever is less.
  • Eligibility: Enrollment in a recognized educational institution in India.
  • Application requirements:
    1. Admission proof: A formal admission letter from an Indian educational institution.
    2. Financial evidence: Documentation demonstrating sufficient funds to cover tuition fees and living expenses.
    3. Academic records: Certified copies of previous educational qualifications.
    4. Passport: A valid US passport with at least six months’ validity.
    5. Photographs: Recent passport-sized photographs as per specifications.
  • Application process
    • Complete the online visa application form on the Indian government’s visa portal.
    • Schedule an appointment at the nearest Indian consulate or embassy.
    • Submit the required documents and pay the applicable visa fee.
    • Attend a visa interview if requested.

Employment visa

The employment visa caters to foreign nationals seeking employment in India.

  • Duration: Up to one year or the term of the contract, whichever is less; renewable in India.
  • Eligibility:
    1. Employment with an Indian company or organization.
    2. The position should require specialized skills or qualifications.
    3. A minimum annual salary threshold may apply, subject to periodic revisions.
  • Application requirements
    • Employment contract: A signed contract detailing the terms of employment.
    • Company registration: Proof of the employer’s registration with Indian authorities.
    • Professional qualifications: Certificates or degrees relevant to the job position.
    • Passport: A valid US passport with at least six months’ validity remaining.
    • Photographs: Recent passport-sized photographs as per specifications.

Read also: Grey vs. local banks: The best way to exchange currency in India

  • Application process

You can complete the application in these quick steps

  1. Fill out the online visa application form on the Indian government’s visa portal.
  2. Schedule an appointment at the nearest Indian consulate or embassy.
  3. Submit the required documents and pay the applicable visa fee.
  4. Attend a visa interview if requested.

Travelling with minors

Here are some additional considerations when travelling to India with minors.

  • Individual visas: Each minor must have a separate visa. They cannot be included in a parent’s or guardian’s visa.
  • Passport: Minors require a valid passport.
  • Parental consent: If a minor is travelling with only one parent or a guardian, a notarized consent letter from the non-accompanying parent(s) may be required, authorizing the trip.
  • Birth certificate: A copy of the minor’s birth certificate may be necessary to establish the relationship between the child and accompanying adult(s).
  • Photographs: Recent passport-sized photographs of the minor may be required.

Please, note that visa regulations and procedures can change. It’s advisable to consult the nearest Indian consulate or embassy for the most current and specific requirements. Ensure all necessary documentation is prepared in advance. This will facilitate a smoother application process and entry into India.

Managing finances while in India

By preparing visa requirements in advance and managing finances wisely, US travellers can enjoy a seamless experience in India. Always refer to the nearest Indian embassy or consulate for official information.

Proper financial planning is essential for a stress-free stay in India. Digital payment solutions like Grey simplify transactions. With multi-currency accounts,  users can exchange USD for Indian Rupees (INR) at competitive rates, receive payments, and manage expenses efficiently.

Grey also provides virtual USD debit cards for secure payments, reducing foreign transaction fees and eliminating unnecessary delays.

Sign up for a Grey account today or download the app to get started.

‍

Last updated:

October 13, 2026

Open a free Grey account to get startedJoin 1 million digital nomads
IF YOU ENJOYED THIS, CHECK THESE OUT

Send Canadian dollars with Grey

•

•

2 min read

Everything we do at Grey is aimed at making it easier for you to make global payments.

We’re excited to announce that Grey now supports Canadian dollars (CAD) payments, which means you can send money to Canada directly from your Grey account via Interac e-Transfer.

You can pay freelancers, send money to family, or make cross-border payments to Canadian businesses right from your phone.

What exactly does this mean for you?

Send money to Canada easily‍

Because we’ve integrated with Interac e-Transfer, you can send money directly to any Canadian bank account. You’ll only pay a flat $3 fee, regardless of how much you’re sending.

Expand your global operations with less friction

‍CAD joins our growing list of supported currencies, giving you more flexibility when operating across borders.

No additional setup required

‍It’s the same Grey account you already have. Sending CAD works exactly like sending any other currency through Grey. There’s no confusion about exchange rates and no need for the recipients to sign up for anything.

How does sending CAD work with Grey?

We’ve kept things simple. Here’s how to send Canadian Dollars using Grey:

  1. Log in to your Grey account.
    ‍
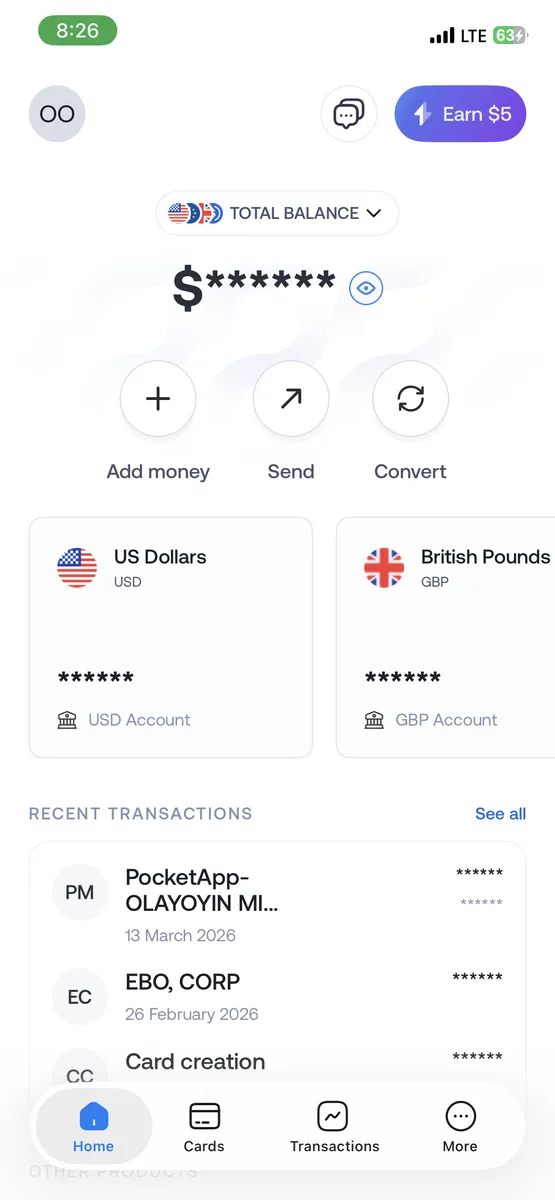
  2. Click “Send”.
Send Canadian dollars with Grey

‍

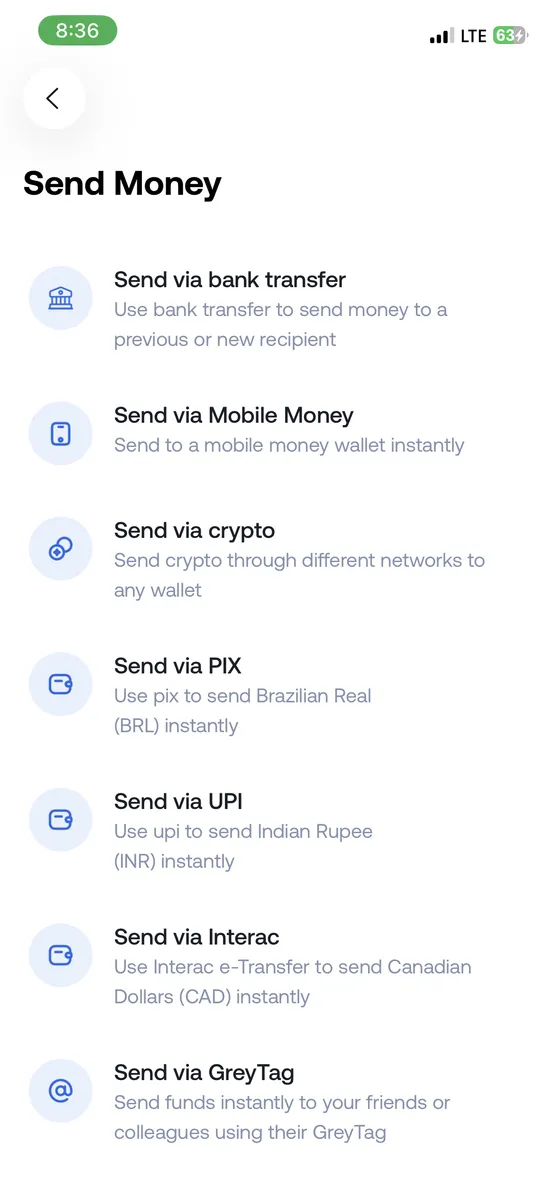
2. On the “Send Money” tab, select “Send via Interac”.

Send Canadian dollars with Grey

‍

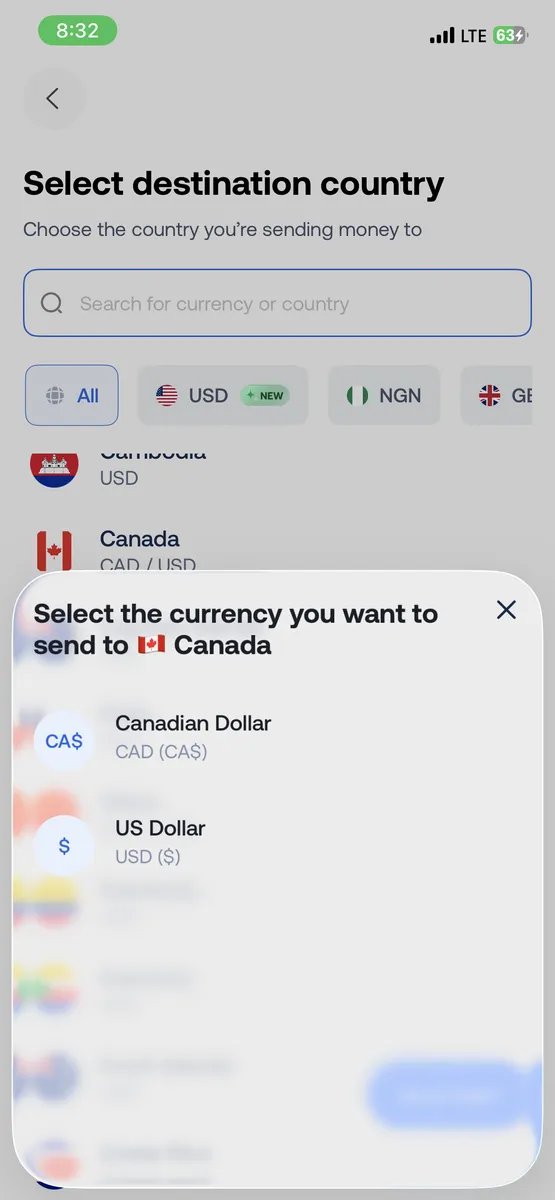
3. Select Canada as the destination and choose CAD as the currency.

Send Canadian dollars with Grey

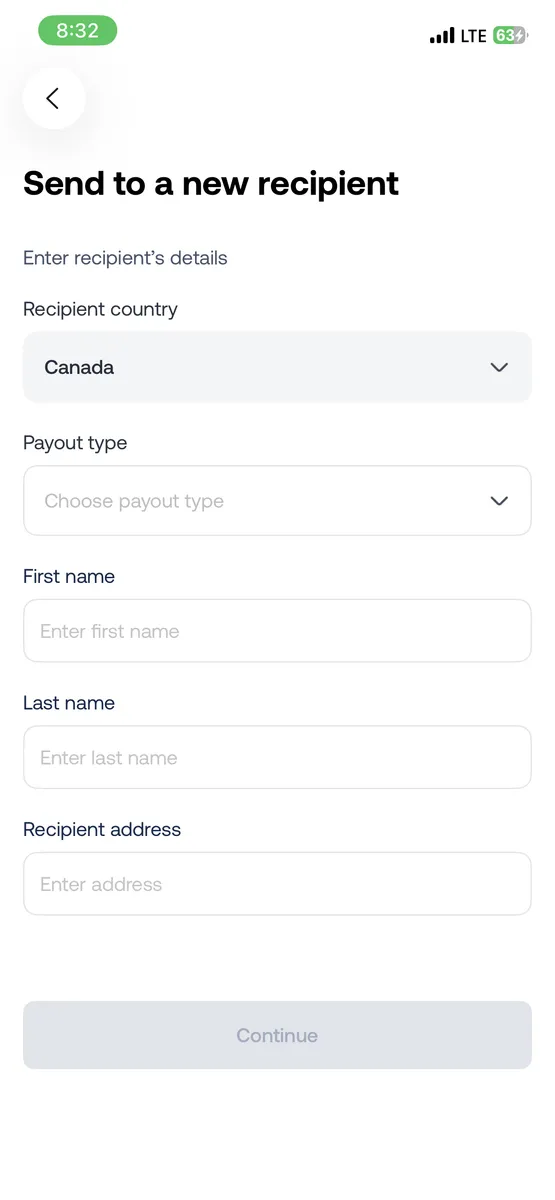
4. Enter the recipient’s details and confirm the transfer.

Send Canadian dollars with Grey

Enjoy global payments with Grey

At Grey, our mission is to make globalisation work for everyone. Supporting payments in Canadian Dollars takes us closer towards achieving that goal.

We want more freelancers, businesses, and remote workers to operate internationally without friction.

More currencies, more countries, and more ways to manage money across borders, that’s where we’re headed.

Open a free Grey account today, or download the app to get started.

‍

Top activities for tourists in Zanzibar in 2024

•

•

2 min read

Zanzibar is a group of islands, i.e., an archipelago, located off the coast of Tanzania in East Africa. It's a melting pot of languages, cuisines, and cultures and home to some of the most beautiful beaches in the world, making it a popular tourist spot. Beyond its beaches, it’s also a top destination for history enthusiasts, nature lovers, and adventure seekers.

In this post, we’ll curate a list of activities to ensure your trip to Zanzibar is memorable.

But first, when’s the best time to visit Zanzibar?

The best time to visit is during the dry season, from June to October. This is also the peak safari season in Tanzania, which makes Zanzibar a popular post-safari destination choice.

January and March are also great times to visit because the beaches have peak diving conditions, and you can explore the lagoons and coral reefs in clear waters.

Now that you know when to visit, let’s look at some must-do activities in Zanzibar.

Top Activities in Zanzibar

Go on a snorkeling tour.

You can kickstart your trip by taking a snorkeling tour to explore the stunning coral reefs and diverse marine life, such as lionfish, sting rays, sea turtles, and dolphins around the archipelago islands.

snorkelling in Zanzibar

This 5-hour tour is usually conducted at Mnemba island because of the high visibility of its water. You’ll be accompanied by a professional guide providing safety instructions and insights while on the tour.

A trip to Stone Town:

Stone Town is the historic heart of Zanzibar City and a UNESCO World Heritage Site. The Arabs built this town during the slave trade, and it’s renowned for its well-preserved historic architecture. Some of the things you can do in Stone Town include:

  • Visit the slave monument
  • Visit the Old Fort
  • Visit the night market
  • Visit the Forodhani Gardens
  • Visit the Hamamni Persian Baths

A guided tour is the best way to familiarize yourself with Stone Town and its history.

Go on a spice tour:

Zanzibar is often called “Spice Island” due to its nutmeg, pepper, and cinnamon production. During the spice tour, you’ll learn the islands’ relationship with spices and how they are grown, harvested, and prepared to make medicines and food.

spice tour Zanzibar

Kitesurf:

Kitesurfing is a popular activity for tourists in Zanzibar. Paje, a small village on the southeastern coast of Unguja island — the main island of the Zanzibar archipelago — is said to be one of the best places in the world to kitesurf.

kite surfing Zanzibar

This is primarily due to its excellent wind conditions and relatively calm waters, allowing beginners to learn and improve. You can also get a 3-hour kitesurfing lesson for €110.

Nature walk in the Jozani forest:

This is one activity you can’t miss out on while in Zanzibar. The Jozani forest is a protected area in the center-eastern region of Unguja island, and it’s the only home to the endangered Red Colobus Monkey.

Jozani forest Zanzibar

It also hosts a variety of wildlife, such as leopards, lemurs, civet cats, pygmy antelopes, and bush babies.

You can take a guided tour to explore this forest; it usually takes an hour. This would also allow you to learn about the different types of wildlife and their medicinal uses.

Dine at The Rock:

The Rock is a famous picturesque restaurant on a rock formation near the beach.

Aside from its stunning ocean view and intimate setting, this restaurant is famous in Zanzibar for its excellent food, making it a tourist favorite. Most seafood is freshly caught from the reefs near the restaurant.

Relax at the beach:

This list would be incomplete without this. Zanzibar is famous for its white sandy beaches and clear blue waters, making it the perfect place to enjoy a beach holiday.

Beach Zanzibar

You can soak in the scenery, dip in the ocean, or even swim with dolphins.

Wrapping up

Traveling to Zanzibar can be a great way to unwind and learn about different cultures in an immersive way. And as a tourist, the last thing you want to worry about is currency exchange, which is why Grey has you covered.

We’ve made it easy for you to convert your money to Tanzanian shillings (TZS) so you can focus on making memories without the stress of navigating currency exchanges. Get started today by opening a Grey account.

‍

The best summer holiday destinations in the Philippines

•

•

2 min read

Have you ever dreamed of escaping to a place where turquoise waters meet powdery white sand, where lush mountains rise in the distance, and every sunset looks like it was painted just for you? That’s the Philippines, a country made up of more than 7,600 islands, each with its own charm. Every time I visit, I find something new to fall in love with.

Whether you’re craving adventure, a quiet beach retreat, or a deep dive into rich cultural experiences, the Philippines has something for you. And let’s not forget the warm hospitality — Filipinos are known for their friendliness, making visitors feel right at home from the moment they arrive.

If you’re thinking about a summer holiday in the Philippines, here are some of the best places to visit that will make your trip unforgettable.

Best places to visit in the Philippines for summer holidays

From world-famous beaches to hidden gems, here are some of my top must-visit places for an unforgettable summer escape:

1. Boracay – The island of white sand beaches

__wf_reserved_inherit

Boracay is one of those places that feels like a postcard come to life. The powdery white sand is so soft it almost feels unreal, and the sunsets? Absolutely breathtaking. White Beach is where most of the action happens, but depending on what you’re in the mood for, you can pick your vibe:

  • Station 1 – Home to upscale resorts and the widest stretch of fine white sand, ideal for a quieter and more luxurious experience.
  • Station 2 – The heart of Boracay’s action, where shopping, restaurants, and nightlife come to life.
  • Station 3 – A more peaceful area with budget-friendly accommodations and a laid-back vibe.

Beyond White Beach, you will love spending time at Puka Shell Beach for a quieter escape, Bulabog Beach for kitesurfing, and Diniwid Beach for a cosy sunset spot away from the crowds.

Must-do experiences in Boracay:

  • Try parasailing, snorkelling, or paddleboarding in the turquoise waters.
  • Take a sunset paraw (local sailboat) ride — it’s pure magic.
  • If you’re feeling adventurous, go cliff diving at Ariel’s Point.
  • Experience Boracay’s nightlife, where fire dancers and beachside cocktails set the mood.

Also read: How to apply for a digital nomad visa in the Philippines

2. Palawan – A paradise of lagoons and limestone cliffs

__wf_reserved_inherit

If you ask me about my happy place, it’s Palawan. It’s where you find those impossibly blue lagoons, towering limestone cliffs, and hidden beaches straight out of a travel magazine. Every corner of Palawan feels untouched and breathtaking.

Here’s where you should go:

  • El Nido – Stunning lagoons, dramatic cliffs, and secret beaches. Island hopping here is a must.
  • Coron – A diver’s paradise with crystal-clear lakes and World War II shipwrecks.
  • Puerto Princesa – Home to the Puerto Princesa Underground River, one of the New Seven Wonders of Nature.
  • Port Barton – A quieter, more relaxed alternative to El Nido, with incredible island-hopping adventures.

What makes Palawan special?

  • Snorkelling in coral-filled waters and swimming alongside sea turtles.
  • Kayaking through hidden lagoons and mangroves.
  • Exploring remote islands where you’ll feel like the only person in the world.
  • Watching the sunset from a secluded beach, surrounded by nothing but nature.

3. Cebu – A mix of history and adventure

__wf_reserved_inherit

Cebu has it all — history, adventure, and some of the best beaches in the Philippines. One day, you could be exploring Spanish-era churches, and the next, swimming with whale sharks or chasing waterfalls.

Places you can’t miss in Cebu:

  • Cebu City – Visit Magellan’s Cross, the Basilica Minore del Santo Niño, and the Taoist Temple.
  • Oslob – Swim with the gentle giants — whale sharks (don’t worry, it’s safe).
  • Moalboal – Witness the incredible sardine run and dive into a world of colourful corals.
  • Kawasan Falls – Go canyoneering through turquoise waterfalls and jungle trails.
  • Bantayan & Malapascua Islands – Tranquil, beautiful, and perfect for escaping the crowds.

If you love food, don’t leave Cebu without trying lechon (roast pig) and the famous dried mangoes.

You may also like: How to open US and UK bank accounts in the Philippines

4. Siargao – The laid-back island escape

__wf_reserved_inherit

Siargao is my ultimate chill-out spot. It’s known as the surfing capital of the Philippines, but even if you don’t surf, you’ll fall in love with its island vibes. Palm trees line the roads, fresh coconut stalls are everywhere, and life moves at a slow, blissful pace.

Siargao highlights:

  • Cloud 9 – The world-famous surf break, even if you’re just there to watch.
  • Sugba Lagoon – Perfect for paddleboarding and kayaking in emerald-green waters.
  • Magpupungko Rock Pools – Crystal-clear tidal pools that appear during low tide.
  • Island hopping – Naked Island, Daku Island, and Guyam Island are must-visits.
  • Sohoton Cove – Swim with stingless jellyfish in a magical lagoon.

Why Siargao stole my heart:

  • The sunrises and sunsets here are something else.
  • The food scene is incredible — smoothie bowls, fresh seafood, and local delicacies.
  • Riding a motorbike around the island is the best way to explore hidden beaches.
  • The island’s laid-back energy makes it impossible to leave.

5. Bohol – Home to the Chocolate Hills

__wf_reserved_inherit

Bohol is one of those destinations that surprises you. It has one of the most unique landscapes in the world — the Chocolate Hills — but that’s just the beginning.

Must-see places in Bohol:

  • Chocolate Hills – Over 1,200 perfectly rounded hills that turn brown in the dry season.
  • Tarsier Conservation Area – Get up close (but not too close!) to the adorable, wide-eyed tarsiers.
  • Loboc River Cruise – Enjoy a peaceful lunch while floating down a jungle river.
  • Panglao Island – White-sand beaches, world-class diving, and snorkelling with sea turtles.
  • Hinagdanan Cave – An underground lagoon where sunlight creates a magical glow.

Bohol is for you if:

  • You love nature and wildlife.
  • You want a mix of adventure, culture, and relaxation.
  • You enjoy exploring places that feel untouched by mass tourism.

Also read: Top 8 digital nomad cities for remote workers in Southeast Asia

The best way to manage payments while travelling to the Philippines

One thing I’ve learned while travelling is that managing money can be tricky, especially when dealing with currency exchange and international transactions. That’s where Grey makes life easier — you can send, receive, and exchange money in multiple currencies without the crazy fees traditional banks charge. It’s a game-changer when you’re travelling.

Make your summer travel to the Philippines stress-free with Grey

So, if the Philippines is on your summer bucket list (which it absolutely should be!), get ready for the adventure of a lifetime. Pack your bags, explore these incredible destinations, and let Grey handle your international payments seamlessly.

Sign up for a Grey account today, or download the app to get started.

‍

Convert pounds to naira at the best rates online

•

•

2 min read

When converting British pounds (GBP) to Nigerian naira (NGN) through traditional banks, hidden fees, slow transfers, and poor exchange rates are common. This can be annoying because, in truth, every penny matters. With traditional banks and transfer services, you often lose a chunk of your earnings before the money even lands in your account.

Thankfully, there’s a faster, easier, and more cost-effective way. With Grey, you can convert GBP to NGN at competitive rates and without unnecessary delays. In this guide, I’ll show you exactly how to do that and why Grey is the best choice for currency exchange in Nigeria.

Common challenges when converting GBP to NGN

Converting British pounds in Nigeria isn’t always straightforward. Many users face:

  • Unfavourable exchange rates: Banks and transfer providers often mark up rates significantly.
  • Hidden fees: Extra charges can quickly eat into your funds.
  • Slow transfers: Traditional banking systems are notorious for long processing times.
  • Limited flexibility: Some platforms restrict how or when you can access your funds.

Grey eliminates these pain points, making it possible to convert and withdraw funds without hassle.

Also read: The easiest way to open an offshore bank account online for free

How to open a GBP account in Nigeria with Grey

Opening a virtual GBP account used to involve paperwork and international trips. With Grey, the process takes just minutes:

  1. Sign up for a Grey account: Head to Grey.co or download the app to get started.
  2. Verify your identity: Upload a valid ID and complete a quick KYC (Know Your Customer) process.
  3. Access your GBP account: Once verified, you’ll get a virtual UK account with all the details you need.
  4. Receive payments: Share your account number with UK clients, family, or platforms like Payoneer and Amazon.

You can start receiving GBP payments instantly without touching a traditional bank.

Also read: High-paying remote jobs you can land without experience

How to convert GBP to Naira using Grey

Once your funds hit your GBP account on Grey, converting them to naira is seamless:

  1. Log into your Grey account via web or app.
  2. Go to your GBP wallet and tap “Convert”.
  3. Enter the amount you want to exchange.
  4. View the real-time exchange rate and confirm the transaction.
  5. Converted Naira will instantly appear in your NGN wallet, ready to withdraw.

No delays. No guesswork. Just quick, transparent currency exchange.

Why choose Grey for GBP to naira conversions

Here’s why Grey stands out:

  • Best-in-market exchange rates: Get more Naira for every pound you convert.
  • Low, transparent fees: No hidden charges or surprises.
  • Fast processing: Convert and withdraw within minutes.
  • Multi-currency wallets: Hold, convert, and manage funds in GBP, USD, EUR, and NGN.
  • Easy withdrawals: Send money directly to any Nigerian bank account.

Tips to get the best GBP to NGN exchange rates

Want to make your money go even further? Here are a few smart tips:

  • Watch the rates: Grey’s live dashboard helps you monitor real-time rates and convert when they’re in your favour.
  • Convert in larger amounts: Converting bulk amounts can help minimise transaction fees.
  • Use GBP for regular payments: Holding a GBP wallet lets you decide the best time to convert.

Also read: The easiest way to get a virtual dollar account for AdSense earnings

The smarter way to manage GBP payments in Nigeria

With Grey, you can keep more of what you earn and enjoy total control over your international finances.

Create your Grey account today or download the app to enjoy inclusive global banking, designed for you to carry your dreams across borders.

‍

How to open a US bank account as a temporary visitor or on a visit visa

•

•

2 min read

You’ve landed in the United States for a few months, maybe for a family visit, a business trip, or to explore the country as a digital nomad. Somewhere along the way, you realise how helpful it would be to have a US bank account. Paying for services, receiving payments from abroad, or just avoiding foreign exchange fees, it all becomes easier when you have access to a US account.

But if you’re not a resident or citizen, opening a bank account in the US can feel like hitting a brick wall. The good news? There’s a way around it — you can open a virtual USD account with Grey, no matter where you are in the world.

I’ll show you how to open a US bank account as a temporary visitor or tourist, and how Grey makes the process seamless and borderless.

Can you open a US bank account as a visitor?

Technically, yes — but the process through traditional banks is not easy or visitor-friendly.

Most US banks require the following:

  • A US address
  • A Social Security Number (SSN) or Individual Taxpayer Identification Number (ITIN)
  • Two forms of government-issued ID
  • In-person visits to a branch for verification

For most short-term visitors or digital nomads, this creates a barrier. Without US documentation, you’ll likely be turned away. And even if you manage to open an account, maintaining it remotely or accessing your funds from outside the US can be challenging.

That’s why many travellers are turning to international financial platforms like Grey, which offer the same functionality, minus the paperwork and limitations.

Also read: How to open US and UK bank accounts in East Africa

Why you might need a US bank account as a visitor

Opening a US account is a strategic financial move during your stay. With a USD account, you can:

  • Receive payments from US employers, clients, or freelance platforms like Upwork or Fiverr.
  • Shop online from US retailers without worrying about foreign transaction fees.
  • Avoid high exchange rates and withdrawal charges when spending or withdrawing USD.
  • Pay for subscriptions and services like Amazon, Netflix US, or local apps with ease.
  • Manage your finances in USD while keeping your local currency untouched.

If you're a digital nomad or a freelancer travelling through the US, having access to a stable, fully functional USD account makes everyday transactions much simpler.

Also read: How to open US bank accounts in Cameroon

Opening a US bank account as a temporary visitor or on a visit visa with Grey

Grey offers a frictionless way to open and manage a USD account from anywhere, without needing a US address or citizenship. With Grey, you get access to a virtual USD account that works just like a domestic US bank account. You can send, receive, hold, and convert US dollars, all from your phone or laptop. Here’s how to do it:

Sign up

Head to grey.co or download the Grey app to create your account. It takes just a few minutes.

Complete your identity verification (KYC)

Upload a government-issued ID (passport, national ID, or driver’s license), a selfie, and a proof of address document. Grey uses this to verify your identity and ensure your account is secure and compliant with regulations.

Get your virtual USD account

Once verified, you can generate a fully functional USD account. It comes with a US account number and routing number.

Receive payments globally

Share your USD account details with clients, employers, or platforms like Amazon, or Upwork. They can pay you directly, and funds will be credited to your Grey account.

Convert and withdraw funds

Use Grey’s built-in currency converter to switch between USD, GBP, EUR, and your local currency. Withdraw the funds to your local bank at competitive exchange rates.

Also read: Fastest way to receive USD freelance payments in China

Why Grey is ideal for temporary visitors in the US

Traditional banks in the US aren’t built for travellers. From requiring a Social Security Number to in-person visits, the process can be daunting for short-term visitors. Grey, on the other hand, was designed specifically for people who live, work, or travel across borders.

Here’s why it works so well:

  • No US residency required: You don’t need to be a US citizen, green card holder, or even physically present in the US to open an account with Grey.
  • Instant access to a USD account: Grey gives you real US banking details, which you can use for freelance platforms, online shopping, or receiving payments from clients and family.
  • Multi-currency support: Alongside your USD account, you’ll also get access to EUR, GBP, and other currencies. This is perfect for managing international payments while travelling.
  • Competitive rates and low fees: Grey offers better exchange rates and lower fees than traditional banks or money transfer services — especially helpful when converting between currencies.
  • 100% digital onboarding: The entire sign-up process is remote. You don’t need to visit a branch or deal with paperwork.
  • Withdraw to your local account: Once you receive funds in your Grey USD account, you can convert and withdraw them to your local bank account wherever you are.

Also read: How to create US and UK bank accounts as a migrant worker

For anyone visiting the US temporarily, Grey offers a modern, stress-free way to manage money internationally. You get all the benefits of a US-based bank account, without the paperwork, red tape, or restrictions. Create your Grey account today or download the app to enjoy inclusive global banking, designed to carry your dreams across borders.

‍

How to exchange currency safely when visiting Indonesia

•

•

2 min read

Indonesia is a dream destination for travellers. Bali’s serene landscapes, Jakarta’s vibrant nightlife and Yogyakarta’s historical wonders — it doesn’t get better than that. To enjoy all of these things, though, having local currency on hand is important.

Fret not. I’ll teach you how to convert your currency into Indonesian Rupiah (IDR), ensuring you get the best value for your money.

Understanding the Indonesian Rupiah (IDR)

Before you exchange money, it’s important to understand Indonesia’s currency. The Indonesian Rupiah (IDR) comes in various denominations, with common banknotes being 1,000, 5,000, 10,000, 50,000, and 100,000 IDR. Due to the large numbers on the bills, be mindful when handling cash to avoid confusion or overpayment. Exchange rates fluctuate, so it’s a good idea to check the current rate before exchanging money.

Also read: How to open US and UK bank accounts in Indonesia

Best ways to exchange money in Indonesia

There are several options for exchanging currency, but not all are equally safe or cost-effective. Here are the most reliable methods:

1. Banks and authorised money changers

One of the safest ways to convert your money into IDR is through banks or licensed exchange offices. Look for authorised money changers approved by Bank Indonesia, as they follow strict regulations to ensure fair transactions. Reputable options include VIP Money Changer, Dirgahayu Valuta Prima, and Central Kuta Money Exchange.

Tips for safe currency exchange:

  • Always count your money before leaving the counter.
  • Ensure it’s an authorised exchange office — look for official signage and licensing.
  • Avoid exchanging large sums at the airport, where rates are usually less favourable.

2. Withdrawing cash from ATMs

If you prefer convenience, using an ATM is a safe and easy way to withdraw IDR at competitive exchange rates. Major banks like Mandiri, BCA, BNI, and CIMB Niaga have ATMs across the country.

Things to keep in mind:

  • Use ATMs in well-lit, secure areas like malls or banks.
  • Withdraw larger amounts at once to minimise transaction fees.
  • Cover the keypad when entering your PIN to protect against skimming devices.

3. Using multi-currency accounts like Grey

A multi-currency account like Grey is an excellent option for seamless international transactions. With Grey, you can receive, hold, and convert currencies like USD, EUR, and GBP at competitive rates, eliminating the need for physical cash exchanges.

Why choose Grey for currency exchange?

  • Lower fees than traditional banks and exchange bureaus.
  • Instant conversions between multiple currencies.
  • Secure transactions without worrying about counterfeit bills or scams.
  • Ease of use. You can manage your money digitally from anywhere.

Tips to avoid currency exchange scams

Currency exchange scams are common in tourist-heavy areas. Here’s how to stay safe:

  • Avoid unauthorised money changers. If a rate seems too good to be true, it probably is.
  • Double-check your bills. Some scammers use sleight of hand to shortchange tourists.
  • Ask for a receipt. A legitimate money changer will provide one.
  • Be cautious with street exchangers. Stick to banks and reputable exchange offices.

Also read: How to send money to Indonesia

Should you use cash or card?

Cash is still widely used in Indonesia, especially in smaller shops, local markets, and rural areas. However, credit and debit cards (Visa and Mastercard) are accepted in hotels, restaurants, and shopping malls.

Also read: How to get an instant USD debit card in Indonesia

Making transactions seamless with Grey

For a hassle-free way to manage your money while travelling, Grey offers a secure and cost-effective multi-currency solution. Instead of worrying about cash exchange or high bank fees, you can:

  • Convert USD, EUR, and GBP to IDR instantly at competitive rates.
  • Receive and hold multiple currencies in one account.
  • Transfer funds internationally without the high fees of traditional banks.

Travel smart with secure currency exchange

Navigating currency exchange in Indonesia isn’t nearly as stressful as it sounds. You can ensure safe, hassle-free transactions throughout your trip by using authorised money changers, trusted ATMs, or a multi-currency account like Grey.

Planning a visit to Indonesia? Create your Grey account today or download the app to enjoy inclusive global banking, designed to carry your dreams across borders.

‍

Arrow (up)

Back to top