<script type="application/ld+json" data-schema-version="grey-blog-v4"> [{"@context":"https://schema.org","@type":"BlogPosting","@id":"https://grey.co/blog/how-to-manage-multiple-currencies-as-an-expatriate-with-grey#article","headline":"How to manage multiple currencies as an expatriate with Grey","description":"Simplify multi-currency management as an expatriate with Grey. Enjoy low fees, competitive exchange rates, and seamless global transactions.","inLanguage":"en","url":"https://grey.co/blog/how-to-manage-multiple-currencies-as-an-expatriate-with-grey","mainEntityOfPage":{"@id":"https://grey.co/blog/how-to-manage-multiple-currencies-as-an-expatriate-with-grey#webpage"},"datePublished":"2025-01-31T16:22:02.641Z","dateModified":"2026-06-15T16:33:32.117Z","author":{"@type":"Person","@id":"https://grey.co/authors/priscila-marotti#person","name":"Priscila Marotti","url":"https://grey.co/authors/priscila-marotti","jobTitle":"Content Writer","sameAs":["https://www.linkedin.com/in/priscila-marotti/"]},"publisher":{"@type":"Organization","@id":"https://grey.co/#organization","name":"Grey","url":"https://grey.co","logo":{"@type":"ImageObject","url":"https://cdn.prod.website-files.com/6360022338a81bd6fdbb1145/6564ae1077a67e39d3c491a6_Grey%20Logo%20Lockup%20Black.svg"}},"image":{"@type":"ImageObject","@id":"https://grey.co/blog/how-to-manage-multiple-currencies-as-an-expatriate-with-grey#primaryimage","url":"https://cdn.prod.website-files.com/636a85d290ee58e70c17e1c0/6a3015e0dd4026ed83d76464_6a3015df51e9fcfea6c6962e_how-to-manage-multiple-currencies-as-an-expatriate-with-grey__header-image.webp","contentUrl":"https://cdn.prod.website-files.com/636a85d290ee58e70c17e1c0/6a3015e0dd4026ed83d76464_6a3015df51e9fcfea6c6962e_how-to-manage-multiple-currencies-as-an-expatriate-with-grey__header-image.webp","width":1200,"height":675}},{"@context":"https://schema.org","@type":"WebPage","@id":"https://grey.co/blog/how-to-manage-multiple-currencies-as-an-expatriate-with-grey#webpage","url":"https://grey.co/blog/how-to-manage-multiple-currencies-as-an-expatriate-with-grey","name":"How to manage multiple currencies as an expatriate with Grey","description":"Simplify multi-currency management as an expatriate with Grey. Enjoy low fees, competitive exchange rates, and seamless global transactions.","inLanguage":"en","primaryImageOfPage":{"@id":"https://grey.co/blog/how-to-manage-multiple-currencies-as-an-expatriate-with-grey#primaryimage"},"breadcrumb":{"@id":"https://grey.co/blog/how-to-manage-multiple-currencies-as-an-expatriate-with-grey#breadcrumb"}},{"@context":"https://schema.org","@type":"BreadcrumbList","@id":"https://grey.co/blog/how-to-manage-multiple-currencies-as-an-expatriate-with-grey#breadcrumb","itemListElement":[{"@type":"ListItem","position":1,"name":"Home","item":"https://grey.co/"},{"@type":"ListItem","position":2,"name":"Blog","item":"https://grey.co/blog"},{"@type":"ListItem","position":3,"name":"How to manage multiple currencies as an expatriate with Grey","item":"https://grey.co/blog/how-to-manage-multiple-currencies-as-an-expatriate-with-grey"}]}] </script>

How to manage multiple currencies as an expatriate with Grey

Priscila Marotti

TABLE OF CONTENT

SHARE THIS POST

Living as an expatriate and remote worker often means juggling multiple currencies, which can be tricky when it comes to managing finances. How do you stay on top of exchange rates, international transfers, and fees without letting it become overwhelming? This article offers practical tips to help you simplify your finances and manage your money effectively across different currencies with Grey.

Why expatriates need to manage multiple currencies

For most expatriates, handling multiple currencies is part of daily life. Whether you’re receiving salary payments in one currency, paying rent or bills in another, or saving for a rainy day, managing financial obligations requires careful organisation. Here’s why it’s crucial to take control of your multi-currency needs:

  • Currency fluctuations: The value of currencies fluctuates frequently, and even minor changes in exchange rates can impact how far your money stretches. For instance, if you earn in US dollars but live in Europe, the EUR/USD exchange rate can significantly affect the value of your income.
  • Conversion fees: Hidden or high conversion fees imposed by traditional banks and financial institutions can quickly eat into your savings. Over time, these charges can add up, making it harder to maintain a balanced budget.
  • Managing multiple accounts: When dealing with various currencies, it is easy to lose track of your funds across different accounts. This can lead to disorganisation and difficulties in budgeting, especially if you need to keep track of multiple accounts in various currencies.

The good news is that with the right financial tools, managing multiple currencies doesn’t need to be a hassle. Grey offers a comprehensive solution to help expatriates stay organised, reduce conversion fees, and streamline financial management.

Also read: Why is international payment so complex for migrant workers?

Choosing the ideal bank account for expatriates

A multi-currency account is one of the best solutions for managing multiple currencies. Traditional banking systems often impose high fees and lengthy processing times for international transactions. Grey offers a modern, efficient alternative that makes international financial management simple and affordable.

  • Low conversion fees: Look for a platform that offers competitive exchange rates and low conversion fees. Grey stands out for its affordable rates and transparent pricing, ensuring you get the most value from your currency exchanges.
  • Multi-currency support: Make sure the platform supports all the currencies you regularly use. Grey offers seamless multi-currency support, allowing expatriates to hold and transact in various currencies, from USD to EUR and beyond.
  • User-friendly interface: Choose a platform that is easy to navigate, helping you manage and track your finances without complexity. Grey provides an intuitive and streamlined platform to make managing your finances as straightforward as possible.

Benefits of using Grey for currency exchange

Expatriates need access to reliable and cost-effective currency exchange platforms, and Grey provides just that. Here’s why Grey is an excellent choice:

  • Competitive exchange rates: Unlike traditional banks that often have high margins, Grey offers real-time market exchange rates, ensuring you get the best value for your money.
  • Fast international transfers: Sending money across borders is quick and hassle-free. Grey processes international transfers swiftly, sometimes within a few hours or instantly, so you can send money without delay.
  • Stay informed: Use Grey’s currency converter to monitor real-time exchange rates. This will give you complete control over your transactions and ensure you make the most of every currency exchange.
  • Transparent pricing: Grey offers clear, upfront information about all fees associated with currency exchanges and transfers, so you won’t be hit with hidden charges.

How does Grey simplify currency management?

Grey is designed to meet the needs of expatriates managing international finances. Here's how Grey works for expatriates and migrants:

1. Open a multi-currency account

Grey allows you to create virtual accounts in USD, EUR, and GBP, making receiving payments in these currencies easy. Follow these steps to get started:

  • Sign up on Grey: Visit Grey’s website or download the app and create your account.
  • Verify your identity: Upload your identification documents for a quick and secure verification process.
  • Access your accounts: Once verified, you can request US dollars, UK Bank Accounts or Euro bank accounts to help receive your foreign currency payments.

With these accounts, you can receive foreign payments or transfer funds without relying on expensive traditional banking.

2. Convert currencies at competitive rates

Grey allows you to convert foreign currencies at competitive exchange rates, saving you money compared to traditional banks. Here’s how:

  • Log in to your Grey account and navigate to the "Convert" section.
  • Select the currency you want to convert and specify the amount.
  • Review the live exchange rate and confirm the transaction.
  • Your converted funds will be credited instantly to your Grey account.
  • You can take a look at how Grey currency conversion works to get started.

Grey's currency conversion is invaluable for expatriates who need to make local payments while holding income in foreign currencies.

3. Using a US virtual card to simplify payments

As an expatriate, a USD virtual card is one of the best tools you can have. Obtaining a USD card can often be complicated, with restrictions, high fees, and problems funding the card in local currencies. Grey offers a simple solution with its US virtual card, providing a seamless way to make payments across a wide range of platforms and services.

  • Global access: A USD debit card gives you access to international stores, brands, and services, allowing you to shop online or in-store without worrying about exchange rates.
  • Save on fees: The Grey USD virtual card allows you to avoid the high conversion fees typically charged by traditional banks when making foreign currency payments.
  • Travel convenience: When you’re travelling, use your Grey USD Mastercard to pay for hotels, flights, transportation, and more without the stress of fluctuating exchange rates.
  • Subscription payments made easy: Many popular services, including Netflix, Spotify, and Adobe, charge in USD. With a Grey USD card, paying for these services is simple and cost-effective.

You may also like: How to get an instant USD debit card online in 2025

Keep your finances organised and safe with Grey

Managing multiple currencies is simpler when you have the right tools. Grey offers an intuitive platform to help expatriates stay organised, track their spending, and manage their budgets effectively.

  • Financial tracking: Use Grey to centralise all your financial information, monitor your spending, and stay within your budget, while tracking multiple currencies in real-time.
  • Create strong passwords: Always use unique and complex passwords for your Grey account to safeguard your funds.
  • Enable two-factor authentication: Grey offers two-factor authentication for added security, ensuring that only you can access your account.

Simplifying multi-currency finances for global expatriates

Managing multiple currencies doesn’t have to be overwhelming. With Grey, expatriates can easily navigate financial complexities, reduce unnecessary fees, and stay organised. Grey is the all-in-one solution for managing your finances while living abroad, allowing you to focus on what matters most: your life abroad.

Open a bank account with Grey today and enjoy the freedom of seamless international transactions, low conversion fees, and a range of features designed for the world's most ambitious expatriates.

‍

Last updated:

October 13, 2026

Open a free Grey account to get startedJoin 1 million digital nomads
IF YOU ENJOYED THIS, CHECK THESE OUT

How US startups pay remote workers outside the US

•

•

2 min read

Remote work has changed how US startups build their teams. It’s no longer unusual for a founder in the United States to work daily with designers, developers, consultants, and marketers living thousands of miles away. Slack messages replace office conversations, video calls stand in for physical meetings, and shared documents keep projects moving. Talent is no longer limited by geography, and startups are more comfortable hiring skilled professionals regardless of where they live.

But when the work is done, a simple question follows: how do payments actually reach these remote workers outside the US? For many startups, paying global talent has become part of their everyday operations. This article examines how US startups handle payments to remote workers around the world and the practical ways those professionals receive their earnings.

Also read: How freelancers in the US get paid by international clients

Challenges US startups face when sending money abroad

Sending money to remote workers outside the US comes with challenges. Understanding them helps startups pay reliably, build trust, and value global talent.

Transaction fees‍

Wire transfers often come with high fees from intermediary banks and the recipient’s bank. As a US startup, it’s important to anticipate these costs so your remote workers get the full payment they expect. Being aware of fees ahead of time helps you plan better, maintain transparency, and show your team that their work is valued.

Payment delays

‍Sending money to emerging markets can take longer than expected, even with the right platforms. Delays can frustrate your remote team and disrupt workflow. By anticipating timing challenges and keeping your workers informed, you demonstrate reliability and professionalism, ensuring your remote consultants feel respected and confident that their efforts will be rewarded on time.

Platform restrictions

‍Not all payment methods work everywhere. Platforms like PayPal may have limited support in some countries, making it tricky for your team to receive funds. Knowing these restrictions upfront helps you select the right solution, so your remote workers can get paid smoothly, avoiding frustration and maintaining trust in your startup’s global processes.

Security risks

‍Cross-border payments carry risks such as fraud, phishing, and data breaches. Using secure platforms and monitoring transactions carefully protects both your startup and your remote workers. Prioritising security shows professionalism and builds confidence. Your team can focus on delivering great work knowing that their money and personal information are safe, strengthening trust across borders.

Also read: Get paid by clients overseas as a US freelancer

How US startups pay remote workers outside the US

Paying remote workers abroad has become a normal part of US startups. Choosing the right platform ensures fast, reliable payments and builds trust.

Wise

Wise gives US startups a straightforward way to send payments to remote workers in other countries. Businesses can transfer USD directly while the recipient receives funds in their local currency at real exchange rates rather than marked-up bank rates. Transfers are trackable in real time and fees are shown upfront, helping startups plan payroll accurately. Wise also supports multi-currency balances, allowing companies to manage payments in different currencies from one account.

Transaction costs are generally lower than traditional bank wires, and transfers are often completed within one to two business days, making it a practical option for startups paying distributed teams.

Payoneer

Payoneer allows US startups to pay remote workers and contractors across multiple countries through a structured global payments network. Businesses can send funds in major currencies such as USD, EUR, or GBP while recipients withdraw to their local bank accounts or use a prepaid Payoneer card where available.

The platform also integrates with many global marketplaces and invoicing tools, which simplifies contractor payments. Fees and currency conversion rates are visible before sending, helping startups manage payroll budgets.

Western Union

Western Union allows US startups to send funds to remote workers in select countries fast. Payments can be picked up in cash at a local agent or deposited directly to a bank account where supported. While fees can be higher than digital‑first platforms, speed and accessibility make it valuable for urgent needs or recipients without online banking.

With a global agent network and mobile options in many regions, it’s practical when flexibility and immediate access to funds matter most.

Grey (recommended)

Grey helps US startups pay remote workers abroad by sending funds in USD to dedicated foreign currency accounts. Your team members can then convert the money into their local currency when it suits them and withdraw to their local bank accounts. This gives remote workers more control over how and when they manage their earnings while keeping payments straightforward for startups.

Grey follows strict anti-money laundering (AML) standards and is registered with FinCEN in the United States and FINTRAC in Canada, helping ensure payments are handled responsibly within recognised financial compliance frameworks.

Remitly

Remitly is commonly used by US startups when paying remote workers in countries where traditional banking systems may be slower or less accessible. The platform offers two transfer speeds: Express, which delivers funds within minutes but at a higher fee, and Economy, which costs less but can take several days.

Payments can reach bank accounts, mobile wallets, or approved cash pickup locations. For teams spread across different regions, Remitly provides flexibility in how workers receive funds and reliable tracking from the moment the payment is sent.

Sendwave

Sendwave is designed for sending money to workers in regions where mobile money is widely used, particularly across Africa and parts of Asia. Instead of relying on traditional bank transfers, US startups can send funds directly to supported mobile wallets, allowing workers to access their earnings instantly through their phones.

Because of its strong mobile wallet integrations, the platform works well for startups paying contractors in markets where mobile financial services are more common than conventional banking.

What should US startups consider before choosing a payment solution?

Choosing the right payment solution requires thought and planning. US startups need to ensure transfers are smooth and reliable, and that they build trust with their remote team.

Speed

Fast deposits matter for keeping your remote team motivated and satisfied. Delays can frustrate workers and slow project momentum. Look for providers that move funds quickly from US accounts to local accounts abroad, with predictable timing and clear tracking. Understanding typical transfer times allows you to plan payroll cycles efficiently, maintain trust, and show remote workers that their time and efforts are valued.

Security

Protecting payments and sensitive data is essential. Choose a provider with built-in fraud detection, encryption, and 3D secure integration. Secure systems prevent phishing, hacking, and unauthorised access, giving both your startup and remote workers confidence. Strong security safeguards help you avoid costly mistakes, maintain compliance, and demonstrate professionalism, ensuring your global team trusts the platform for every international transfer.

Support quality

Reliable support is crucial for resolving payment issues quickly. Access to 24/7 dedicated customer service ensures that any delays, errors, or account questions are handled efficiently. Responsive support reduces stress for both your startup and remote workers, ensuring smooth operations. Knowing that help is always available allows you to manage international payroll confidently without worrying about interruptions.

High uptime

Choose a payment provider with consistently high uptime to avoid failed transactions, system downtime, or lost revenue. Downtimes can delay payments and erode trust with remote workers. A reliable platform ensures your transfer process runs smoothly around the clock, across time zones, and in line with deadlines. High uptime gives peace of mind, reduces administrative follow-up, and keeps global teams focused on their work.

Regional support

Your payment provider should support local methods in the regions where your remote workers operate. This ensures workers can access funds without complications, whether through local banks, mobile wallets, or cash pickup points. Matching local preferences makes payments convenient and reliable, showing respect for workers’ needs. Regional compatibility also prevents unnecessary delays and demonstrates that your startup values its global team.

Customer preferences

Consider the payment methods your remote workers prefer. Some may favour direct bank transfers, others mobile wallets or platform-specific options. Catering to these preferences increases satisfaction, avoids frustration, and reduces time spent troubleshooting payment issues. Understanding what works best for your team ensures smooth operations, demonstrates attentiveness, and helps build strong, long-term relationships with remote talent across countries.

Fees

Evaluate all costs, including transaction fees, monthly charges, setup costs, and chargeback fees. Hidden or unexpected fees can reduce the amount your remote workers receive and affect budgeting. Comparing fees across platforms helps you choose the most cost-effective solution while maintaining reliability. Transparent costs show professionalism and help build trust with your team, ensuring that payments are fair, predictable, and worry-free.

Send international payments with Grey

Paying remote workers outside the US can be challenging if you don’t carefully consider speed, security, fees, and local support. Choosing the right platform makes all the difference for keeping your team motivated and confident. Grey stands out as a reliable solution that lets you send USD quickly, securely, and transparently. With fast transfers, multi-currency options, and easy withdrawals to local accounts, Grey helps you focus on your work while your team gets paid on time.

Sign up on Grey by creating an account with your email, verifying your identity, and setting up your business profile. You can also download the Grey app to handle international payouts from your phone wherever you work.
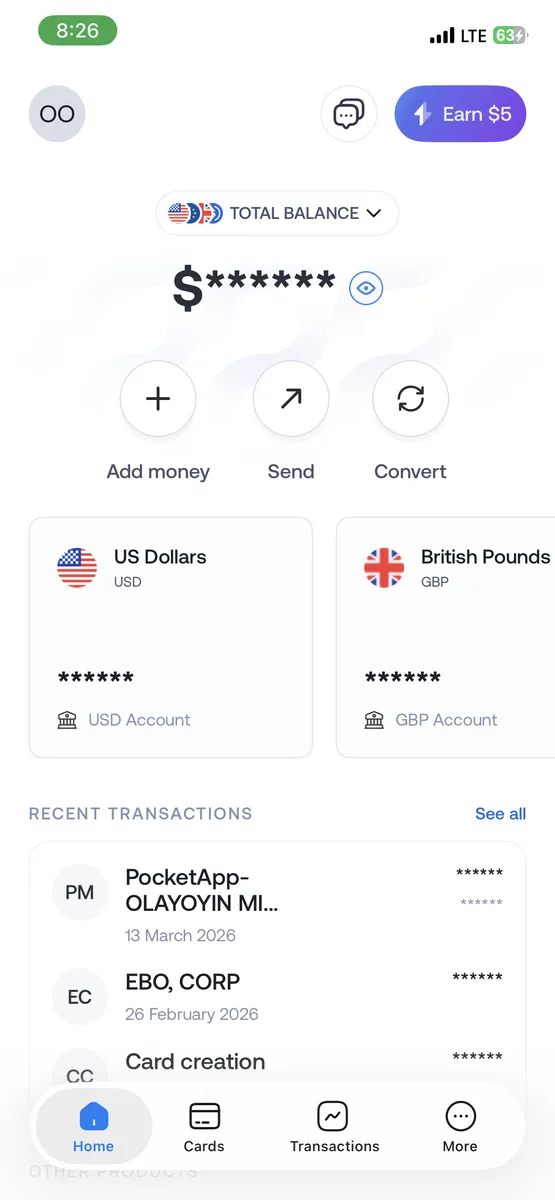
‍

Grey Business vs Grey personal banking

•

•

2 min read

“Should I be using Grey Business, or is my personal Grey account enough?”

It’s a common question, especially once your income starts growing.

At the beginning, everything feels simple. You get paid and you withdraw your money easily. But as your work evolves, whether that’s taking on more clients, earning from multiple platforms, or starting a company, the way you manage money needs to evolve too.

Grey offers two account types for this exact reason: Grey Personal and Grey Business. They are not better or worse than each other. They are built for different stages of your earning process.

This guide breaks down the differences, including fees, features, and when to switch, so you can choose the right setup without second-guessing.

‍Also read: Receiving foreign income as a solo founder

What is a Grey personal account?

A Grey personal account is designed for individuals who receive and manage international payments.

If you are a freelancer, remote worker, or creator earning from global clients or platforms, this is the account you are expected to use.

With a personal account, you can open USD, GBP, and EUR balances with real banking details. This allows clients to pay you as if they were making a local transfer in their own country. Instead of receiving an expensive international wire, you receive money through local rails like ACH, SEPA, and FPS.

Once the money arrives, you can hold it in foreign currency, convert it when the rate works for you, or withdraw it to your local bank account. You can also spend directly using your Grey virtual card without needing to manually move funds around.

The focus here is simplicity. You are managing your own income, and the account is designed to make that as flexible as possible.

What fees does Grey Personal charge?

Understanding fees is where most people get confused, so here’s how it actually works.

When you receive money through ACH, SEPA, or FPS, Grey charges a 0.8% fee, with a minimum of $2, €2, or £2 and a maximum of $10, €10, or £10. This means larger payments become proportionally cheaper because of the cap.

Currency conversion depends on the currency pair. Some routes are free, while others range from 0.5% to 1%. For certain major pairs, the fee is capped at $6. The important detail is that Grey shows the rate before you confirm, so there are no hidden charges after the fact.

Withdrawals vary depending on the country, but for major currencies like EUR and GBP, the fee is typically 0.5%, with a minimum and maximum cap. Other corridors may use fixed fees instead.

For less common deposit methods like Fedwire, BACS, or CHAPS, fixed fees apply. These are generally used less often, since local rails like ACH or FPS are cheaper.

Read more: Grey charges explained: what every transaction costs

What is Grey Business?

Grey Business is designed for companies rather than individuals.

If you are running a registered business, working under a company name, or managing revenue that belongs to a business entity, this is the account structure you need.

Unlike a personal account, a Grey Business account is built for your company. This means you can receive payments on behalf of the business, manage funds at a company level, and keep financial records properly organised for accounting and compliance.

The functionality goes beyond receiving payments. Grey Business allows you to manage team access, assign roles, and give multiple people control over finances without sharing a single login.

You can also pay contractors globally, send payments in local currencies, and handle bulk payouts by uploading recipient details. This becomes important as soon as you are working with a team or scaling operations.

The goal of Grey Business is not just to receive money, but to structure how your business handles it.

What fees does Grey Business charge?

Grey Business follows the same core pricing model as personal accounts.

Receiving payments still comes with the 0.8% fee capped at $10. Conversion fees follow the same tiered structure, and withdrawals depend on the payout country.

The difference is not in lower fees, but in what the account enables.

With Grey Business, you are paying for structure, team management, and the ability to operate at scale without mixing personal and company finances.

Grey Personal vs Grey Business: what is the difference?

The main difference comes down to ownership.

A personal account is for money that belongs to you as an individual. A business account is for money that belongs to a company.

Everything else builds from that.

Grey Personal is simpler, quicker to set up, and designed for individuals managing their own income. Grey Business requires verification of a registered company but provides tools to manage payments, teams, and operations effectively.

If you are working alone and getting paid for your own work, a personal account is enough. If you are invoicing as a company, hiring people, or managing shared finances, you need a business account.

‍Also read: Can non-residents open a US bank account online in 2026?

When should you use Grey for personal use?

You should use a personal account if you are earning in your own name.

This includes freelancers, remote employees, and creators earning from platforms like YouTube, TikTok, or Upwork. At this stage, your income is still personal, even if it comes from multiple sources.

A personal account keeps things simple.

When should you use Grey Business?

You should use Grey Business when your income is no longer just yours.

If you have registered a company, invoice under a business name, or manage revenue that belongs to a business entity, a personal account is no longer the right structure.

This is especially important if you are paying contractors, working with a team, or preparing financial records for accounting and tax purposes.

Can you have both Grey for personal use and Grey Business?

Yes, and in many cases, this is the best setup.

If you run a company but also earn income personally, keeping both accounts separate helps avoid confusion. Your business transactions stay within the business account, while your personal income remains separate.

This makes accounting cleaner and reduces the risk of mixing funds.

Grey for personal use vs Grey Business: key differences

Feature Grey Personal Grey Business
Who it’s for Individuals (freelancers, creators, remote workers) Registered companies, startups, agencies
Account ownership Personal use Business entity
Currencies supported USD, GBP, EUR, USDC USD, USDC (business-focused)
Receiving payments Yes (ACH, SEPA, FPS) Yes (for business transactions)
Team access No Yes (multi-user access with roles)
Bulk payouts No Yes (CSV uploads supported)
Virtual cards Yes (for personal use) Yes (multiple cards for teams, tools, ads)
Best use case Getting paid individually Managing company finances and scaling operations
Setup process Fast (ID verification) More detailed (business verification required)

So, which Grey account should you choose?

Most people overthink this decision, but it comes down to one simple question:

Who does the money belong to?

If you’re earning as an individual, whether that’s freelancing, remote work, or content creation, a Grey Personal account is the right fit. It keeps things simple and flexible while giving you full access to international payments.

If you’re operating as a registered business, invoicing clients under a company name, or managing team payments, Grey Business is the structure you need. It helps you separate finances properly and handle growth without creating confusion later.

If you’re in between, which is common, you can start with a personal account and move to business when your setup requires it. Many users also keep both, using one for personal income and the other for company operations.

The goal isn’t to pick the most advanced option. It’s to choose the one that fits how you earn today and won’t slow you down as you grow.

Getting started with Grey

Opening a Grey Personal account takes just a few minutes. You can sign up in under 5 minutes, and once your identity is verified, you can usually start receiving payments the same day.

Opening Grey Business takes a bit longer because it involves business verification. You’ll need to submit your company registration and ownership details, and approval typically takes 1 to 3 business days, depending on the documents provided. This ensures your account is set up correctly from the start.

Frequently asked questions

What is the difference between Grey for persona use and Grey Business?

Grey Personal is for individuals receiving and managing their own income, such as freelancers, creators, and remote workers. Grey Business is for registered companies that need to manage business revenue, pay contractors, and give team members access to finances.

The main difference is ownership. Personal accounts are for your money. Business accounts are for company funds.

Can I use a Grey Personal account for business payments?

You can use a personal account while you are freelancing under your own name. However, once you register a company or start invoicing under a business name, it is better to switch to Grey Business.

Using a personal account for business transactions can create confusion with accounting, taxes, and financial tracking.

Does Grey Business have different fees from Grey Personal?

Grey Business follows the same core pricing structure as personal accounts. Receiving fees are typically 0.8% with a cap, and conversion fees depend on the currency pair.

The main difference is not pricing, but functionality. Grey Business adds tools for team access, bulk payments, and structured financial management.

Can I have both a Grey Personal and Grey Business account?

Yes. Many users have both accounts.

This is useful if you have personal income, such as freelance work or creator earnings, and also run a registered business. Keeping them separate makes accounting cleaner and easier to manage.

When should I switch from Grey Personal to Grey Business?

You should consider switching when your income becomes business revenue instead of personal income.

This usually happens when you register a company, start invoicing clients as a business, hire contractors, or need proper financial records for tax and reporting purposes.

What documents are required to open a Grey Business account?

To open a Grey Business account, you will need to provide company registration documents, ownership details, and verification information about the business.

The process is more detailed than a personal account because it involves verifying a legal entity.

Is Grey Personal enough for freelancers and creators?

Yes. For most freelancers, remote workers, and creators, Grey Personal is more than enough.

It allows you to receive international payments, hold foreign currency, convert when needed, and withdraw locally without needing business-level setup.

Can I receive USD, GBP, and EUR with both accounts?

Yes. Both Grey Personal and Grey Business support multi-currency functionality.

Personal accounts focus on individual income, while business accounts structure those same capabilities for company use.

Which Grey account is better?

Neither is better. They are designed for different use cases.

Grey Personal is better for individuals managing their own income. Grey Business is better for companies managing business finances and scaling operations.

Ready to get started?

Open your Grey Personal account to start receiving international payments as an individual, or set up Grey Business if you’re managing company finances and need a more structured setup.

Send Canadian dollars with Grey

•

•

2 min read

Everything we do at Grey is aimed at making it easier for you to make global payments.

We’re excited to announce that Grey now supports Canadian dollars (CAD) payments, which means you can send money to Canada directly from your Grey account via Interac e-Transfer.

You can pay freelancers, send money to family, or make cross-border payments to Canadian businesses right from your phone.

What exactly does this mean for you?

Send money to Canada easily‍

Because we’ve integrated with Interac e-Transfer, you can send money directly to any Canadian bank account. You’ll only pay a flat $3 fee, regardless of how much you’re sending.

Expand your global operations with less friction

‍CAD joins our growing list of supported currencies, giving you more flexibility when operating across borders.

No additional setup required

‍It’s the same Grey account you already have. Sending CAD works exactly like sending any other currency through Grey. There’s no confusion about exchange rates and no need for the recipients to sign up for anything.

How does sending CAD work with Grey?

We’ve kept things simple. Here’s how to send Canadian Dollars using Grey:

  1. Log in to your Grey account.
    ‍
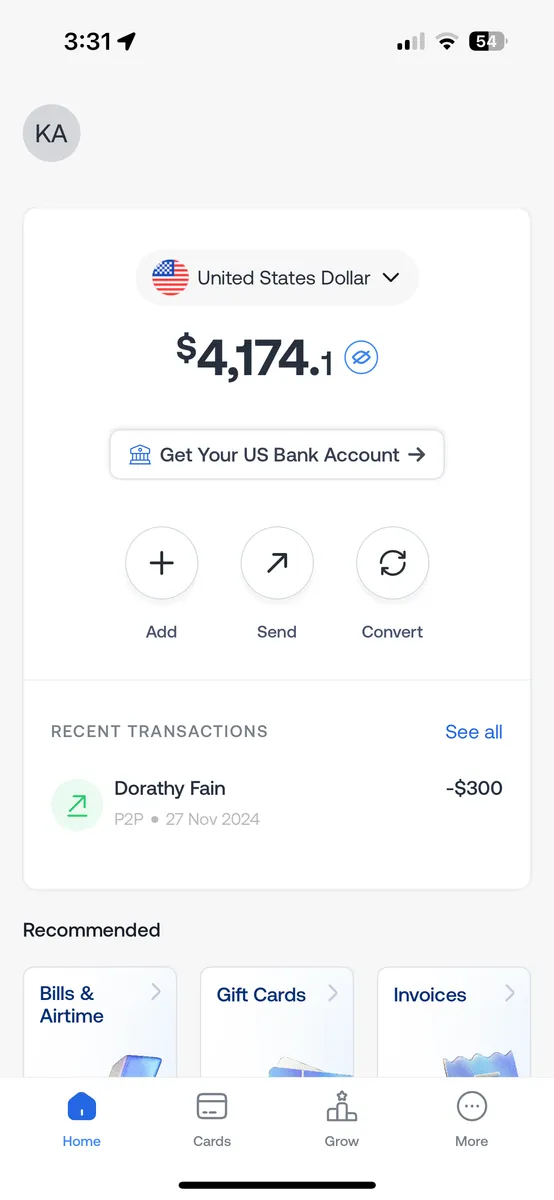
  2. Click “Send”.
Send Canadian dollars with Grey

‍

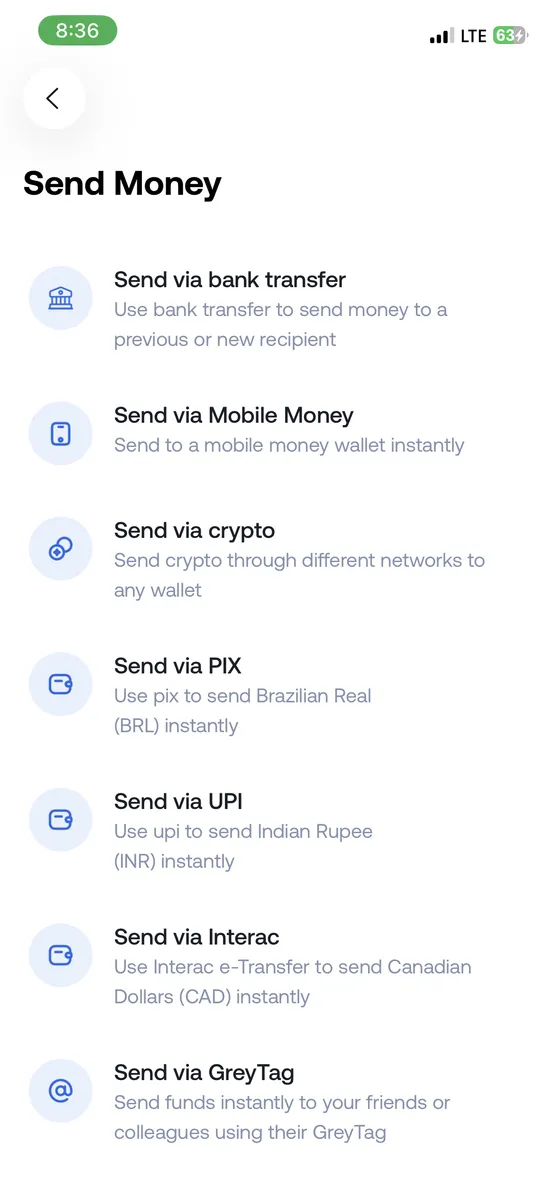
2. On the “Send Money” tab, select “Send via Interac”.

Send Canadian dollars with Grey

‍

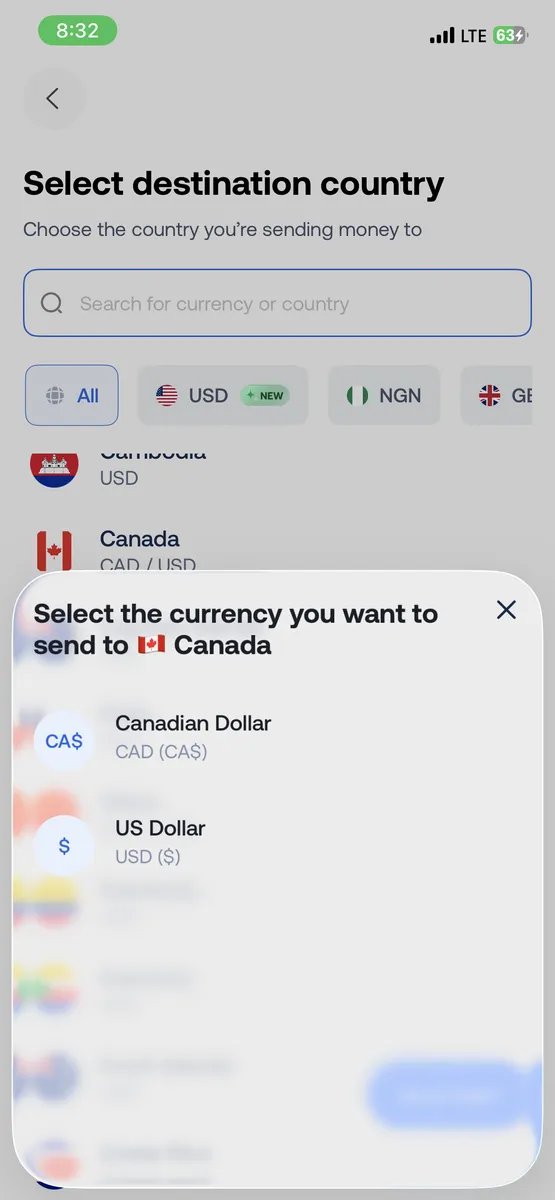
3. Select Canada as the destination and choose CAD as the currency.

Send Canadian dollars with Grey

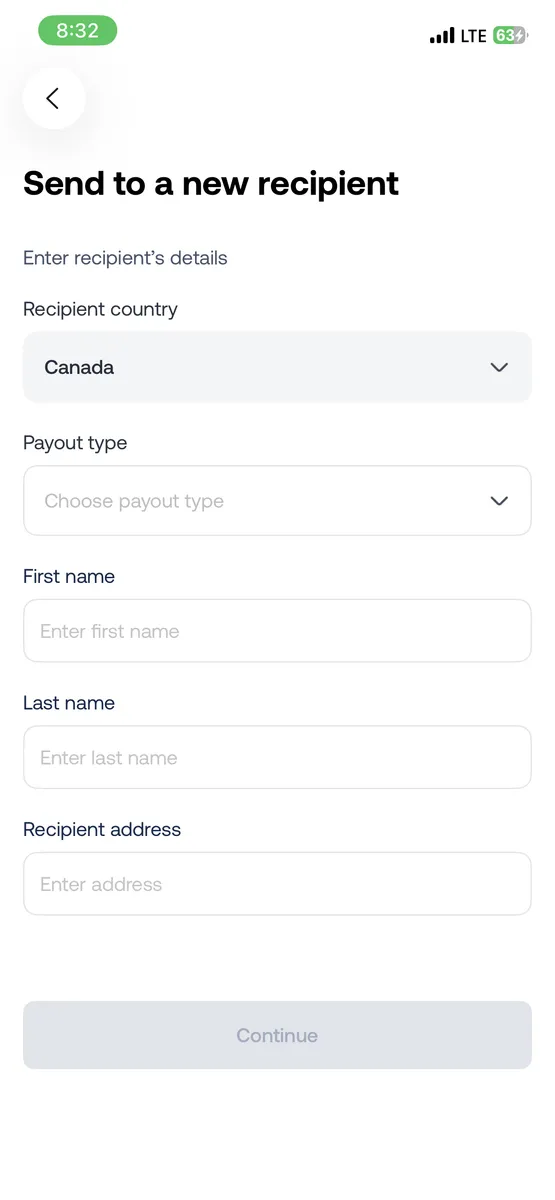
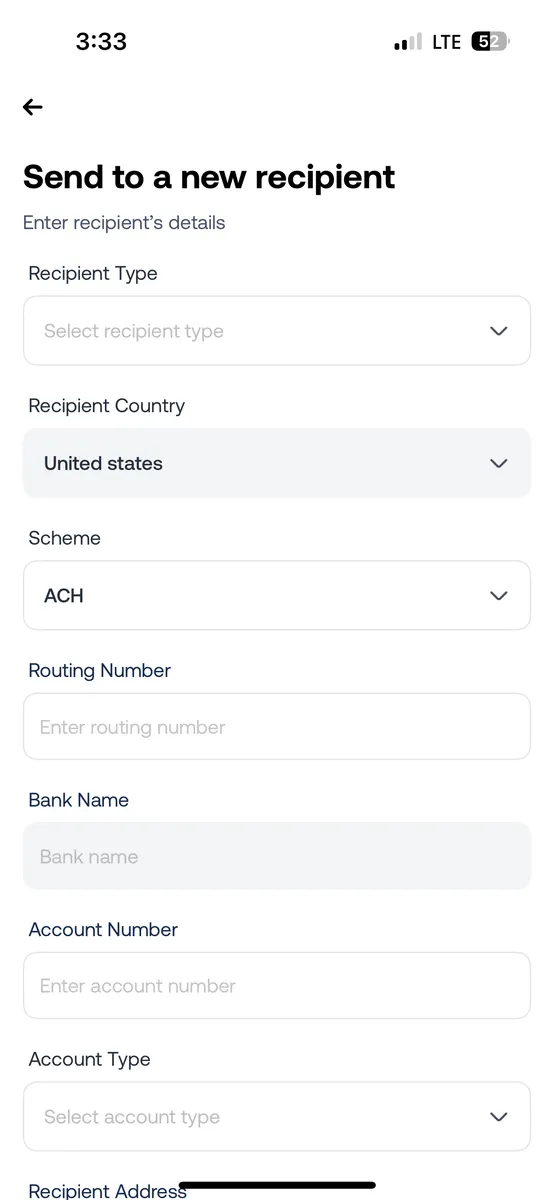
4. Enter the recipient’s details and confirm the transfer.

Send Canadian dollars with Grey

Enjoy global payments with Grey

At Grey, our mission is to make globalisation work for everyone. Supporting payments in Canadian Dollars takes us closer towards achieving that goal.

We want more freelancers, businesses, and remote workers to operate internationally without friction.

More currencies, more countries, and more ways to manage money across borders, that’s where we’re headed.

Open a free Grey account today, or download the app to get started.

‍

How to send USD to a Nigerian domiciliary account

•

•

2 min read

Most of the information you’ll find online on sending money to Nigeria will most likely focus on naira delivery. But that’s not what you need if the recipient has a domiciliary account and wants to receive USD without converting to naira.

A Nigerian domiciliary account holds foreign currency, typically US dollars, without forcing an immediate conversion. Sending USD to one keeps that option in the recipient’s hands. It’s a decent choice for freelancers holding dollar savings, importers managing USD expenses, or anyone who wants to preserve dollar value rather than convert at a potentially unfavourable rate.

The mechanics of getting USD from a US bank account into a Nigerian domiciliary account are specific. You need to understand the required details, the fees you’ll encounter, and the mistakes that cause transfers to fail or arrive short before you send. For a broader overview of receiving dollar income in Nigeria, see our guide on how to receive US dollars in Nigeria and the options available for opening a Nigerian dollar account.

What is a domiciliary account?

A domiciliary account, also commonly called a dom account, is a bank account held at a Nigerian commercial bank that stores foreign currency without converting it to naira. The Central Bank of Nigeria (CBN) permits individuals and businesses to hold certain foreign currencies in domiciliary accounts at licensed Nigerian banks.

The key distinction from a standard naira savings account is that funds credited to a domiciliary account remain in the foreign currency in which they were credited. The account holder decides when and whether to convert, and at what rate. This matters because the naira has historically depreciated against major currencies, and holding USD can protect against the value erosion of naira conversions.

Domiciliary accounts are the primary mechanism by which Nigerians receive international SWIFT wire transfers in USD. CBN’s foreign exchange regulations require that inbound USD transfers be credited to a domiciliary account or converted to naira at the official rate. If a sender directs a USD wire to a standard naira account, the bank will convert it on arrival. If the recipient wants the money to remain in USD, the wire must be sent to the domiciliary account number, not the naira account number.

Both the naira and domiciliary accounts exist at the same bank for the same person and may look similar. They are different accounts with different account numbers. Confirm the domiciliary account number explicitly with the recipient before initiating the wire.

How to send USD via SWIFT wire: step by step

A SWIFT wire from a US bank to a Nigerian domiciliary account requires specific information, and if you miss any, it can cause delays, returns, or the transfer landing in the wrong account.

Step one: Collect the recipient’s domiciliary account details.

You need all of the following:

  • Recipient’s full legal name, exactly as registered with the Nigerian bank
  • The domiciliary account number (not the naira account number)
  • The bank name and branch address
  • The bank’s SWIFT code

The SWIFT codes for some major Nigerian banks are as follows: Access Bank: ABNGNGLA, GTBank (Guaranty Trust Bank): GTBINGLA, Zenith Bank: ZEIBNGLA, First Bank of Nigeria: FBNINGLA, United Bank for Africa (UBA): UNAFNGLA, Stanbic IBTC Bank: SBICNGLX, Ecobank Nigeria: ECOCNGLA, Fidelity Bank: FBNKNGLA, FCMB (First City Monument Bank): FCMBNGLA.

Always verify the SWIFT code directly with the recipient’s bank before initiating a high-value transfer, as branch-specific codes sometimes differ from the head office code.

Step two: Initiate the wire transfer at your US bank.

Log in to your online banking or visit a branch. Navigate to international wire transfers. Enter the recipient’s details: full name, domiciliary account number, bank name, branch address, and SWIFT code. Specify USD as the transfer currency. Nigeria is a USD-only wire destination at Bank of America; Bank of America requires international wires to Nigeria to be sent in US dollars due to local regulations, and foreign currency transfers are not available to this destination.

Step three: Select your charge instruction.

Depending on your bank, you may be asked whether to use SHA (shared charges) or OUR (sender pays all). Under SHA, correspondent bank fees are deducted from the transfer amount in transit, meaning the recipient receives less than what you send. Under OUR, you pay all correspondent fees upfront, and the recipient receives the full amount. For transfers where the recipient needs a specific USD amount, OUR is the right choice. For transfers where the fee deductions are acceptable, SHA is the standard default.

Step four: The wire routes through the SWIFT network.

Not all US banks have direct correspondent relationships with Nigerian banks. A US-to-Nigeria wire might involve two or three correspondent bank hops due to limited direct banking relationships. Each correspondent bank in the chain processes and forwards the payment, and under SHA, each one can deduct a fee from the transfer amount before forwarding the remainder.

Step five: The money arrives in the domiciliary account.

SWIFT transfers to Nigeria typically take one to three business days. Large transfers may be held for CBN compliance review, which can extend the timeline. Once that is cleared, the USD is credited to the domiciliary account and remains in dollars until the account holder decides to convert or withdraw.

What a SWIFT wire really costs

The posted fee at your US bank is not the full cost of a SWIFT wire to Nigeria. Three fee layers stack on every transfer.

Layer one: Your US bank’s outgoing wire fee
A 2026 NerdWallet survey reported a median outgoing international wire transfer fee of $45, with major US banks charging $35 to $50 per send. Chase charges $40 online for USD wires. Bank of America charges $35 for online transfers. Wells Fargo charges $25 to $45, depending on account type.

Layer two: Correspondent bank deductions in transit
Correspondent banks that relay the payment along the SWIFT chain can each deduct $10 to $30 in fees from the transferred amount before it reaches its destination. On a US-to-Nigeria wire routed through two correspondent banks, that’s $20 to $60 deducted from the transfer amount. Neither you nor the recipient is notified of these deductions in advance.

Layer three: The Nigerian receiving bank’s incoming wire fee
Nigerian banks charge an inbound wire fee on SWIFT receipts. This is typically deducted from the funds upon arrival before they are credited to the domiciliary account.

Here’s what this looks like on real transfers:

$500 transfer $5,000 transfer
US bank outgoing wire fee $40 $40
Correspondent bank deductions (estimated) $30–$50 $30–$50
Nigerian receiving bank fee $10–$15 $10–$15
Total fees $80–$105 $80–$105
As a percentage of transfer 16–21% 1.6–2.1%
USD received in domiciliary account $395–$420 $4,895–$4,920

‍

Also read: Sending USD from Nigeria to the USA: Step-by-step guide

Cheaper alternatives to a SWIFT wire transfer

For smaller or regular payments, the SWIFT route is difficult to justify. Here are the practical alternatives and when each one makes sense.

Multi-currency accounts (the recommended alternative for most senders)

Platforms like Grey provide USD accounts with US routing numbers and account numbers that senders can use to pay as a standard domestic US transfer, with no SWIFT correspondent chain involved.

The sender pays via ACH from their US bank account to a US account number. The money arrives in the recipient’s Grey USD balance without correspondent bank deductions. The recipient then controls when to convert or hold the USD. Multi-currency fintech accounts route payments through their own infrastructure rather than the SWIFT correspondent chain.

Grey’s deposit fee via ACH is 0.8%, capped at $10. On a $500 transfer, the fee is $4. On a $5,000 transfer, the fee is $10. Currency conversion is charged at 1% capped at $6 when the recipient converts to naira.

Stablecoin route

Some senders use USDC to move dollar value to Nigeria. The sender buys USDC on a US-licensed exchange, transfers to the recipient’s wallet address, and the recipient converts to USD or naira via a licensed Nigerian platform. This route avoids SWIFT entirely and can be faster, but requires both parties to be comfortable with crypto infrastructure and introduces volatility risk if either party converts at an unfavourable moment.

When SWIFT is still the right choice

If the recipient holds a domiciliary account and wants to receive funds in dollars without naira conversion, a bank wire is one of the most practical routes. SWIFT confirmations from US banks carry institutional credibility that other receipts may not in certain legal contexts. Nigerian property lawyers, courts, and some financial institutions require a bank-generated wire confirmation to authenticate a large transfer.

For transfers above $5,000 where the fixed fees are a small percentage, for institutional or legal documentation requirements, and for recipients who specifically need a SWIFT credit advice from a Nigerian bank, the traditional wire remains appropriate.

Sending USD to Nigeria with Grey

Grey provides a USD account with real US banking details, including a routing number and an account number issued by Grey's partner bank. Senders in the US use these details to pay as if they were paying any domestic US account. The payment goes out as a standard ACH transfer, bypasses the SWIFT correspondent chain entirely, and arrives in the recipient’s Grey USD balance within one to two business days.

For the recipient, the USD sits in their Grey account and can be held, converted to naira at a rate shown before confirmation, or used directly for USD-denominated expenses via the Grey virtual card.

The practical comparison on a $500 transfer: SWIFT costs $80 to $105 in stacked fees, leaving the recipient with $395 to $420. Grey costs $4 on the deposit, leaving the recipient with $496. On a monthly transfer of $500, that’s a difference of approximately $900 per year.

For senders who regularly send money to Nigeria with Grey, providing the Grey USD account details to the sender once removes all SWIFT complexity.

For those evaluating their full range of options, see our guide on sending money from the US for a broader comparison of methods and costs on the US-to-Nigeria corridor.

Send USD to Nigeria with Grey

Frequently asked questions on how to send USD from the USA to a Nigerian domiciliary account

Can I send USD to a Nigerian domiciliary account from the US?

Yes. A USD SWIFT wire from any US bank to a Nigerian domiciliary account is the standard method for sending dollars that land in Nigeria and remain there as dollars. You need the recipient’s domiciliary account number (not their naira account number), their bank’s SWIFT code, and the bank’s branch address. Alternatively, if the recipient holds a Grey USD account, you can send via ACH as a domestic US transfer, which avoids the SWIFT fee chain entirely.

How much does a SWIFT wire to a Nigerian domiciliary account cost?

Sending USD to a Nigerian domiciliary account via SWIFT can cost up to $60 to $100 in stacked fees across the three layers: the US bank’s outgoing wire fee ($35 to $50), correspondent bank deductions in transit ($10 to $30 per bank), and the Nigerian receiving bank’s incoming wire fee. These fees apply regardless of the transfer amount, which is why SWIFT wires only make financial sense on larger transfers where the fixed cost is a small percentage of the total.

How long does a SWIFT wire to Nigeria take?

SWIFT transfers to Nigeria typically take one to three business days after the US bank initiates the transfer. Large transfers may be held for CBN compliance review, which can extend the timeline. Transfers initiated late in the US banking day or on Fridays may not begin processing until the following business day. Grey ACH transfers to a US account number typically arrive in one to two business days.

Is there a cheaper way to get USD into Nigeria without using SWIFT?

Yes. A USD account through a multi-currency platform like Grey receives ACH transfers from US senders at a fraction of the cost of SWIFT transfers. Grey’s deposit fee is 0.8%, capped at $10, compared to $60-$100 in SWIFT fees for the same transfer. The tradeoff is that the USD lands in a Grey account rather than a Nigerian bank domiciliary account. For recipients who need SWIFT credit advice from a Nigerian bank for legal or institutional purposes, traditional wire transfers remain necessary. For everyday dollar receipts, the ACH route through Grey is significantly cheaper.

Grey charges fees on deposits, conversions, and withdrawals. Deposits via ACH incur a 0.8% fee (minimum $2, maximum $10). Currency conversions are charged at 1%, capped at $6. Withdrawal fees vary by currency: ₦35 for NGN. Exchange rates are variable and include a margin over the mid-market rate. Always review fees and the rate before confirming a transaction.

How to convert and send USD to Ugandan Shillings (UGX) online

•

•

2 min read

Managing cross-border payments doesn’t have to be complicated. Whether you’re a freelancer, remote worker, or supporting family in Uganda, converting USD to Ugandan Shilling (UGX) can be quick, secure, and hassle-free with Grey.

This guide shows you how to easily convert and send USD to UGX online, highlighting key benefits, costs, and tips for seamless transactions.

Why use Grey to convert and send USD to UGX?

Grey is a digital banking platform designed for global citizens who want to manage multiple currencies easily. Here’s why Grey is an excellent choice for converting and sending USD to UGX:

  • Competitive exchange rates: Grey offers real-time rates to ensure you get the most value when converting USD to UGX.
  • Low fees: Avoid the high conversion and transfer fees associated with traditional banks.
  • Quick transfers: Funds are processed quickly, ensuring your recipients get the money without delays.
  • User-friendly platform: Grey’s app and website are designed to make international transactions simple and accessible for everyone.

Exchange rates fluctuate for various reasons, so we’ve designed a handy, real time currency converter for you.

Also read: How to convert and send USD with Grey

How to convert and send USD to UGX with Grey

1. Create your Grey account

First, sign up for a free Grey account via the website or app, available on iOS and Android. Registration is straightforward and requires you to:

  • Provide basic personal information.
  • Verify your identity by uploading the required documents.
  • Set up your virtual wallet for multiple currencies, including USD.

2. Add USD to your Grey account

Once your account is active, deposit USD into your Grey wallet. You can do this in several ways:

  • Bank transfer: Link your USD bank account and transfer funds directly.
  • Freelance platforms: Receive payments from platforms like Upwork or Fiverr directly into your Grey USD wallet.
  • Wire transfers: Accept payments from international clients or businesses.

With USD in your account, you can convert it into UGX.

3. Convert USD to Ugandan Shilling with Grey

Follow these steps to convert your USD to UGX:

  1. Log into your account: Open the Grey app or website and sign in.
  2. Navigate to currency exchange: Select the “Convert” option from the dashboard.
  3. Choose currencies: Select USD as the source currency and UGX as the destination currency.
  4. Enter the amount: Specify the amount of USD you want to convert.
  5. Confirm the transaction: Review the exchange rate, fees, and total amount in UGX, then click “Convert.” The converted funds will appear in your UGX wallet instantly.

4. Send UGX to your recipient

Once your USD is converted to UGX, it’s time to transfer the funds to your recipient in Uganda. Here’s how:

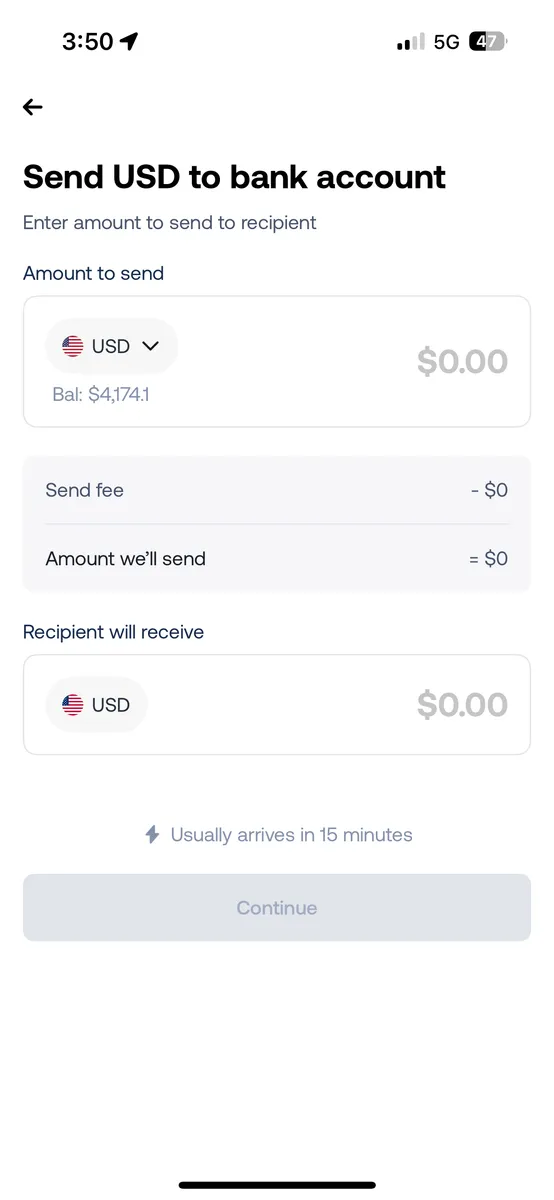
1. Navigate to the Send Money section: Choose the “Send” option in the Grey app.

676ec441190ed0b08ba00d26 676ebd9e62b40f1197672db7 send us dollars grey 6

2. Enter the recipient’s details: Add the recipient’s bank account or wallet information. You can also send funds to another Grey user.

676ec442190ed0b08ba00d42 676ebd4d245072006253a99c send us dollars grey 4

3. Choose the amount to send: Enter the amount in USD or your currency (e.g., EUR).

676ec442190ed0b08ba00d3f 676ec3b94c9821344d4d5d63 IMG 0368

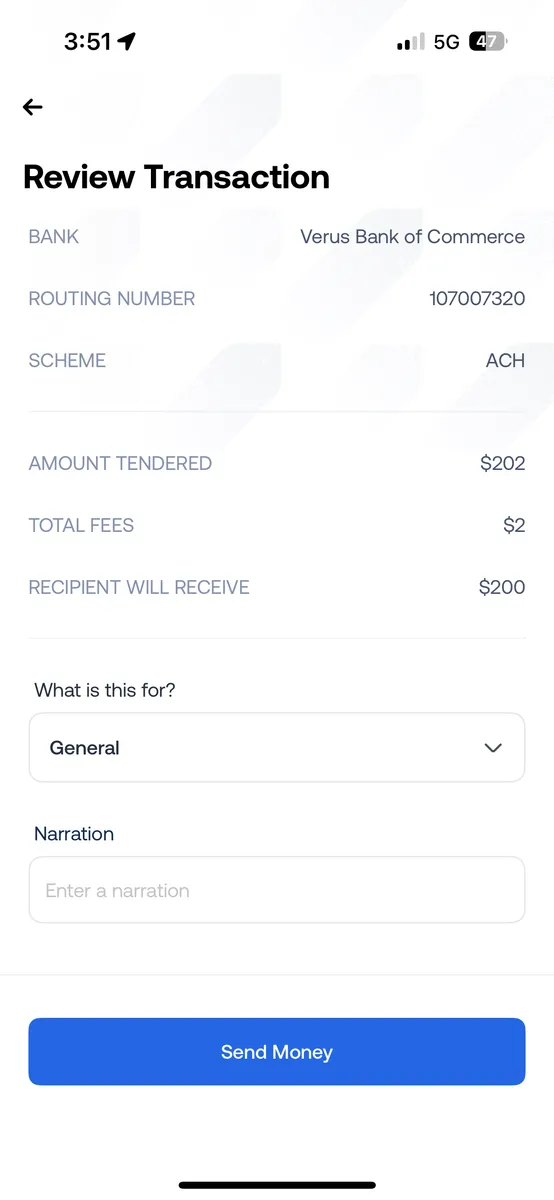
4. Review fees and exchange rates: Grey will estimate the fees and exchange rates so you know exactly how much the recipient will receive.

676ec442190ed0b08ba00d79 676ec3c426d44aa2a43d7fc8 IMG 0370

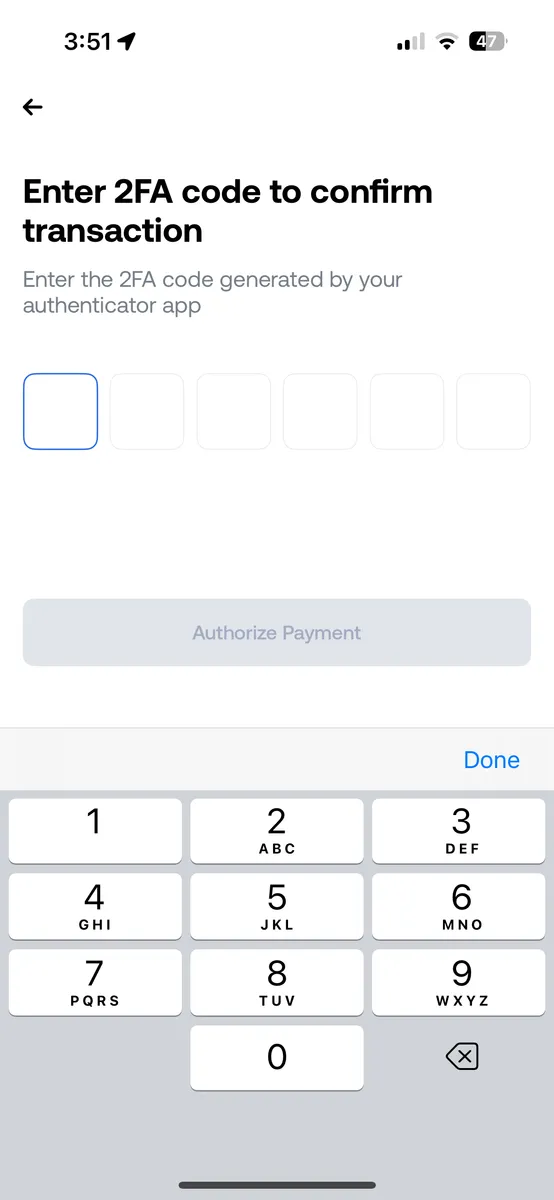
5. Complete the transaction: Confirm the details and authorise the payment. The recipient typically receives the funds in minutes to a few hours, depending on the payment method.

676ec442190ed0b08ba00d45 676ec3d1138ab1eb14571c89 IMG 0371

‍

‍You may also like: How to convert and send USD to TZS online

Key tips for converting and sending USD to UGX

  1. Monitor exchange rates: Keep an eye on the exchange rate to convert your funds at the best possible time.
  2. Double-check recipient details: Ensure the accuracy of bank account or mobile wallet information to avoid delays.
  3. Use Grey’s multi-currency wallets: Store USD and UGX in your Grey account to avoid frequent conversions and save on fees.
  4. Track your transactions: Grey offers a transaction history feature to easily track conversions and transfers.

Why Grey is the best option for USD to UGX transfers

Grey stands out as a reliable and cost-effective platform for handling international payments. Here’s why it’s a top choice:

  • Speed: Transfers are processed faster than most traditional banks, so your recipients get their money quickly.
  • Savings: With low fees and competitive exchange rates, you keep more of your hard-earned money.
  • Flexibility: Manage multiple currencies from one account and send funds anytime, anywhere.
  • Security: Grey prioritises secure transactions, giving you peace of mind.

Take control of your cross-border payments with Grey

Converting and sending USD to Ugandan Shilling has never been easier. Whether supporting family, paying vendors, or managing personal finances, Grey’s seamless platform saves you time, money, and effort.

Ready to simplify your financial transactions? Sign up with Grey today and enjoy a hassle-free way to convert and send USD to UGX online.

‍

How South African freelancers can receive payments from the US, UK & EU clients

•

•

2 min read

South Africa is home to a growing community of freelancers, remote workers, and digital entrepreneurs offering services to clients across the US, UK, and Europe.

However, while working with international clients can be highly rewarding, receiving payments remains a major challenge. High transfer fees, poor exchange rates, and long processing times often reduce earnings and cause unnecessary delays.

With a Grey account, freelancers in South Africa can receive payments in USD, GBP, and EUR, convert at competitive rates, and withdraw directly to their South African bank accounts.

Also read: How freelancers in Morocco can receive payments from US, UK & EU clients

How to open a USD, GBP or EUR account with Grey

1. Sign up for Grey

Creating an account with Grey is simple, requiring only a few personal details. Here’s what you need to do.

How South African freelancers can receive payments from the US, UK & EU clients
  • Choose your country: Select your current country of residence. This helps Grey tailor the setup to your location. In this case, it’s South Africa.
How South African freelancers can receive payments from the US, UK & EU clients
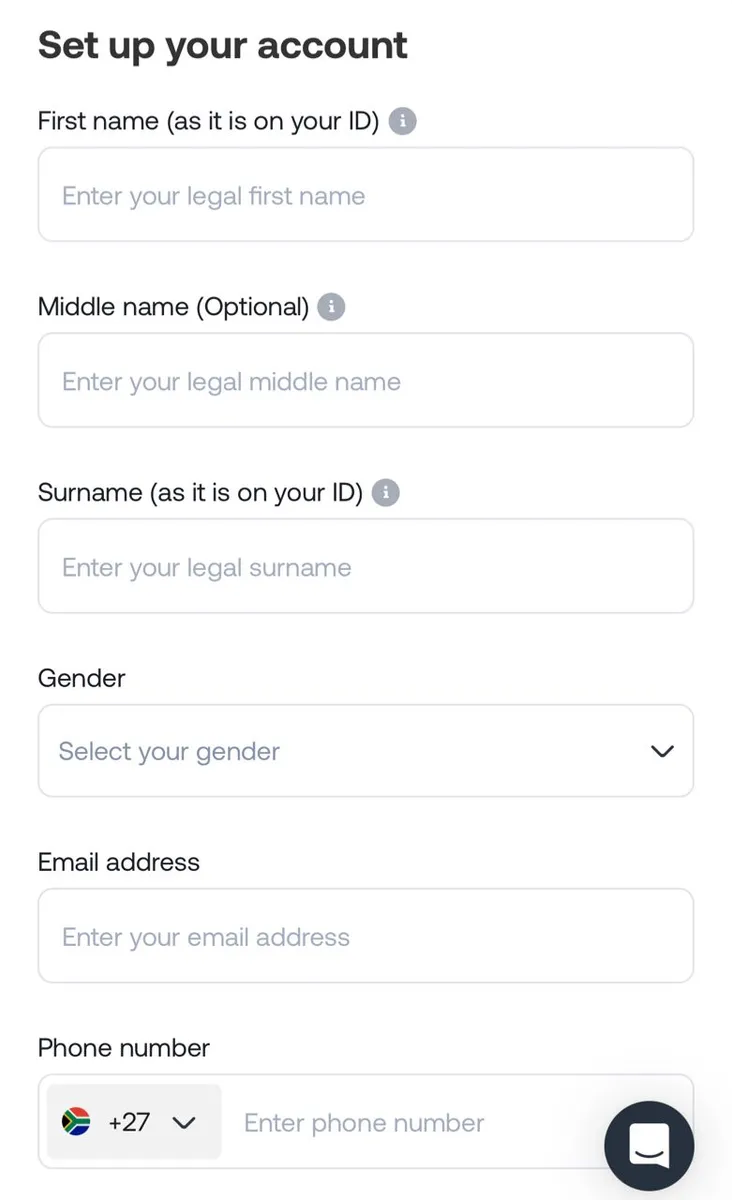
  • Enter your details: You’ll be prompted to provide your full name, email address, and phone number, then create a secure password.
How South African freelancers can receive payments from the US, UK & EU clients
  • Verify your email: Grey will send a one-time password (OTP) to your email address. Simply enter the code on the site to complete this step.
How South African freelancers can receive payments from the US, UK & EU clients
  • Once you’re set up, you’re ready for identity verification.

2. Verify your identity for secure access

Here’s what you’ll need to provide:

  • Government-issued ID: A valid passport or national ID card is required. Make sure it’s clear and up-to-date.
  • Proof of address: A recent utility bill or bank statement will verify your location. Grey uses this document to confirm your residency.
  • Submit your documents for review: Once uploaded, Grey will review your documents, a process that typically takes a few business days. Clear and accurate documentation speeds up approval.

3. Access your global bank accounts

Once your identity is verified, log in to your Grey account.

  • Navigate to the “Accounts” section and select “Create Account.”
  • Choose the currency (USD, GBP or EUR).
  • Your global bank account details, including your account number and routing number, will be generated instantly.

Also read: How to receive payments from Guru in South Africa in 2025

How to receive payments from US, UK & EU clients

Once you’ve created your Grey account, receiving payments is easy. Here’s how:

  • Log in to your Grey account via the app or website to securely access your currency balances.
  • Navigate to "Home" and select your preferred currency account (e.g., USD, EUR, GBP).
  • Share your account details (IBAN, sort code, or account number) with international clients, employers, or payment platforms like PayPal and Upwork.
  • The funds will be deposited into the Grey account.

Also read: How to receive Amazon payments in South Africa

Why Grey is the best online global bank for South African freelancers

Here are major reasons Grey stands out as the best online bank for freelancers in South Africa:

  • No hidden fees – Transparent pricing so you keep more of your earnings.
  • Hold multiple currencies – Manage your finances in USD, GBP, or EUR without forced conversions.
  • Fast international transfers – Receive and send money globally without delays.
  • Global access – Manage your money anytime, anywhere with Grey.
  • Direct withdrawals – Transfer funds seamlessly to your South African bank account.

Simplify banking across borders with Grey

Receiving international payments in South Africa doesn’t have to be complicated. With Grey, you can open a foreign bank account and accept payments seamlessly.

Create your Grey account today or download the app to enjoy inclusive global banking, designed for you to carry your dreams across borders.

‍

Arrow (up)

Back to top